
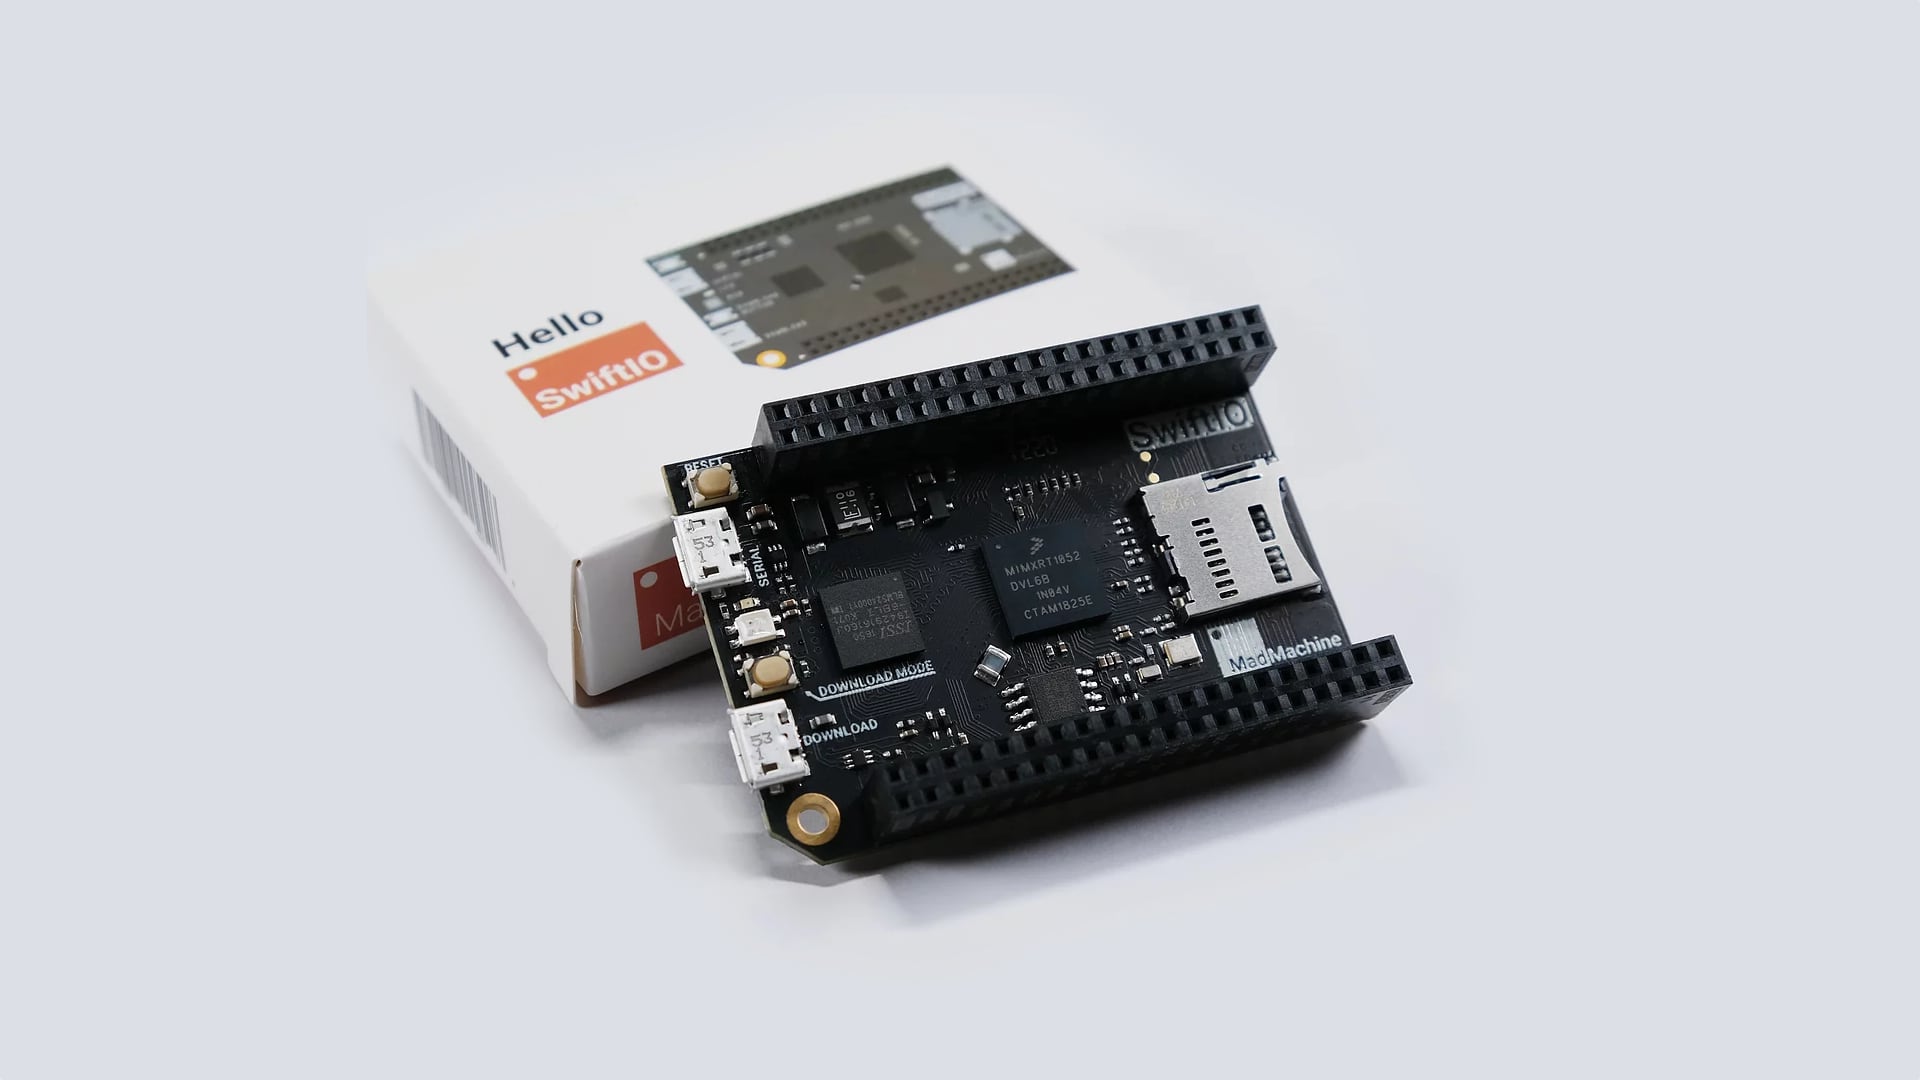
The SwiftIO board
MadMachine‘s SwiftIO board is an Arduino-like system, however it will probably run Swift code natively on the {hardware}. Swift is a superb programming language for training functions, it’s a fashionable language with a JavaScript-like syntax that’s straightforward to study and perceive. Swift is protected and environment friendly, this mixture makes it an ideal candidate for embedded techniques. The SwiftIO board allows us common Swift / iOS builders to construct IoT initiatives utilizing our favourite programming language.
The board itself has a small footprint, it is nearly 1,57″ x 2,36″ (4cm x 6cm) huge.
It is fairly a strong microcontroller. It’s undoubtedly probably the most reasonably priced Swift language studying machine. It may be best for STEM training functions for college students who wish to see find out how to construct digital circuits and get some fundamental Swift programming expertise on the identical time.
The Maker Equipment field accommodates each a 7 section and an LCD show, a servo and a DC motor with drivers, a humiture (temperature & humidity) sensor, a buzzer module a potentiometer and a lightweight sensor and lots of extra different issues (breadboard, resistors, LEDs, buttons and cables, and so on.) that you should utilize to construct the starter initiatives. You should have just about the whole lot within the field that you just want as a newcomer to get began and have some enjoyable time utilizing SwiftIO. 📦
Sadly you will not discover a working GPS, WiFi or Bluetooth module for the SwiftIO board but, however hopefully these sort of equipment are only a few months away. There’s a new defend and a model new display module within the works. Oh by the way in which a defend is one thing that you may plug into your board and join exterior equipment utilizing “particular” colourful cables. 🌈
Shields are boards that may be plugged on prime of the Arduino PCB extending its capabilities. The totally different shields comply with the identical philosophy as the unique toolkit: they’re straightforward to mount, and low cost to supply. – ArduinoShields
The board initially went on sale in July, 2020 and many individuals introduced it from all around the globe. New plug-ins, extensions and modules are nonetheless being developed by the makers, however it is very important emphasize that the SwiftIO board {hardware} is in a secure state. 💪
Technical specs:
- i.MX RT1052 Crossover Processor with Arm® Cortex®-M7 core @600MHz
- Micro SD card slot, supporting normal and excessive capability SD playing cards
- Micro USB connector for energy
- On-board USB to UART for serial communication
- 46 GPIO on left and proper edges
- On-board GRB LED
- 12x 12-bit analog to digital (ADC) converters
- 4 UART, 2 CAN, 2 IIC, and a couple of SPI
- 14 PWM pins
- Many further superior options to fulfill the wants of superior customers
Ports, communication, structure
You possibly can join the SwiftIO board to your pc through a USB connector, the 2 gadgets can talk by means of a serial port. The USB cable will present the mandatory energy help, however alternatively you should utilize an adapter or an exterior battery by means of a defend.
You possibly can wire up further elements utilizing the Normal Goal Enter/Output pins (GPIO). You possibly can see the precise specification on the image above, however actually I barely perceive this diagram.
Confession time: I do not know shit about electronics (but). 💩
The board can be utilized with a defend and luckily the MakersKit arrives with a helpful instruction guide for absolute rookies. I felt fortunate, as a result of I used to be capable of strategy this little gadget with my programmer mindset and I may focus extra on Swift as an alternative of constructing working circuits.
So what’s really beneath the hood? How can I construct & run purposes for SwiftIO?
The grey space is the {hardware} itself, on prime of that within the pink-ish/purple containers there may be this Zephyr layer which I’ve by no means heard earlier than. I am simply scratching the floor right here, however that is advantageous, since as a Swift developer we solely care concerning the orange stuff. Lengthy story brief, there’s a customized constructed Swift toolchain for this machine that permits us to construct and run Swift purposes on the board. 😅
If there’s a toolchain, then we will run Swift binaries, however how can we talk with the ports and stuff like that? Happily the SwiftIO framework is right here for us. It gives an easy accessibility to speak with exterior {hardware} equipment. You possibly can learn or write digital and analog alerts utilizing the communication protocol. Are you prepared for some Swift code?
The SwiftIO setting
Though the {hardware} is secure, the software program is just not completed but. There are two choices out there, however in case you are on a Home windows machine, you need to seize the official MadMachine IDE and use that. The reason being that the Swift Bundle Supervisor is just not prepared for that platform but, so you will not be capable of work with the instruments that I will present you subsequent. Sorry Home windows, no offense. 😅
So possibility A, is to go together with the IDE, it is very easy to make use of and gives an amazing DX. Choice B, study a bit extra concerning the underlying toolkit and comply with my information, it is a bit extra sophisticated, however you may know extra concerning the technical infrastructure when you select this path. 🤔
Putting in the MadMachine SDK & CLI
As a macOS or Linux person you need to know that you may set up the unofficial MadMachine SDK alongside a command line instrument known as mm. As you’ll be able to see this MadMachine SDK is written in Swift, however you need to know that I ported a python script from the unique mm-sdk undertaking with the assistance of Marcus Kida. First, he made an Xcode template by invoking the unique script contained in the official MadMachine IDE, then I believed, it could be cool to eliminate the IDE for good, and now, right here we go, now we have a standalone Swift model of the mandatory construct instruments. You possibly can set up it like this:
git clone https://github.com/EmbeddedSwift/MadMachine.git
cd MadMachine
make set up
Now you have to be prepared to make use of the mm cli app, you’ll be able to test the out there instructions contained in the README file on GitHub. I’ve not examined this on Linux but, so when you discover any points, please do not hesitate to report or submit a PR. That is an experimental undertaking, so maintain this in thoughts. 😅
The MadMachine toolchain
So as to use the MadMachine SDK you will want a working toolchain put in in your pc. You possibly can seize the most recent one by working the next command:
mm toolchain --upgrade
It will seize the most recent launch from the unofficial MadMachine toolchain repository, and place it beneath your house folder contained in the .MadMachine listing. There may be one further factor that now you need to do earlier than you could possibly begin constructing SwiftIO apps. Presently there may be one further python script that was not ported but, as a result of it is going to be fully eradicated sooner or later. For now you continue to should obtain the official MadMachine SDK from the GitHub releases web page and place the whole contents of the mm-sdk/tools_[platform]/scripts/dist/gen_isr_tables folder into the ~/.MadMachine/legacy listing. You may need to create a legacy folder. 🙈
The SwiftIO framework
The SwiftIO framework goes to be linked with the applying binary, now we have to put in it (with the assistance of the mm-cli instrument) as a system library first. There’s an unofficial repo with a makefile for this:
git clone https://github.com/EmbeddedSwift/SwiftIO
cd SwiftIO
make set up
You will discover the library reference for the SwiftIO framework, however we’ll see you can also make it work, in only a few moments. Earlier than we go additional you need to be aware that the customized MadMachine toolchain is a modified model of the Swift 5.1 toolchain. This implies that you may’t use Swift 5.3 on the board but, however hopefully the creators of SwiftIO will launch new software program elements actual quickly. 🤞
Utilizing Xcode
The SwiftIO framework could be compiled in your native machine with the native Swift toolchain (utilizing Xcode), so it’s doable to construct purposes with out concentrating on the board, and afterward you’ll be able to re-compile the supply information with the mm-cli command, signal the ultimate binary and deploy it to the SwiftIO board after you’ve got pressed the obtain button. That is the present workflow in a nutshell.
There may be an current Xcode template created by @kidmar that you should utilize as a place to begin.
Utilizing SPM
These days I favor to create a Swift bundle for nearly the whole lot. You should utilize SPM with a Makefile and your favourite editor to create SwiftIO apps. You simply should initialize a brand new executable bundle with the mandatory dependencies, for instance:
import PackageDescription

let bundle = Bundle(
    title: "myProject",
    merchandise: [
        .executable(name: "myProject", targets: ["myProject"]),
    ],
    dependencies: [
        .package(url: "https://github.com/EmbeddedSwift/SwiftIO", .branch("main")),
        .package(url: "https://github.com/EmbeddedSwift/SHT3x", .branch("main")),
        .package(url: "https://github.com/EmbeddedSwift/LCD1602", .branch("main")),
    ],
    targets: [
        .target(name: "myProject", dependencies: [
            .product(name: "SwiftIO", package: "SwiftIO"),
            .product(name: "SHT3x", package: "SHT3x"),
            .product(name: "LCD1602", package: "LCD1602"),
        ]),
    ]
)
Contained in the important.swift file now you’ll be able to write a easy Humiture sensor app that shows the present humidity & temperature on a 16×2 LCD show like this:
import SwiftIO
import SHT3x
import LCD1602


extension Float {
    func format(_ f: Int) -> Float {
        guard f > 0 else {return self}
        var mul = 10
        for _ in 1..<f {
            mul *= 10
        }
        let knowledge = Int(self * Float(mul))
        return Float(knowledge) / Float(mul)
    }
}


let i2c = I2C(Id.I2C0)
let liquid crystal display = LCD1602(i2c)
let sht = SHT3x(i2c)

whereas true{

    let temp = sht.readTemperature()
    liquid crystal display.write(x: 0, y: 0, "Temperature:")
    liquid crystal display.write(x: 0, y: 1, String(temp.format(1)))
    liquid crystal display.write(x: 4, y: 1, " ")
    liquid crystal display.write(x: 5, y: 1, "C")
    sleep(ms: 1000)
}
Now when you open the Bundle.swift file utilizing Xcode you’ll be able to even construct the undertaking regionally utilizing the CMD+B shortcut, however do not attempt to run it, since your Mac is just not a SwiftIO board… 😅
If you wish to construct and run this undertaking you need to goal the SwiftIO board. The mm-cli cannot resolve bundle dependencies (but) so you need to set up the mandatory dependencies (SHT3x, LCD1602) the identical approach as we did with the SwiftIO library. You must clone each repositories and use the makefile to put in them as native MadMachine system libraries. It will transfer the required information beneath the ~/.MadMachine/libraries folder, all of the out there libraries “reside” there. 🔨
After you’ve got put in the libraries, you should utilize the next Makefile for the precise binary builds:
construct:
    mm construct --name myProject --binary-type executable --input . --output ./myProject

run: construct
    mm board --run ./myProject/swiftio.bin

clear:
    rm -r ./myProject
The mm construct command invokes the swiftc compiler from the SwiftIO toolchain with the precise search paths and library search paths. The mm board --run [binary] command will merely copy the mandatory information to the MadMachine board whether it is in obtain mode. You must press the obtain button on the board earlier than you run this command. Urgent the obtain button will mount the SD card so we will deploy the signed binary to the machine, then eject the storage, which is able to restart the board and the brand new utility will probably be loaded & executed instantly. 🚀
The MadMachine IDE
In the event you do not wish to play with command line utilities, you’ll be able to at all times use the MadMachine IDE to construct and ship your initiatives. It makes use of a mmp file to explain dependencies, so it will probably resolve them on the fly, however I do not like the truth that I’ve to make use of a brand new bundle supervisor and editor to work with Swift. I am in a love and hate relationship with Xcode (plus I am an old-school Elegant Textual content fan). ❤️
Anyway, yow will discover actually nice examples with a devoted GitHub repository and lots of video tutorials on the official YouTube channel. You possibly can entry all of the MakerKit pattern codes, they’re each on GitHub and you may clone a template with a click on utilizing the MadMachine IDE.
Conclusion
For me, the SwiftIO board was a pleasing shock. I at all times needed to play with embedded techniques, know somewhat extra about {hardware} and low stage stuff, however the Raspberry PI and the Arduino felt like alien planet. As soon as I’ve tried to construct an app for a Raspberry PI at a hackaton, nevertheless it was a whole catastrophe, I used to be dissatisfied, as a result of the instruments and the developer expertise was actually dangerous.
The promise of MadMachine is that you may simply use Swift on such a tool and I imagine that Andy Liu created one thing that may have a brilliant future on the long run. I felt in love with SwiftIO proper after I’ve assembled my first circuit and deployed my very first Swift supply. It was a seamless (ache free) expertise and I imagine that is a very essential issue for builders who by no means used such gadgets earlier than. This may be the start and the way forward for Swift on embedded techniques. 😍
You possibly can construct some actually enjoyable stuff with SwiftIO, it is an ideal instrument for studying how electrical circuits work. I am unable to wait to see increasingly sensors and libraries out there for MadMachine. When you have an thought or a query be happy to affix the official Discord server.