

Generally, researchers and builders have to simulate varied forms of networks with software program that might in any other case be arduous to do with actual gadgets. For instance, some {hardware} could be arduous to get, costly to arrange, or past the abilities of the group to implement. When the underlying {hardware} shouldn’t be a priority however the important features that it does is, software program generally is a viable various.
NS-3 is a mature, open-source networking simulation library with contributions from the Lawrence Livermore Nationwide Laboratory , Google Summer season of Code, and others. It has a excessive diploma of functionality to simulate varied sorts of networks and user-end gadgets, and its Python-to-C++ bindings make it accessible for a lot of builders.
In some instances, nevertheless, it is not adequate to simulate a community. A simulator may want to check how information behaves in a simulated community (i.e., testing the integrity of Consumer Datagram Protocol (UDP) visitors in a wifi community, how 5G information propagates throughout cell towers and person gadgets, and so forth. NS-3 permits such sorts of simulations by piping information from faucet interfaces (a function of digital community gadgets supplied by the Linux kernel that move ethernet frames to and from person house) into the operating simulation.
This weblog publish presents a tutorial on how one can transmit stay information by means of an NS-3-simulated community with the added benefit of getting the data-producing/data-receiving nodes be Docker containers. Lastly, we use Docker Compose to automate advanced setups and make repeatable simulations in seconds. Observe: All of the code for this undertaking could be discovered within the Github repository linked on the finish of this publish.
Introduction to NS-3 Networking
NS-3 has quite a few APIs (software programming interfaces) to make its simulations work together with the true world. Certainly one of these APIS is the TapBridge class, which is basically a community bridge that permits for community packets coming in from a course of to change into out there to the NS-3 simulation surroundings. It does this by sending visitors to a Linux Faucet gadget despatched over to the NS-3 simulation. Within the C++ code beneath, we are able to see how simple it’s to make use of to make use of the TapBridge API:
// Create an ns-3 node
NodeContainer node;
node.Create(1);
// Create a channel that the node connects to
CsmaHelper csma;
NetDeviceContainer gadgets = csma.Set up(node);
//Create an occasion of a TapBridge
TapBridgeHelper tapBridge;
// Allow UseBridge mode, which has the person outline the faucet gadget it's going to
//connect with. There are extra modes out there which we received’t focus on right here.
tapBridge.SetAttribute("Mode", StringValue(“UseBridge"));
// we're defining our faucet gadget which I known as mytap
tapBridge.SetAttribute("DeviceName", StringValue("mytap"));
tapBridge.Set up(node.Get(0));
}
The code above assumes that the person created a named Faucet Machine (“mytap”) and that the TapBridge occasion can connect with it.
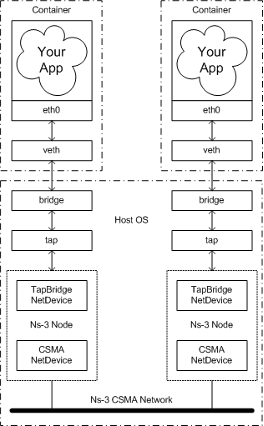
Since simulations generally function a number of customers, we are able to envision every person as its personal, remoted node that produces and transmits information into the simulation. This situation subsequently suits properly throughout the mannequin of operating a number of containers throughout the identical host. A container is just an remoted course of with its dependencies separated from its surrounding surroundings, utilizing particular Linux Kernel software programming interfaces (APIs) to perform this. The next diagram sketches out the setup I’d prefer to create for the primary iteration of this tutorial:
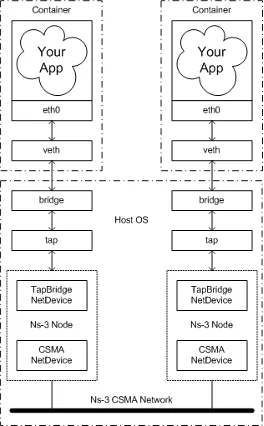
Determine 1. Structure of an NS-3 simulation with two containers passing actual information by means of it.
Two containers are every operating some type of data-producing software. That information is broadcasted by means of certainly one of its community interfaces into the host operating the NS-3 simulation utilizing a bridge. This bridge glues collectively the container community with the faucet gadget interfaces on the host by utilizing veth (digital ethernet) pairs. This configuration allows sending information to the listening node within the NS-3 simulation. This setup frees us from having to face up a number of VMs or purposes that share dependencies and allows portability and maintainability when operating NS-3 simulations throughout totally different machines.
The primary iteration of this tutorial makes use of Linux Containers (LXC) to implement what was proven within the determine above, and intently follows what the NS-3 wiki already exhibits, so I will not dwell an excessive amount of on it.
LXC doesn’t carry a lot overhead, making it comparatively simple to know, however LXC lacks loads of the performance you will discover within the aforementioned container engines. Let’s rapidly create the setup proven within the diagram above. To begin, guarantee NS-3 and LXC are put in in your system and that NS-3 is constructed.
1. Create Faucet Gadgets
ip tuntap add tap-left mode faucet
ip tuntap add tap-right mode faucet
2. Convey up faucets in promiscuous mode (This mode tells the OS to hearken to all community packets being despatched, even when it has a special MAC vacation spot handle.):
ip hyperlink set tap-left promisc on
ip hyperlink set tap-right promisc on
3. Create community bridges that may join the container to the faucet gadget:
ip hyperlink add identify br-left kind bridge
ip hyperlink add identify br-right kind bridge
ip hyperlink set dev br-left up
ip hyperlink set dev br-right up
4. Create the 2 containers that may ping one another:
lxc-create -n left -t obtain -f lxc-left.conf -- -d ubuntu -r focal -a amd64lxc-create is the command to create containers however to not run them. We specify a reputation (-n) and a configuration file to make use of (-f) and use one of many pre-built template (-t) —much like a Docker picture. We specify the container to make use of the ubuntu (-d) focal launch (-r) in amd64 structure (-a). We do the identical command however for the “proper” container.
5. Begin the containers:
lxc-start left
lxc-start proper
6. Connect to the containers and an IP handle to every:
(in a brand new shell)
lxc-attach left
#left >ip addr add 10.0.0.1/24 dev
(in a brand new shell)
lxc-attach proper
#proper >ip addr add 10.0.0.2/24 dev
Verify that the IP addresses have been added utilizing
ip addr present7. Connect faucet gadget to the beforehand made bridges (be aware: the containers won’t be able to attach to one another till the simulation is began).
ip hyperlink set tap-left grasp br-left
ip hyperlink set tap-right grasp br-right
8. Begin the NS-3 simulator with one of many instance faucet gadget applications that include NS-3:
./ns3 run ns-3/src/tap-bridge/examples/tap-csma-virtual-machine.cc9. Connect to every container individually and ping the opposite container to substantiate packets are flowing:
#lxc-left >ping 10.0.0.2
#lxc-right >ping 10.0.0.1
Connecting NS-3 to Docker
This bare-bones setup works properly if you happen to do not thoughts working with Linux containers and guide labor. Nonetheless, most individuals do not use LXC immediately, however as a substitute use Docker or Podman. Builders usually assume that the setup for Docker can be comparable: create two Docker containers (left, proper) with two Docker community bridges (br-left, br-right) linked to one another like so:
docker run -it --name left --network br-left ubuntu bash
docker run -it --name proper --network br-right ubuntu bash
Then connect faucet gadgets to the community bridge’s id (The community bridge id could be retrieved by operating ip hyperlink present):
ip hyperlink set tap-1 grasp br-***
ip hyperlink set tap-2 grasp br-***
This setup sadly, doesn’t work. As an alternative, we should create a customized community namespace that acts on behalf of the container to connect with the host community interface. We will do that by connecting our customized community namespace to the container ethernet community interface by utilizing veth pairs, then connecting our namespace to a faucet gadget through a bridge.
- To begin, create customized bridges and faucet gadgets as earlier than. Then, enable the OS to ahead ethernet frames to the newly created bridges:
sudo iptables -I FORWARD -m physdev --physdev-is-bridged -i br-left -p tcp -j ACCEPT
sudo iptables -I FORWARD -m physdev --physdev-is-bridged -i br-left -p arp -j ACCEPT
sudo iptables -I FORWARD -m physdev --physdev-is-bridged -i br-right -p tcp -j ACCEPT
sudo iptables -I FORWARD -m physdev --physdev-is-bridged -i br-right -p arp -j ACCEPT
2. Create the Docker containers and seize their Course of ID (PID) for future use:
pid_left=$(docker examine --format '{{ .State.Pid }}' left)
pid_right=$(docker examine --format '{{ .State.Pid }}' proper)
3. Create a brand new community namespace that will likely be symbolically linked to the primary container (that is setting us as much as enable our adjustments to take impact on the container):
mkdir -p /var/run/netns
ln -s /proc/$pid_left/ns/internet /var/run/netns/$pid_left
4. Create the veth pair to attach containers to the customized bridge:
ip hyperlink add internal-left kind veth peer identify external-left
ip hyperlink set internal-left grasp br-left
ip hyperlink set internal-left up
5. Assign an IP handle and a MAC handle:
ip hyperlink set external-left netns $pid_left
ip netns exec $pid_left ip hyperlink set dev external-left identify eth0
ip netns exec $pid_left ip hyperlink set eth0 handle 12:34:88:5D:61:BD
ip netns exec $pid_left ip hyperlink set eth0 up
ip netns exec $pid_left ip addr add 10.0.0.1/16 dev eth0
6. Repeat the identical steps for the correct container, bridge, and interfaces.
7. Head over the containers and begin them with a TTY console like bash.
8. Lastly, begin the NS-3 simulation. Ping every container and watch these packets circulation.
This setup works at Layer 2 of the OSI Mannequin, so it permits TCP, UDP, and HTTP visitors to undergo. It’s brittle, nevertheless, since any time the container is stopped, the PID is thrown out, and the community namespace we made turns into ineffective. To scale back toil and make this course of repeatable, it’s higher to make use of a script. Higher but, if there have been a method to orchestrate a number of containers in order that we are able to create an arbitrary variety of them—with scripts that kick off these configurations and cease the operating containers—we might have an extremely helpful and transportable software to run any type of simulation utilizing NS-3. We will take this course of one step additional utilizing Docker Compose.
Utilizing Docker Compose to Automate our Simulations
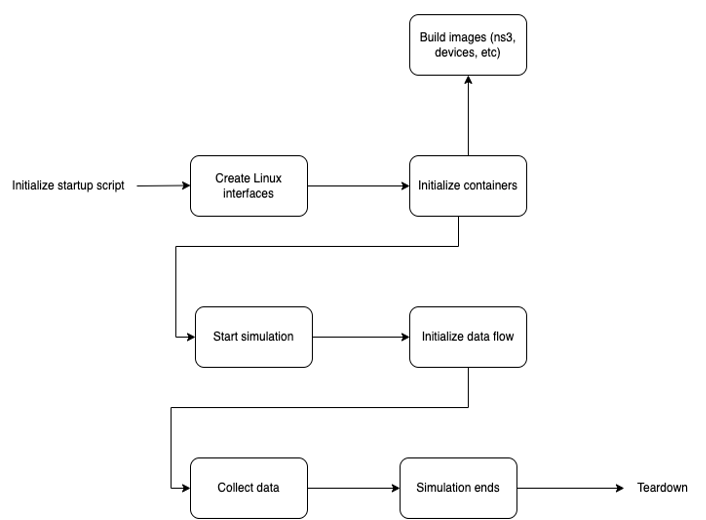
Let’s take a step again and evaluation our ranges of abstraction. We’ve got a simulation that’s operating a situation with n variety of containers, some sending and receiving messages and one which runs the simulation itself. One can think about having extra containers doing sure duties like information assortment and evaluation, and so forth. After the simulation ends, an output is produced, and all containers and interfaces are destroyed. The next schematic illustrates this strategy:
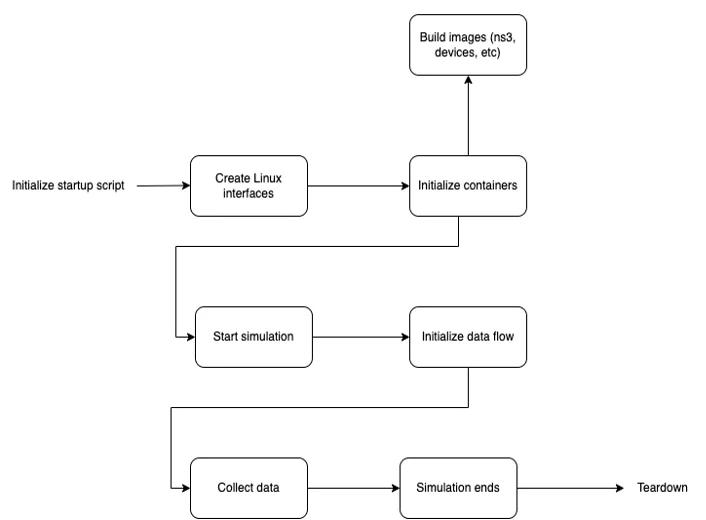
Determine 2. Ultimate Simulation Creation Stream
With this stage of abstraction, we are able to assume at a excessive stage about what the wants of our simulation are. What number of nodes do we wish? What sort of community can we need to simulate? How will the info assortment, logging, and processing happen? Defining the primary after which going into the granular stage later permits for simpler conceptualization of the issue we are attempting to unravel, and likewise takes us to a stage of considering that tries to get nearer to the issue.
To make this concrete, let’s look at the next Docker Compose file intimately. It defines the simulation to be run as two gadgets (“left” and “proper”) that talk over a point-to-point connection.
For every user-end gadget (on this case, “left” and “proper”) we outline the OS it makes use of, the community mode it operates on and an attribute to allow us to log into the shell as soon as they’re operating.
“ns_3” makes use of a customized picture that downloads, builds and runs NS-3 together with the 5G-Lena bundle for simulating 5G networks. The picture additionally copies a growth file for NS-3 from the host surroundings into the container on the acceptable location, permitting NS-3 to construct and hyperlink to it at runtime. To entry kernel-level networking options, the NS-3 container is granted particular permissions by means of “cap-add” to make use of TapDevice interfaces, and a community mode of “host” is used.
model: "3.8"
providers:
  left:
    picture: "ubuntu"
    container_name: left
    network_mode: "none"
    tty: true
    depends_on:
      - ns_3
  proper:
    tty: true
    picture: "ubuntu-net"
    container_name: proper
    network_mode: "none"
    depends_on:
      - ns_3
      - left
  ns_3:
    picture: "ns3-lena"
    container_name: ns-3
    network_mode: "host"
    volumes:
      - ${PWD}/src/tap-csma-scenario.cc:/usr/native/ns-allinone-3.37/ns-3.37/scratch/tap-csma-scenario.cc
    tty: true
    cap_add:
      - NET_ADMIN
    gadgets:
      - /dev/internet/tun:/dev/internet/tun
The precise creation of Linux interfaces, attaching of bridges, and so forth. is completed through a bash script, which executes this Docker Compose file within the course of and thereafter runs the applications contained in the nodes that move information from one to a different. As soon as operating, these containers can run any type of information producing/consuming purposes, whereas passing them by means of a simulated NS-3 community.
A New Method to Automating NS-3 Simulations
I hope that this tutorial provides you a brand new manner to take a look at automating NS-3 simulations, and the way customizing some current business instruments can yield new and extremely helpful applications.