

Replace observe: Luka Kordić up to date this tutorial for Android Studio Flamingo, Kotlin 1.8 and Android 13. Amanjeet Singh wrote the unique.
Asynchronous programming is essential for contemporary apps. Utilizing it will increase the quantity of labor your app can carry out in parallel. This, in flip, means that you can run heavy-duty duties within the background, away from the UI thread. By doing so, you keep away from UI freezes and supply a fluid expertise to your customers.
The Android ecosystem has a number of mechanisms builders can select from relating to asynchronous programming: IntentService, Handlers, Executors, RxJava and ListenableFutures, to call just a few. However it’s tough to choose essentially the most acceptable one to make use of. Some mechanisms have a steep studying curve. Others require a ton of boilerplate code to implement and aren’t that concise or intuitive to make use of. Asynchronous programming is advanced sufficient by itself, so builders naturally search for the only resolution to assist scale back the complexity. Meet Kotlin Coroutines!
Why Use Kotlin Coroutines?
Kotlin Coroutines are nice as a result of they’re simple to start out with. Their greatest benefit over the opposite options is that they can help you write your asynchronous code sequentially. This makes the code a lot simpler to grasp. Whereas simple to start out with, they’re fairly highly effective and supply the instruments to sort out virtually each downside associated to concurrency or threading that you simply may encounter whereas constructing fashionable Android apps.
All through this tutorial, you’ll develop a photograph enhancing app, Snowy. It means that you can obtain a picture after which apply a snow filter to it. To obtain the pictures and course of them, you’ll have to carry out asynchronous duties.
Alongside the best way, you’ll be taught:
- About completely different elements of the Coroutine API.
- Methods to create your personal Kotlin Coroutines.
- Methods to execute a number of duties in parallel.
- Exception dealing with with Kotlin Coroutines.
Getting Began
To begin, obtain the supplies for this tutorial by clicking Obtain supplies on the high or backside of the tutorial. Then, open the starter challenge in Android Studio Electrical Eel or later, and look by way of its content material.

You’ll see:
-
mannequin bundle with
Tutorialmannequin, which has 4 properties: the tutorial’stitle, thedescriptionand two URLs for photographs. -
utils bundle with
SnowFilter, which has a operate known asapplySnowEffect.applySnowEffecttakes aBitmapas an argument and returns a processedBitmapwith a snow filter. -
MainActivity, which hosts 4 tabs: Kotlin, Android, RxKotlin and Kitura. -
TutorialFragment, which exhibits particulars of various tutorials. -
TutorialPagerAdapter: AFragmentStateAdapterto arrange the tabs andViewPager.
Construct and run the starter challenge.

You’ll see 4 tabs with their names. Every tab accommodates a title, description and a placeholder picture. You’ll substitute the placeholder with a picture downloaded from the web quickly. Earlier than doing that, you might want to add Kotlin Coroutines to the challenge and be taught some fundamental ideas. You’ll try this within the subsequent part.
Including Kotlin Coroutines Assist
Earlier than you possibly can create Kotlin Coroutines, you need to add the dependencies to your Android challenge. Navigate to the app module’s construct.gradle file, and add the next two traces contained in the dependencies block:
implementation 'org.jetbrains.kotlinx:kotlinx-coroutines-core:1.6.4'
implementation 'org.jetbrains.kotlinx:kotlinx-coroutines-android:1.6.4'
Despite the fact that Kotlin has native help for coroutines, you might want to add these two dependencies when engaged on Android. It’s because the built-in language help supplies solely low-level primitives. The library accommodates all of the higher-level APIs that you simply’ll work with.
Introduction to Kotlin Coroutines
A coroutine is a mechanism just like a thread. Despite the fact that they’re just like threads, coroutines are less expensive to create. That’s why they’re also known as “light-weight threads”, and that’s why you possibly can simply create many coroutines with none reminiscence overhead. You may as well consider a coroutine as a computation or a chunk of labor that may be paused — suspended at a sure level after which resumed at a later time limit.
You’re in all probability conscious {that a} piece of code might be blocking or non-blocking. Kotlin Coroutines convey a brand new idea of suspension into the combo. Within the subsequent part, you’ll see how suspending habits differs from blocking habits.
Suspending vs. Blocking
Suspension and blocking could sound related, however they’re truly fairly completely different ideas. It’s all the time simpler to elucidate issues utilizing photographs, so try the one beneath:

A blocking name to a operate signifies that the thread the operate is working in received’t be capable of do the rest till the operate completes. Following up, which means that in case you make a blocking operate name on the principle thread, you successfully freeze the UI. Till that blocking name finishes, the person will see a static display screen and received’t be capable of work together with the app. If left on this state for 5 seconds or extra, the app will crash with the ANR (Software Not Responding) error.
However, suspending capabilities have a particular potential to pause their execution and resume it at a later time. To make a operate suspendable, you need to add the droop modifier earlier than the operate.
droop enjoyable myFirstSuspendingFunction() {...}
One vital factor to know is that suspending capabilities can solely be known as from inside a coroutine or from different suspending capabilities. That’s as a result of they droop the coroutine — not a thread — they’re working in. This means of suspending leaves the present thread free to do different work till the droop operate returns a consequence. See the picture beneath to get a greater understanding of the idea.
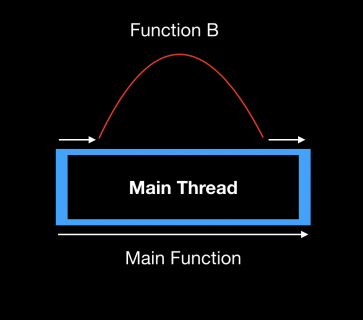
Within the instance above, Operate B does some work and suspends on the principle thread. Whereas it’s suspended, the principle thread isn’t blocked and is free to execute usually. Operate B merely resumes its execution as soon as it’s prepared to take action. Within the subsequent part, you’ll see tips on how to use the facility of droop capabilities and coroutines to obtain a picture.
Creating Your First Coroutine
Open TutorialFragment.kt, and navigate to downloadSingleImage. Exchange // TODO: Not carried out with the next code:
lifecycleScope.launch {
 val originalBitmap = getOriginalBitmap(tutorial)
 val snowFilterBitmap = loadSnowFilter(originalBitmap)
 loadImage(snowFilterBitmap)
}
On this technique, you mix two ideas from the Kotlin Coroutines API to launch a brand new coroutine and execute some code inside it. lifecycleScope is a coroutine scope and launch is a coroutine builder. You merely name launch on an occasion of CoroutineScope and cross a block of code that you simply wish to execute. That is all it takes to create a brand new coroutine and execute some code in it. Easy, proper? :]
A fantastic factor when utilizing Kotlin Coroutines is that the code you write is sequential and appears just about like common blocking code. When you name getOriginalBitmap, the coroutine will droop till the bitmap is prepared. In the meantime, the thread this code runs in is free to do different work. When the bitmap turns into out there, the coroutine will resume and can execute loadSnowFilter and loadImage after that.
Earlier than you proceed to the following part, the place you’ll be taught extra about coroutine builders, study getOriginalBitmap:
//1
personal droop enjoyable getOriginalBitmap(tutorial: Tutorial): Bitmap =
//2
withContext(Dispatchers.IO) {
  //3
  URL(tutorial.imageUrl).openStream().use {
    return@withContext BitmapFactory.decodeStream(it)
  }
}
This technique is invoked from contained in the coroutine you’ve simply created. Right here’s a breakdown of what it does:
- Discover that the strategy is marked with the
droopmodifier. Because of this the strategy has the power to droop the execution of a coroutine it’s presently working in. That is actually vital on this case as a result of the strategy is doing a heavy operation that would probably block the principle thread. -
withContext(Dispatchers.IO)makes certain that you simply swap the heavy work to a employee thread. You’ll find out aboutDispatchersandwithContextwithin the following sections. For now, simply keep in mind that that is used to dump the work to a different thread. - You open a connection to the desired URL, which returns an occasion of
InputStreamfor studying from that connection. This piece of code downloads the picture.
Construct and run the app to see what you’ve performed to this point:

You’ll see a Kotlin picture with the snow filter utilized within the first tab. If you happen to attempt to navigate to different tabs, you’ll solely see a placeholder picture. That’s OK for now — you’ll repair it later. Proper now, it’s time to be taught a bit extra about coroutine builders.
Coroutine Builders
You possibly can create new coroutines in a few alternative ways. The API has a number of constructs at your disposal, every supposed for a unique function. Since that is an introduction to Kotlin Coroutines, you’ll be taught solely concerning the important ones:
-
launch: Essentially the most typically used coroutine builder. It creates a brand new coroutine and returns a deal with to the newly created coroutine as a Job object. You’ll learn to use jobs for canceling a coroutine in a later part. You employ this builder once you don’t have to return a price from the coroutine. -
async: Used once you wish to return a price from a coroutine in a postponed approach. It launches a brand new coroutine and returns aDeferredobject, which accommodates the operation’s consequence. To get a price from theDeferredobject, you might want to nameawaiton it. You may as well use this builder to do issues in parallel. You’ll see this later within the tutorial once you obtain two photographs.
Discover that you simply invoke the launch builder on lifecycleScope. Each async and launch are outlined as extension capabilities on CoroutineScope. Verify the next part for extra particulars concerning the coroutine scope.
Coroutine Scope
A coroutine scope determines how lengthy a coroutine lives. It does that by offering a mother or father context to coroutines created inside it. That’s why each coroutine builder is outlined as an extension operate on the scope.
In Android apps, you might have two predefined scopes prepared for use: lifecycleScope and viewModelScope. In downloadSingleImage, you used lifecycleScope, which is tied to the lifecycle of the present lifecycle proprietor. Because of this all coroutines created in lifecycleScope can be canceled as soon as this fragment is destroyed. It is a nice idea since you don’t have to preserve monitor of the coroutines manually. All the things’s performed mechanically for you. As a common rule, it is best to use the predefined scopes to create your coroutines.
GlobalScope
Coroutines API additionally accommodates GlobalScope. This scope stays energetic so long as an app is alive. It’s thought-about a fragile API as a result of it may be simply misused and trigger reminiscence leaks. You possibly can examine the official docs for extra details about it. You received’t use it on this tutorial.
Downloading Photographs in Parallel With async
For the Kotlin tutorial, you solely downloaded one picture. Different tutorials within the app have two picture URLs. On this part, you’ll use the async coroutine builder to obtain each photographs in parallel.
Open TutorialFragment.kt, and navigate to downloadTwoImages. Exchange // TODO: Not carried out with this code:
// 1
lifecycleScope.launch {
  // 2
  val deferredOne = lifecycleScope.async {
    getOriginalBitmap(tutorial)
  }
  // 3
  val deferredTwo = lifecycleScope.async {
    val originalBitmap = getOriginalBitmap(tutorial)
    loadSnowFilter(originalBitmap)
  }
  // 4
  loadTwoImages(deferredOne.await(), deferredTwo.await())
}
Right here’s what the code does:
- Launches a brand new coroutine in
lifecyleScope. This is similar as within the earlier instance. - Creates a brand new coroutine in
lifecycleScope, returns an implementation ofDeferredand shops it indeferredOne‘s worth. This coroutine will obtain and present the unique picture. - Creates a brand new coroutine in
lifecycleScope, returns an implementation ofDeferredand shops it indeferredTwo‘s worth. This coroutine will obtain and present the unique picture with the snow filter utilized. - Calls
awaiton eachdeferredOneanddeferredTwo. This suspends the coroutine till each of the values are absolutely computed.
Once you create a brand new coroutine through the use of async, the system begins its execution instantly, however it additionally returns a future worth wrapped in a Deferred object.
To get the worth, you might want to name await on the deferred occasion. If the worth isn’t prepared but, the coroutine will droop. If it’s prepared, you’ll get it again instantly.
It is a very highly effective idea, and it will probably considerably pace up your code when you might want to carry out a number of long-running operations. However what when you’ve got just one piece of labor and you might want to return its consequence? You’ll discover that reply within the subsequent part.
Construct and run the app and navigate to the Android tab to see the 2 photographs:

Returning a Single Worth From a Coroutine
In fact, you should use the async builder to get a single worth, however that’s not its supposed function. As a substitute, it is best to use withContext. It’s a suspending operate that takes in a CoroutineContext and a block of code to execute as its parameters. An instance utilization can seem like this:
droop enjoyable getTestValue(): String = withContext(Dispatchers.Important) {
  "Take a look at"
}
As a result of withContext is a suspending operate, you might want to mark getTestValue with droop as effectively. The primary parameter to withContext is Dispatchers.Important, which suggests this code can be executed on the principle thread. The second parameter is a lambda operate that merely returns the "Take a look at" string.
withContext isn’t used solely to return a price. You may as well use it to change the execution context of a coroutine. That’s why it accepts CoroutineContext as a parameter.
Coroutine Context
CoroutineContext is a set of many parts, however you received’t undergo all of them. You’ll concentrate on only a few on this tutorial. One vital component you’ve already used is CoroutineDispatcher.
Coroutine Dispatchers
The title “dispatchers” hints at their function. They’re answerable for dispatching work to 1 a thread pool. You’ll use three dispatchers most frequently:
-
Default: Makes use of a predefined pool of background threads. Use this for computationally costly coroutines that use CPU assets. -
IO: Use this for offloading blocking IO operations to a pool of threads optimized for this sort of work. -
Important: This dispatcher is confined to Android’s fundamental thread. Use it when you might want to work together with the UI from inside a coroutine.
Enhancing Snowy’s Efficiency
You’ll use your information about dispatchers to enhance the efficiency of your code by shifting applySnowEffect‘s execution to a different thread.
Exchange the prevailing implementation of loadSnowFilter with the next:
personal droop enjoyable loadSnowFilter(originalBitmap: Bitmap): Bitmap =
 withContext(Dispatchers.Default) {
   SnowFilter.applySnowEffect(originalBitmap)
}
applySnowEffect is a CPU-heavy operation as a result of it goes by way of each pixel of a picture and does sure operations on it. To maneuver the heavy work from the principle thread, you wrap the decision with withContext(Dispatchers.Default). You’re utilizing the Default dispatcher as a result of it’s optimized for duties which can be intensive on the CPU.
Construct and run the challenge now.
You received’t see any distinction on the display screen, however you possibly can connect a debugger and put a breakpoint on applySnowEffect. When the execution stops, you’ll see one thing like this:

You possibly can see within the marked space that the strategy is executing in a employee thread. Because of this the principle thread is free to do different work.
Nice progress to this point! Now, it’s time to learn to cancel a working coroutine.
Canceling a Coroutine
Cancellation performs an enormous position within the Coroutines API. You all the time wish to create coroutines in a approach that means that you can cancel them when their work is not wanted. This implies you’ll principally create coroutines in ViewModel courses or within the view layer. Each of them have well-defined lifecycles. That offers you the power to cancel any work that’s not wanted when these courses are destroyed. You possibly can cancel a number of coroutines working in a scope by canceling the whole scope. You do that by calling scope.cancel(). Within the subsequent part, you’ll learn to cancel a single coroutine.
Coroutine Job
A Job is among the CoroutineContext parts that acts like a deal with for a coroutine. Each coroutine you launch returns a type of a Job. launch builder returns Job, whereas async builder returns Deferred. Deferred is only a Job with a consequence. Thus, you possibly can name cancel on it. You’ll use jobs to cancel the execution of a single coroutine. To run the next instance, open it within the Kotlin Playground. It ought to seem like this:
import kotlinx.coroutines.*

enjoyable fundamental() = runBlocking {
 //1
 val printingJob = launch {
  //2
  repeat(10) { quantity ->
   delay(200)
   println(quantity)
  }
 }
 //3
 delay(1000)
 //4
 printingJob.cancel()
 println("I canceled the printing job!")
}
This instance does the next:
- Creates a brand new coroutine and shops its job to the
printingJobworth. - Repeats the desired block of code 10 instances.
- Delays the execution of the mother or father coroutine by one second.
- Cancels
printingJobafter one second.
Once you run the instance, you’ll see output like beneath:
0
1
2
3
I canceled the printing job!
Jobs aren’t used only for cancellation. They may also be used to kind parent-child relationships. Have a look at the next instance within the Kotlin Playground:
import kotlinx.coroutines.*

enjoyable fundamental() = runBlocking {
 //1
 val parentJob = launch {
  repeat(10) { quantity ->
   delay(200)
   println("Mother or father coroutine $quantity")
  }
  //2
  launch {
   repeat(10) { quantity ->
    println("Little one coroutine $quantity")
   }
  }
 }
 //3
 delay(1000)
 //4
 parentJob.cancel()
}
This instance does the next:
- Creates a mother or father coroutine and shops its job in
parentJob. - Creates a baby coroutine.
- Delays the execution of the basis coroutine by one second.
- Cancels the mother or father coroutine.
The output ought to seem like this:
Mother or father coroutine 0
Mother or father coroutine 1
Mother or father coroutine 2
Mother or father coroutine 3
You possibly can see that the kid coroutine by no means received to execute its work. That’s as a result of once you cancel a mother or father coroutine, it cancels all of its kids as effectively.
Now that you understand how to cancel coroutines, there’s another vital subject to cowl — error dealing with.
Error Dealing with in Coroutines
The strategy to exception dealing with in coroutines is barely completely different relying on the coroutine builder you employ. The exception could get propagated mechanically, or it could get deferred till the buyer consumes the consequence.
Have a look at how exceptions behave for the builders you utilized in your code and tips on how to deal with them:
-
launch: Exceptions are thrown as quickly as they occur and are propagated as much as the mother or father. Exceptions are handled as uncaught exceptions. -
async: Whenasyncis used as a root coroutine builder, exceptions are solely thrown once you nameawait.
Coroutine Exception Handler
CoroutineExceptionHandler is one other CoroutineContext component that’s used to deal with uncaught exceptions. Because of this solely exceptions that weren’t beforehand dealt with will find yourself within the handler. Usually, uncaught exceptions may end up solely from root coroutines created utilizing launch builder.
Open TutorialFragment.kt, and substitute // TODO: Insert coroutineExceptionHandler with the code beneath:
personal val coroutineExceptionHandler: CoroutineExceptionHandler =
 CoroutineExceptionHandler { _, throwable ->
  showError("CoroutineExceptionHandler: ${throwable.message}")
  throwable.printStackTrace()
  println("Caught $throwable")
}
This code creates an occasion of CoroutineExceptionHandler and handles the incoming exception. To put in the handler, add this code instantly beneath it:
personal val tutorialLifecycleScope = lifecycleScope + coroutineExceptionHandler
This piece of code creates a brand new coroutine scope known as tutorialLifecycleScope. It combines the predefined lifecycleScope with the newly created coroutineExceptionHandler.
Exchange lifecycleScope with tutorialLifecycleScope in downloadSingleImage.
personal enjoyable downloadSingleImage(tutorial: Tutorial) {
  tutorialLifecycleScope.launch {
    val originalBitmap = getOriginalBitmap(tutorial)
    val snowFilterBitmap = loadSnowFilter(originalBitmap)
    loadImage(snowFilterBitmap)
  }
}
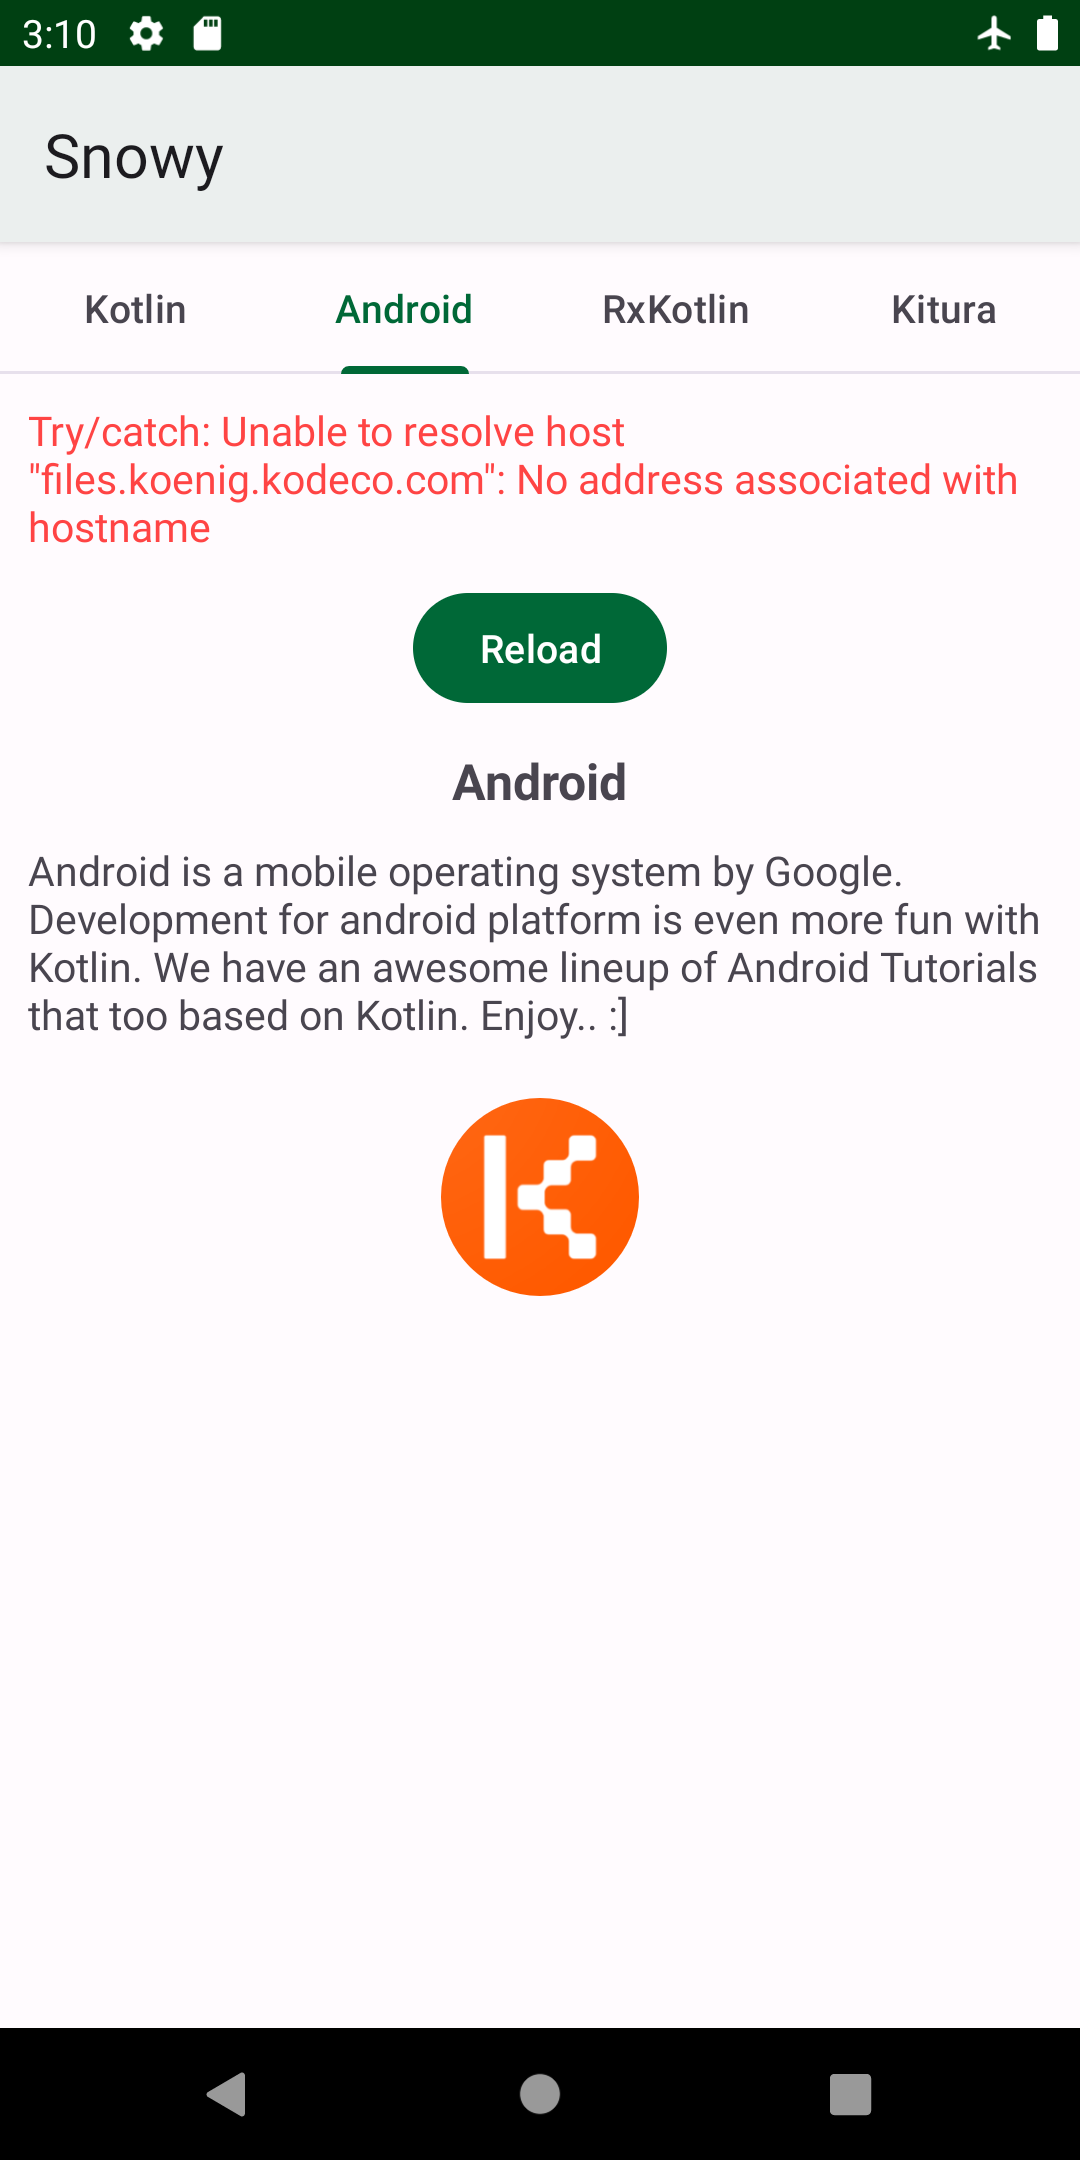
Earlier than you do that, be sure to activate airplane mode in your cellphone. That’s the best strategy to set off an exception within the code. Construct and run the app. You’ll see a display screen with an error message and a reload button, like beneath:

CoroutineExceptionHandler ought to solely be used as a world catch-all mechanism as a result of you possibly can’t recuperate from an exception in it. The coroutine that threw an exception has already completed at that time.
Attempt/Catch
In the case of dealing with exceptions for a particular coroutine, you should use a strive/catch block to catch exceptions and deal with them as you’d do in regular synchronous programming with Kotlin. To see this in motion, navigate to downloadTwoImages and wrap the loadTwoImages invocation with the strive/catch block.
strive {
  loadTwoImages(deferredOne.await(), deferredTwo.await())
} catch (e: Exception) {
  showError("Attempt/catch: ${e.message}")
}
Discover that you simply didn’t wrap the async builder itself with the strive/catch block as a result of the exception is simply thrown once you name await().
Construct and run the app once more, and navigate to the Android tab. You’ll see this display screen:
The place to Go From Right here?
Good job ending the tutorial! In the long run, you realized that Kotlin Coroutines aren’t simply one other instrument in a dusty shed known as asynchronous programming. The API is rather more than that. It’s a brand new approach to consider async programming general, which is humorous as a result of the idea dates again to the ’50s and ’60s. You noticed how simple it was to change between threads and return values asynchronously, and also you additionally noticed how dealing with exceptions might be simple and the way cleansing up assets takes one operate name.
You possibly can obtain the ultimate challenge by clicking Obtain supplies on the high or backside of this tutorial.
If you wish to be taught extra about coroutines, try our Kotlin Coroutines by Tutorials e-book. It brings an much more in-depth take a look at Kotlin coroutines and affords extra tutorials. You may as well try Kotlin Coroutines Tutorial for Android: Superior. Lastly, the official coroutines information is a superb studying useful resource as effectively.
I hope you loved this tutorial. Be part of us within the boards to share your experiences with Kotlin Coroutines!