

Pie charts and donut charts are two in style chart varieties utilized in information visualization. Previous to iOS 17, if you wish to create a majority of these charts utilizing SwiftUI, you’ll should construct the charts by yourself utilizing parts like Path and Arc. Beforehand, we wrote an in depth tutorial on the way to implement pie charts and donut charts from scratch. Nevertheless, within the upcoming launch of iOS 17, that is not mandatory. SwiftUI simplifies the method of making these charts by introducing a brand new mark kind known as SectorMark. This makes it simple for builders to construct all types of pie and donut charts.
On this tutorial, we’ll information you thru the method of constructing pie charts and donut charts utilizing SwiftUI. On high of that, you’ll additionally learn to add interactivity to the charts.
To observe the code pattern of this tutorial, please be sure to use Xcode 15 (Beta 2 or up).
Revisiting Bar Charts
Let’s begin by implementing a easy bar chart utilizing the Charts framework. Assuming you might have created a brand new SwiftUI mission, insert the strains of code under to initialize the pattern information for the bar chart:
|
personal var coffeeSales = [ (name: “Americano”, count: 120), (name: “Cappuccino”, count: 234), (name: “Espresso”, count: 62), (name: “Latte”, count: 625), (name: “Mocha”, count: 320), (name: “Affogato”, count: 50) ] |
These are just a few random information on espresso gross sales for chart rendering. For simplicity, I used an array of tuples to carry the information. The Charts framework makes it very simple for builders to create a bar chart from these information.
First, import the Charts framework and exchange the physique half with the next code:
|
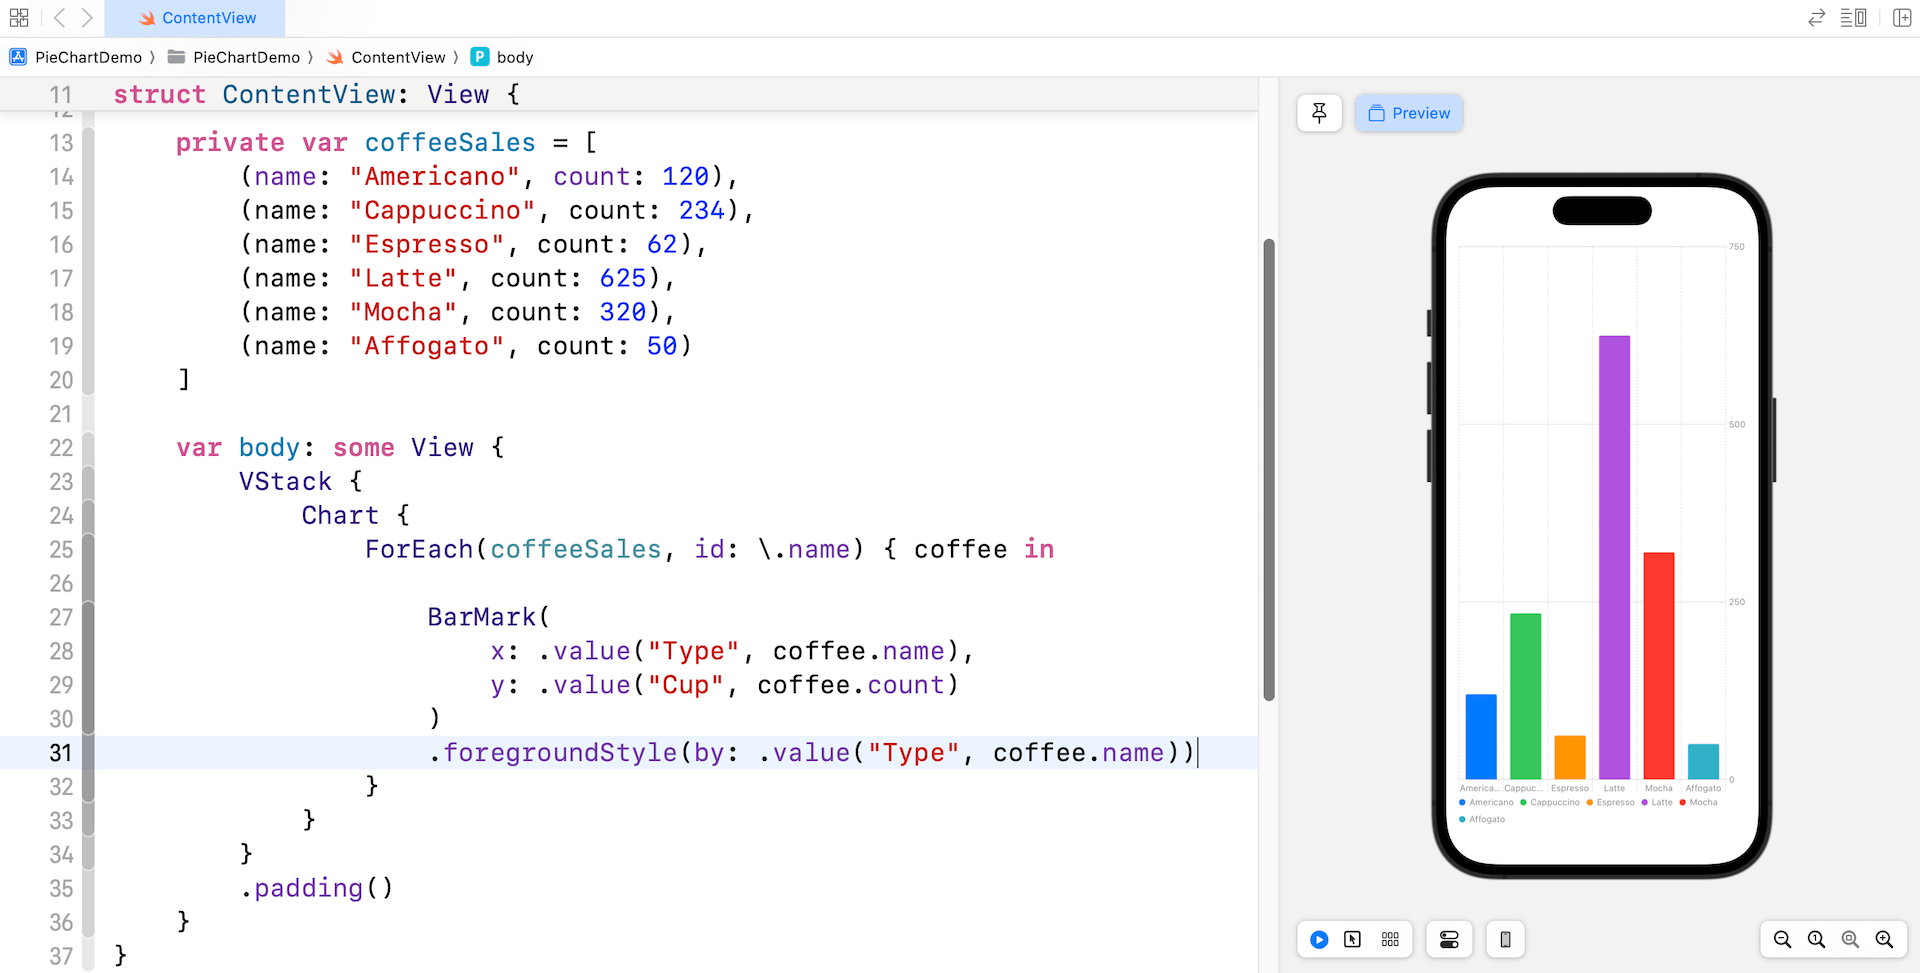
VStack { Chart { ForEach(coffeeSales, id: .identify) { espresso in BarMark( x: .worth(“Sort”, espresso.identify), y: .worth(“Cup”, espresso.rely) ) .foregroundStyle(by: .worth(“Sort”, espresso.identify)) } } } .padding() |
Whether or not you’re making a bar chart or a pie chart, all of it begins with the Chart view. Inside this view, we outline a set of BarMark for rendering a vertical bar chart that plots espresso varieties on the x-axis and counts on the y-axis. The foregroundStyle modifier robotically assigns a singular coloration for every of the bars.
You possibly can simply create a distinct kind of bar chart by altering among the BarMark parameters.

For instance, if you wish to create a one dimensional bar chart, you simply want to offer the values for the x or y axis:
|
VStack { Chart { ForEach(coffeeSales, id: .identify) { espresso in
BarMark( x: .worth(“Cup”, espresso.rely) ) .foregroundStyle(by: .worth(“Sort”, espresso.identify)) } } .body(top: 100) } .padding() |
By default, it reveals the collected rely within the x-axis. If you wish to normalized the values, easy specify the stacking parameter for BarMark like this:
|
BarMark( x: .worth(“Cup”, espresso.rely), stacking: .normalized ) .foregroundStyle(by: .worth(“Sort”, espresso.identify)) |
Creating Pie Charts with SectorMark
Now that we’ve constructed a bar chart, let’s how it may be transformed to a pie chart utilizing the brand new SectorMark launched in iOS 17.
The SectorMark, because the identify suggests, represents a sector of the pie chart that corresponds to a particular class. Every SectorMark is outlined by the worth it represents. By utilizing SectorMark, builders can simply create numerous varieties of pie (or donut charts) with out having to construct them from scratch utilizing parts like Path and Arc.
For instance, if we need to convert the bar chart right into a pie chart, all it’s essential to do is exchange BarMark with SectorMark like this:
|
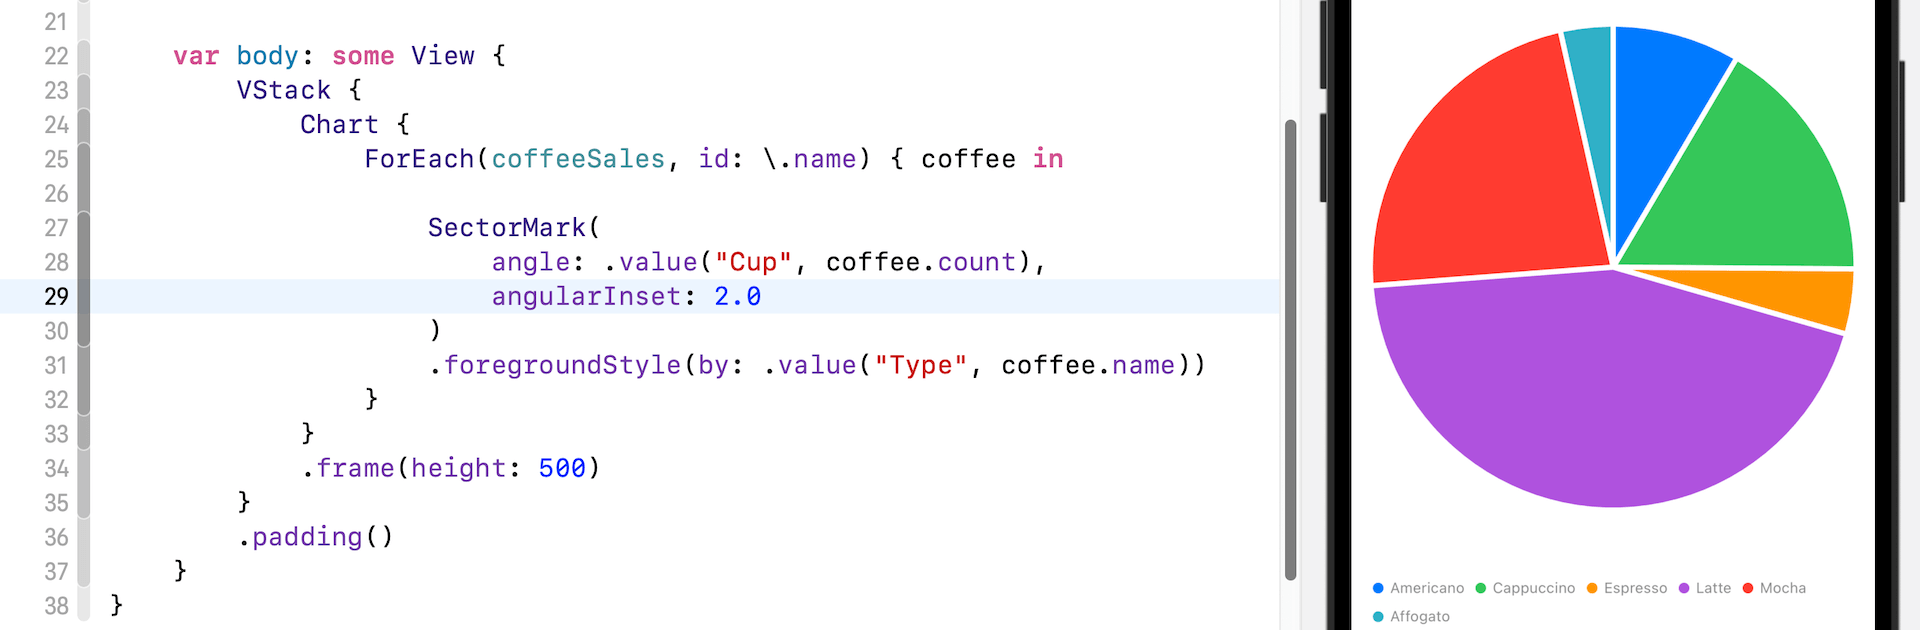
Chart { ForEach(coffeeSales, id: .identify) { espresso in
SectorMark( angle: .worth(“Cup”, espresso.rely) ) .foregroundStyle(by: .worth(“Sort”, espresso.identify)) } } .body(top: 500) |
As a substitute of specifying the worth of x-axis, you cross the values to the angle parameter. SwiftUI will robotically compute the angular measurement of the sector and generate the pie chart.

Customizing the Pie Chart
SectorMark comes with numerous parameters so that you can customise every of the sectors. So as to add some spacing between sectors, you possibly can present the worth of angularInset.
You possibly can management the dimensions of the sectors by specifying a price for the outerRadius parameter. For instance, if you wish to spotlight the Latte sector by making it a bit bigger, you possibly can add the outerRadius parameter.

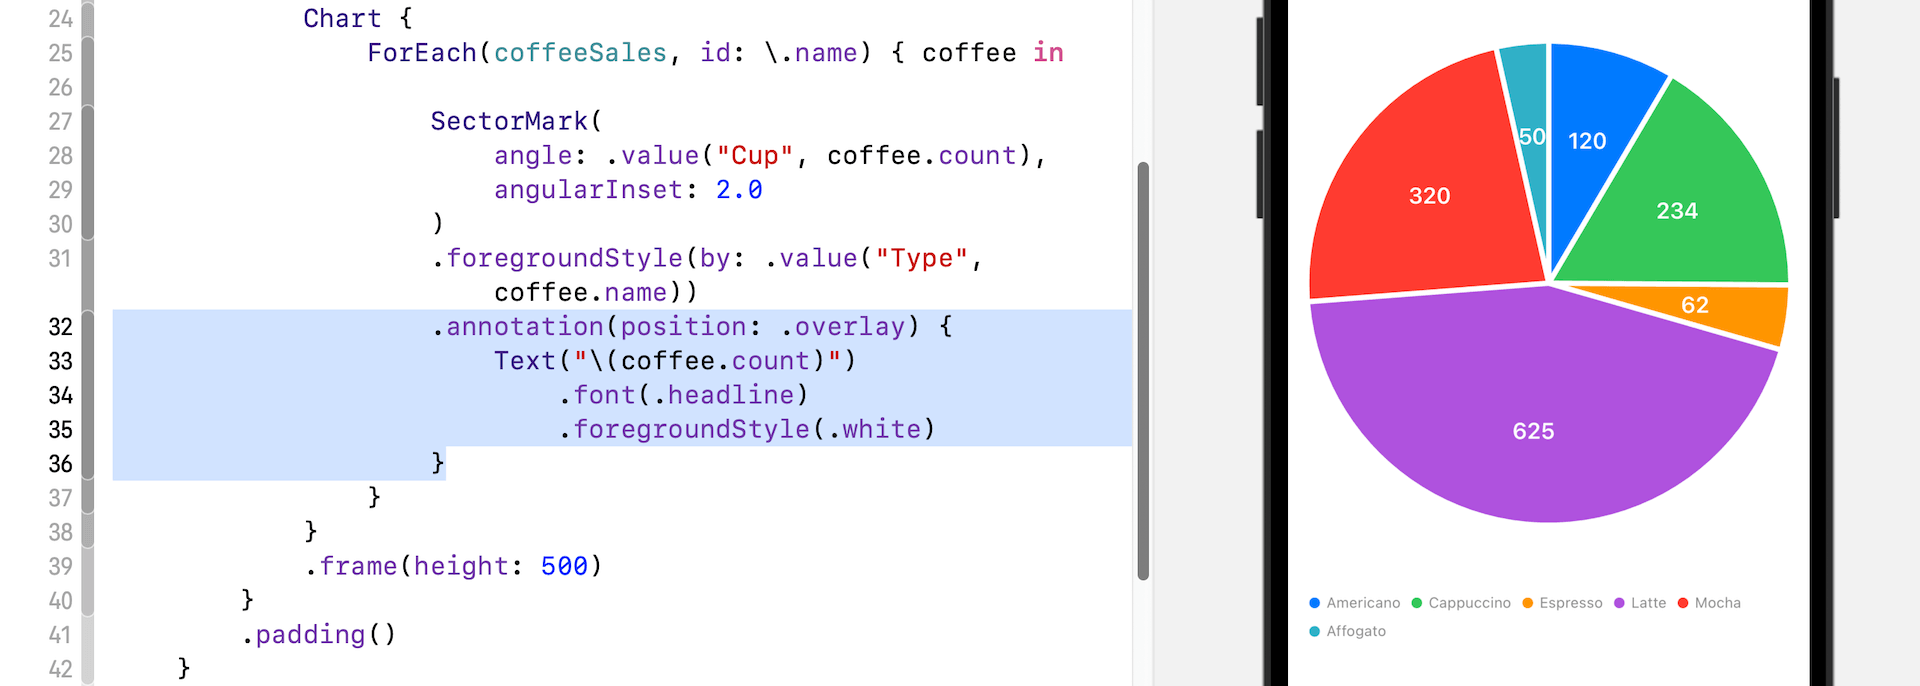
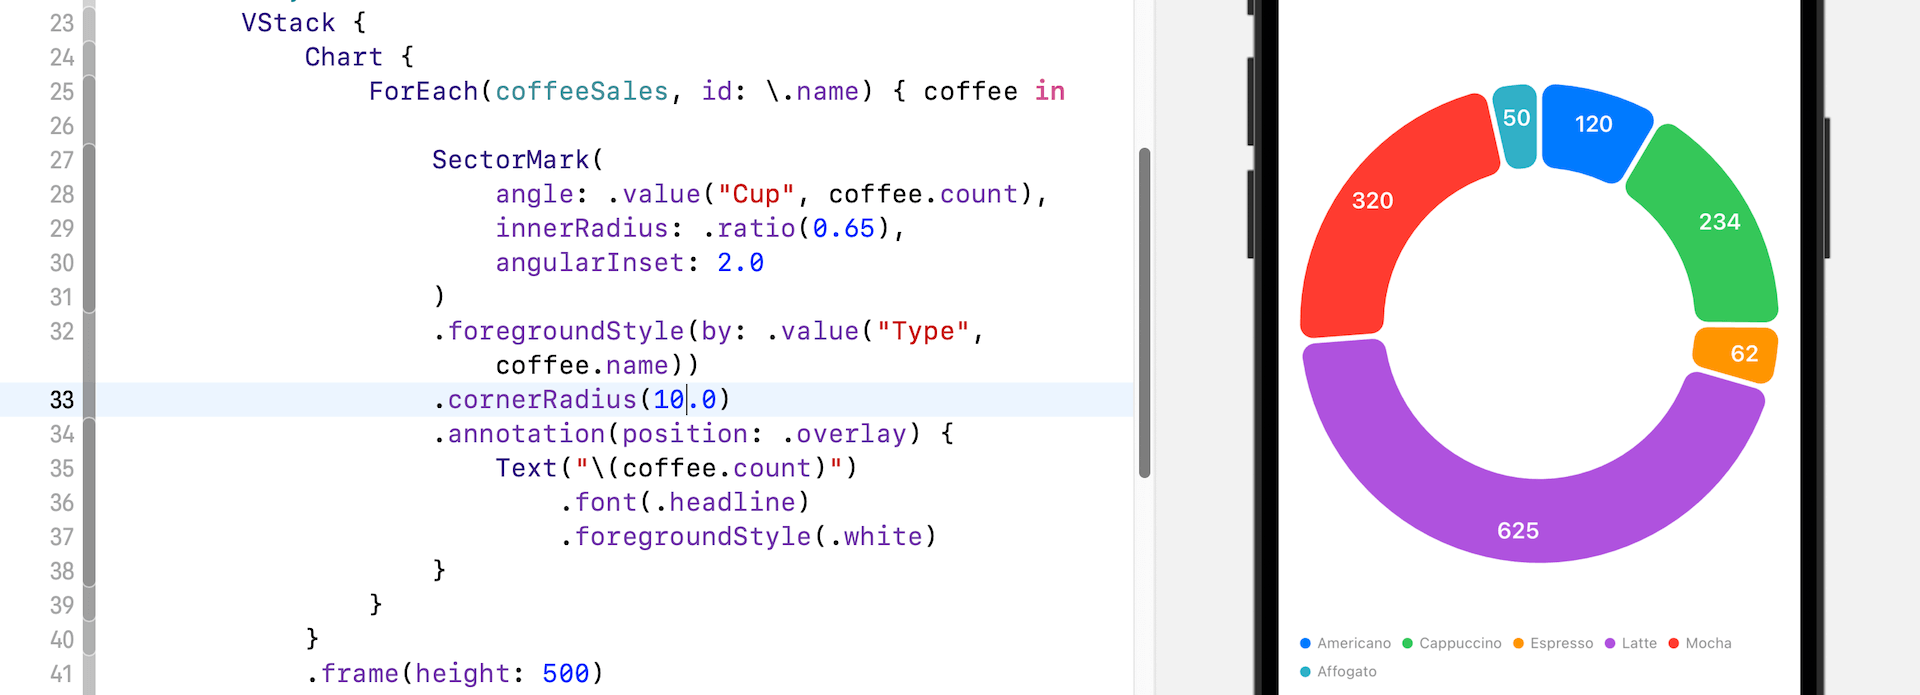
So as to add a label for every sector, you possibly can connect the annotation modifier to SectorMark and set the place to .overlay:
|
.annotation(place: .overlay) { Textual content(“(espresso.rely)“) .font(.headline) .foregroundStyle(.white) } |
Right here, we merely overlay a textual content label on every sector to show the rely.
Changing the Pie Chart to Donut Chart
So, how will you create a donut chart? The brand new SectorMark is so highly effective that you just simply want so as to add a single line of code to show the pie chart right into a donut chart. There’s an elective parameter for SectorMark that I haven’t talked about earlier than.
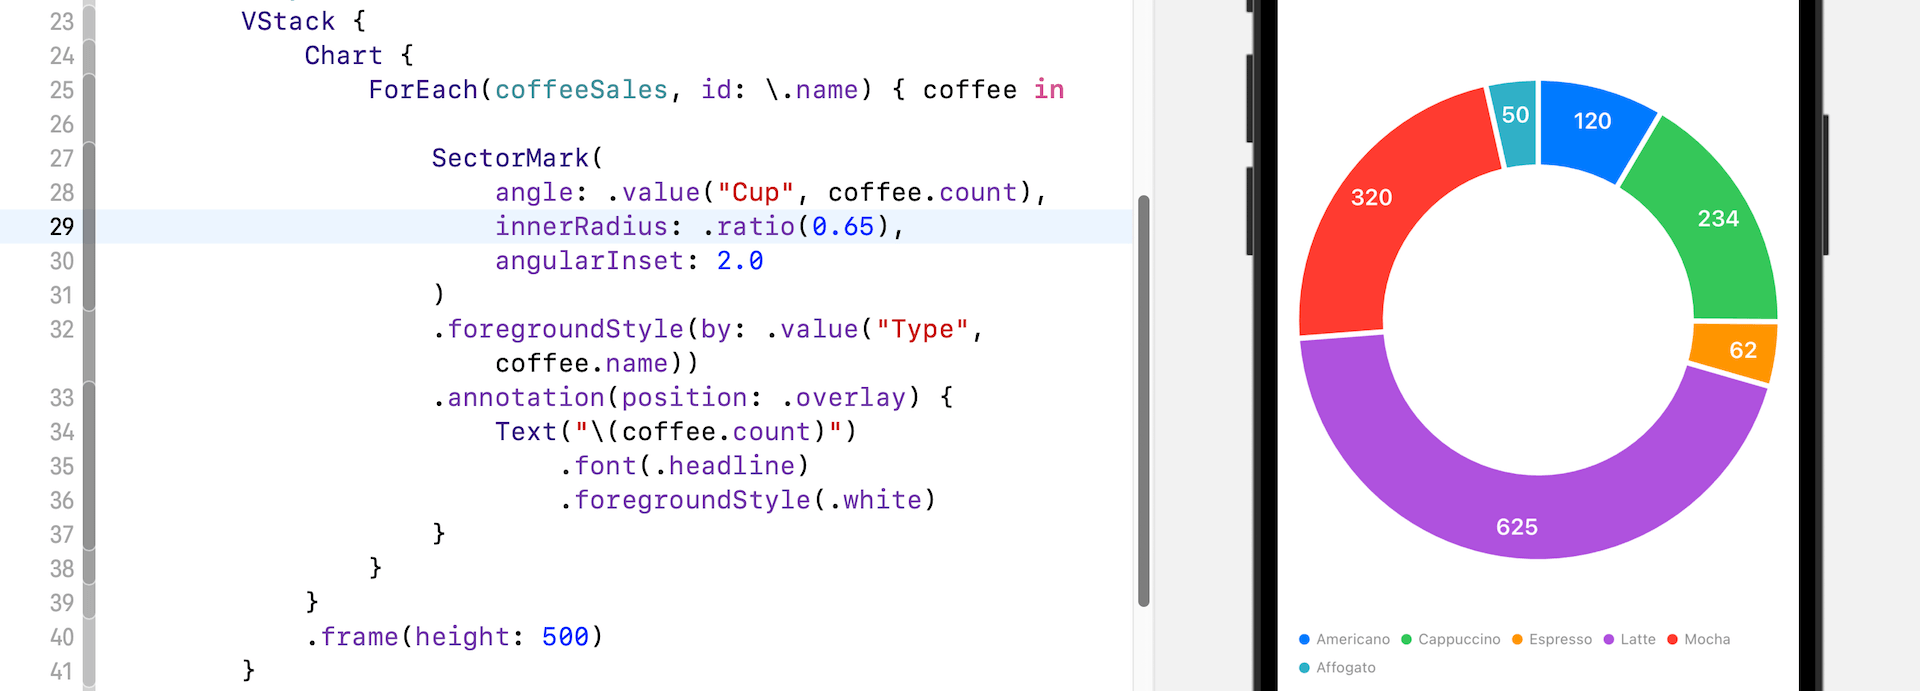
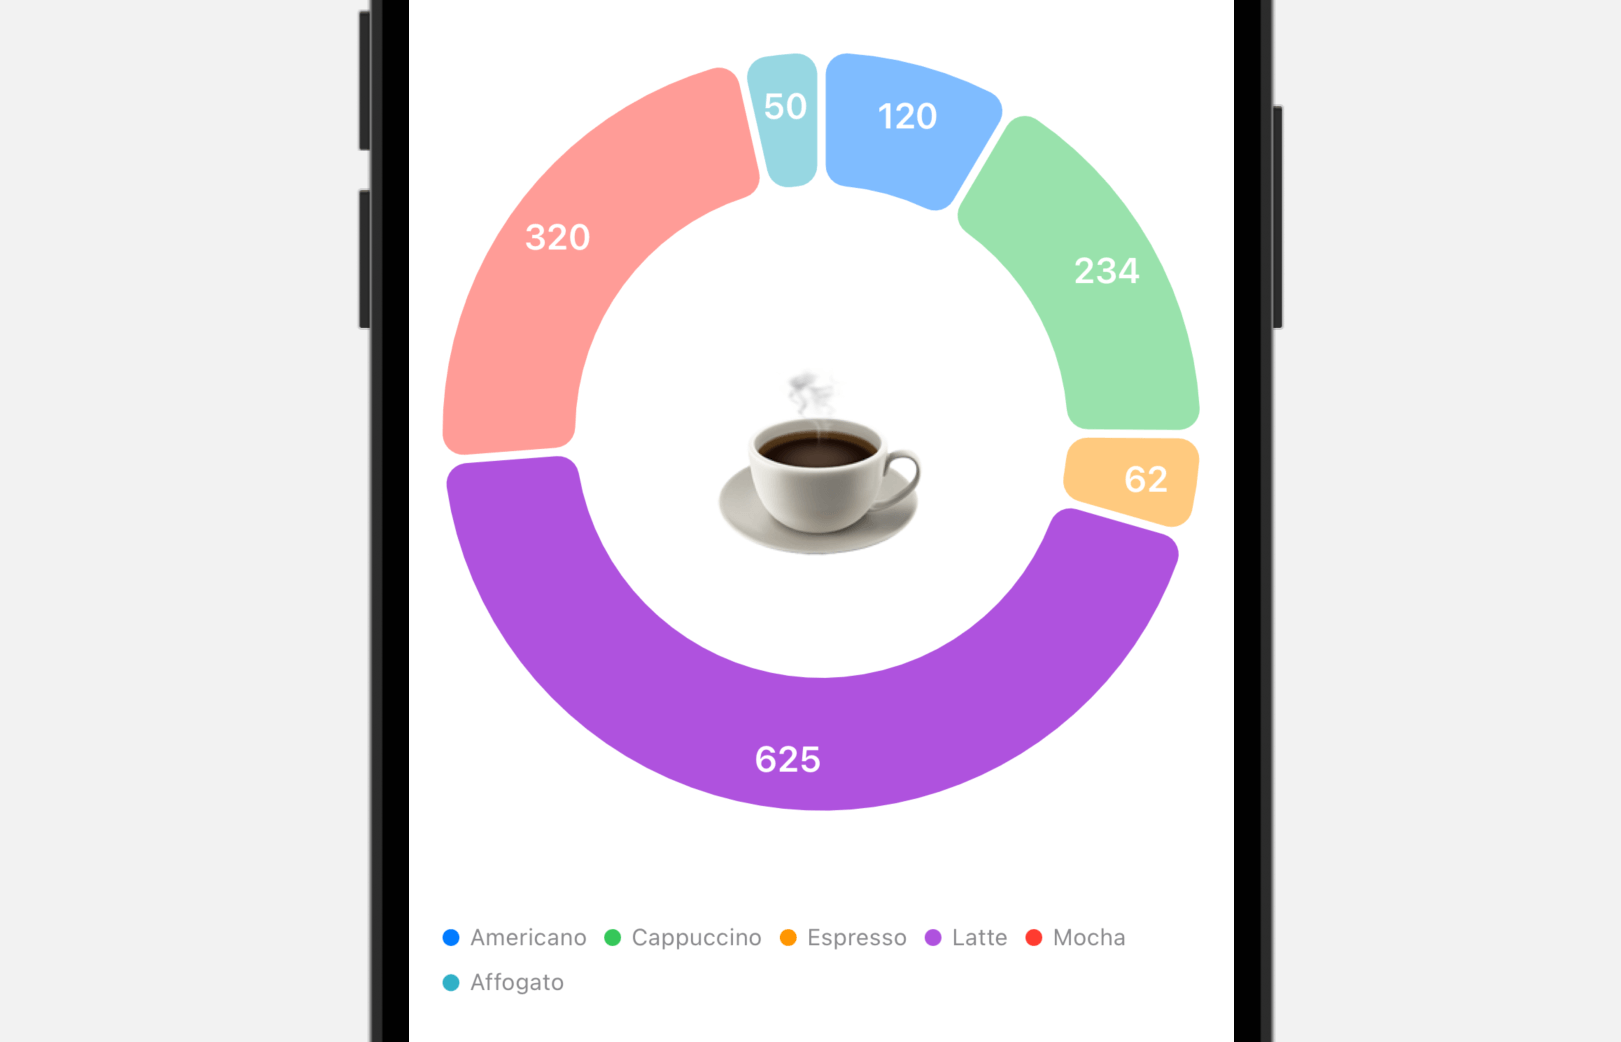
To create a donut chart, merely specify the innerRadius parameter of the sector mark and cross it your most well-liked worth:
|
SectorMark( angle: .worth(“Cup”, espresso.rely), innerRadius: .ratio(0.65), angularInset: 2.0 ) |
The worth of innerRadius is both a measurement in factors, or a .ratio or .inset relative to the outer radius. By having a price larger than zero, you create a gap within the pie and switch the chart right into a donut chart.
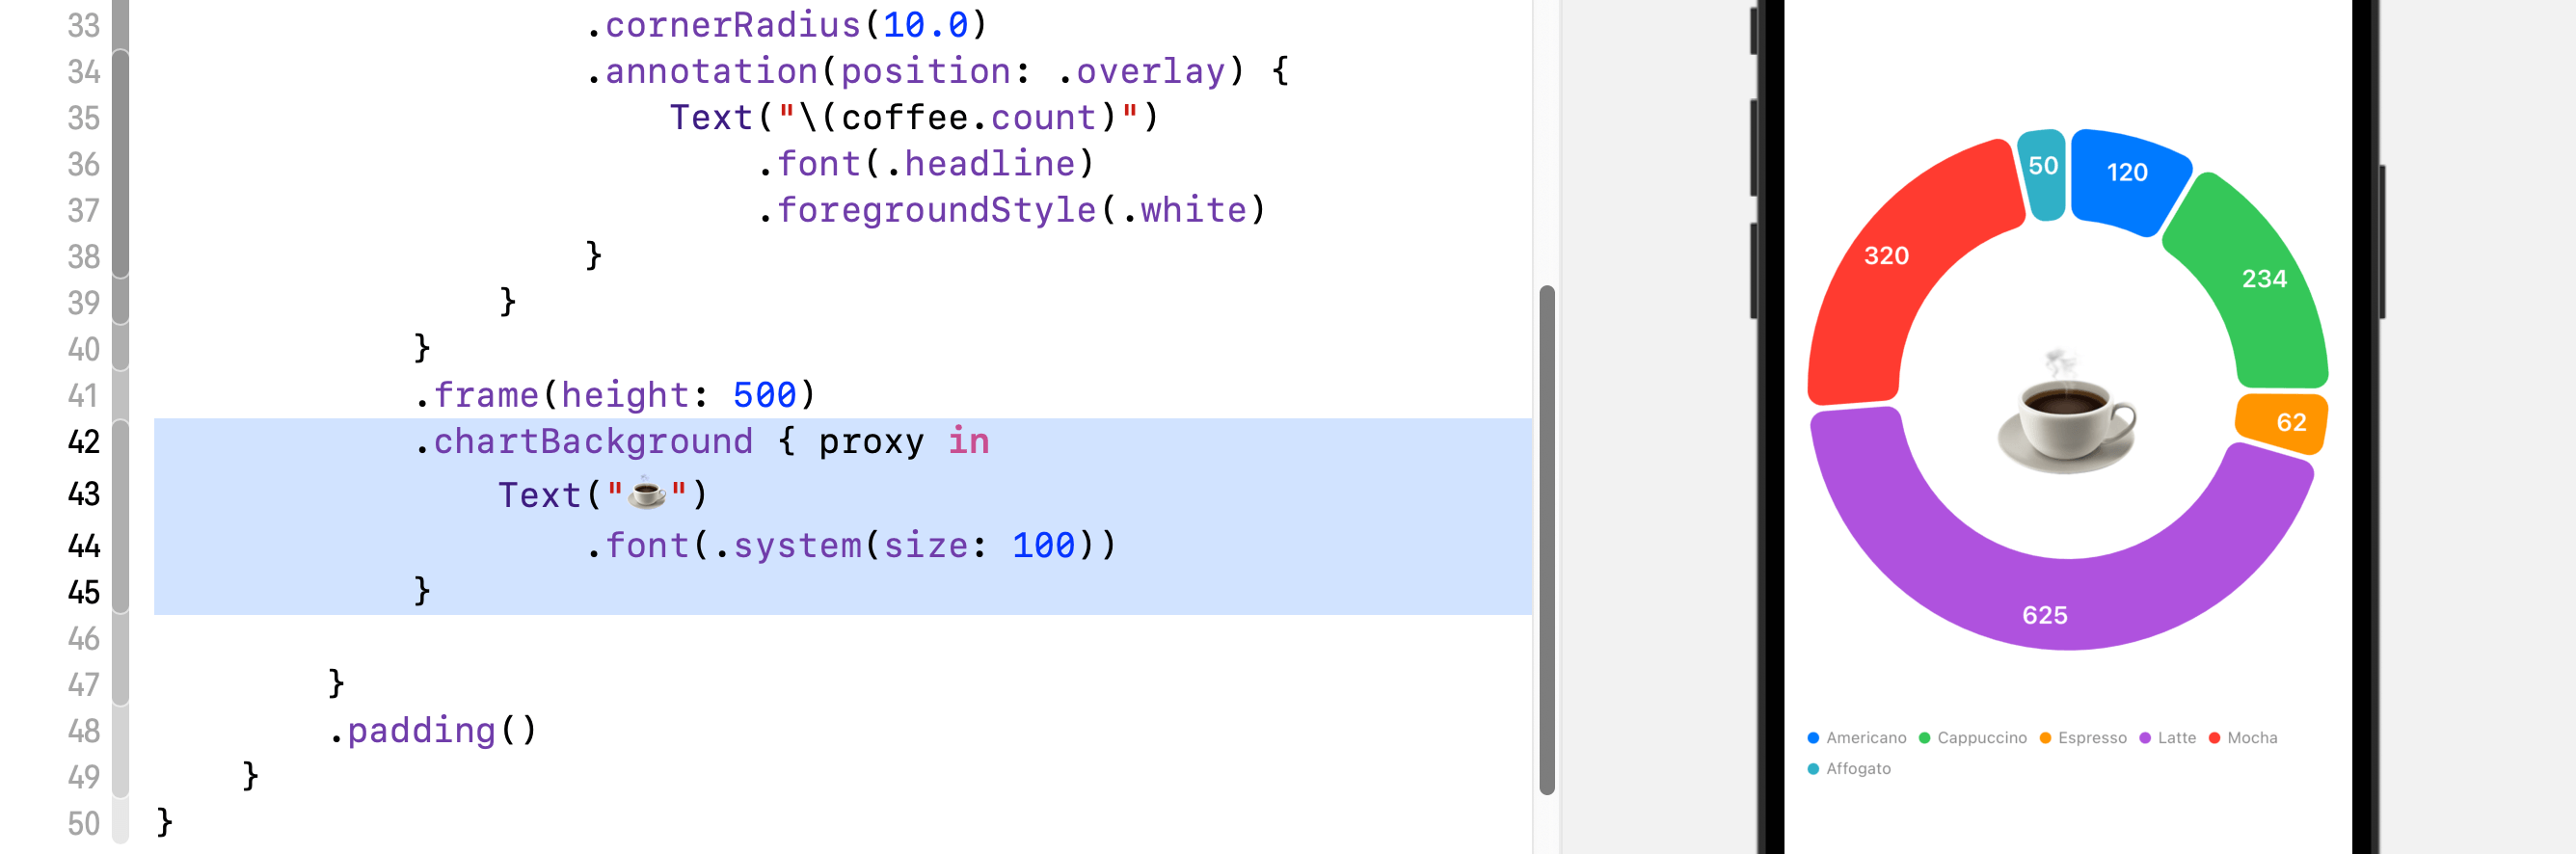
Optionally, you possibly can connect a cornerRadius modifier to the sector marks to around the corners of the sector.
You too can add a view to the chart’s background by attaching the chartBackground modifier to the Chart view. Right here is an instance.
Interacting with Charts
Aside from introducing SectorMark, the brand new model of SwiftUI comes with new Chart APIs for dealing with person interactions. For each pie and donut charts, you connect the chartAngleSelection modifier and cross it a binding to seize person’s touches:
|
@State personal var selectedCount: Int?
Chart {
. . .
} .chartAngleSelection(worth: $selectedCount) |
The chartAngleSelection modifier takes in a binding to a plottable worth. Since all our plottable values are in integer, we declare a state variable of the sort Int. With the implementation, the chart now can detect person’s contact and seize the chosen rely of the donut (or pie) chart.
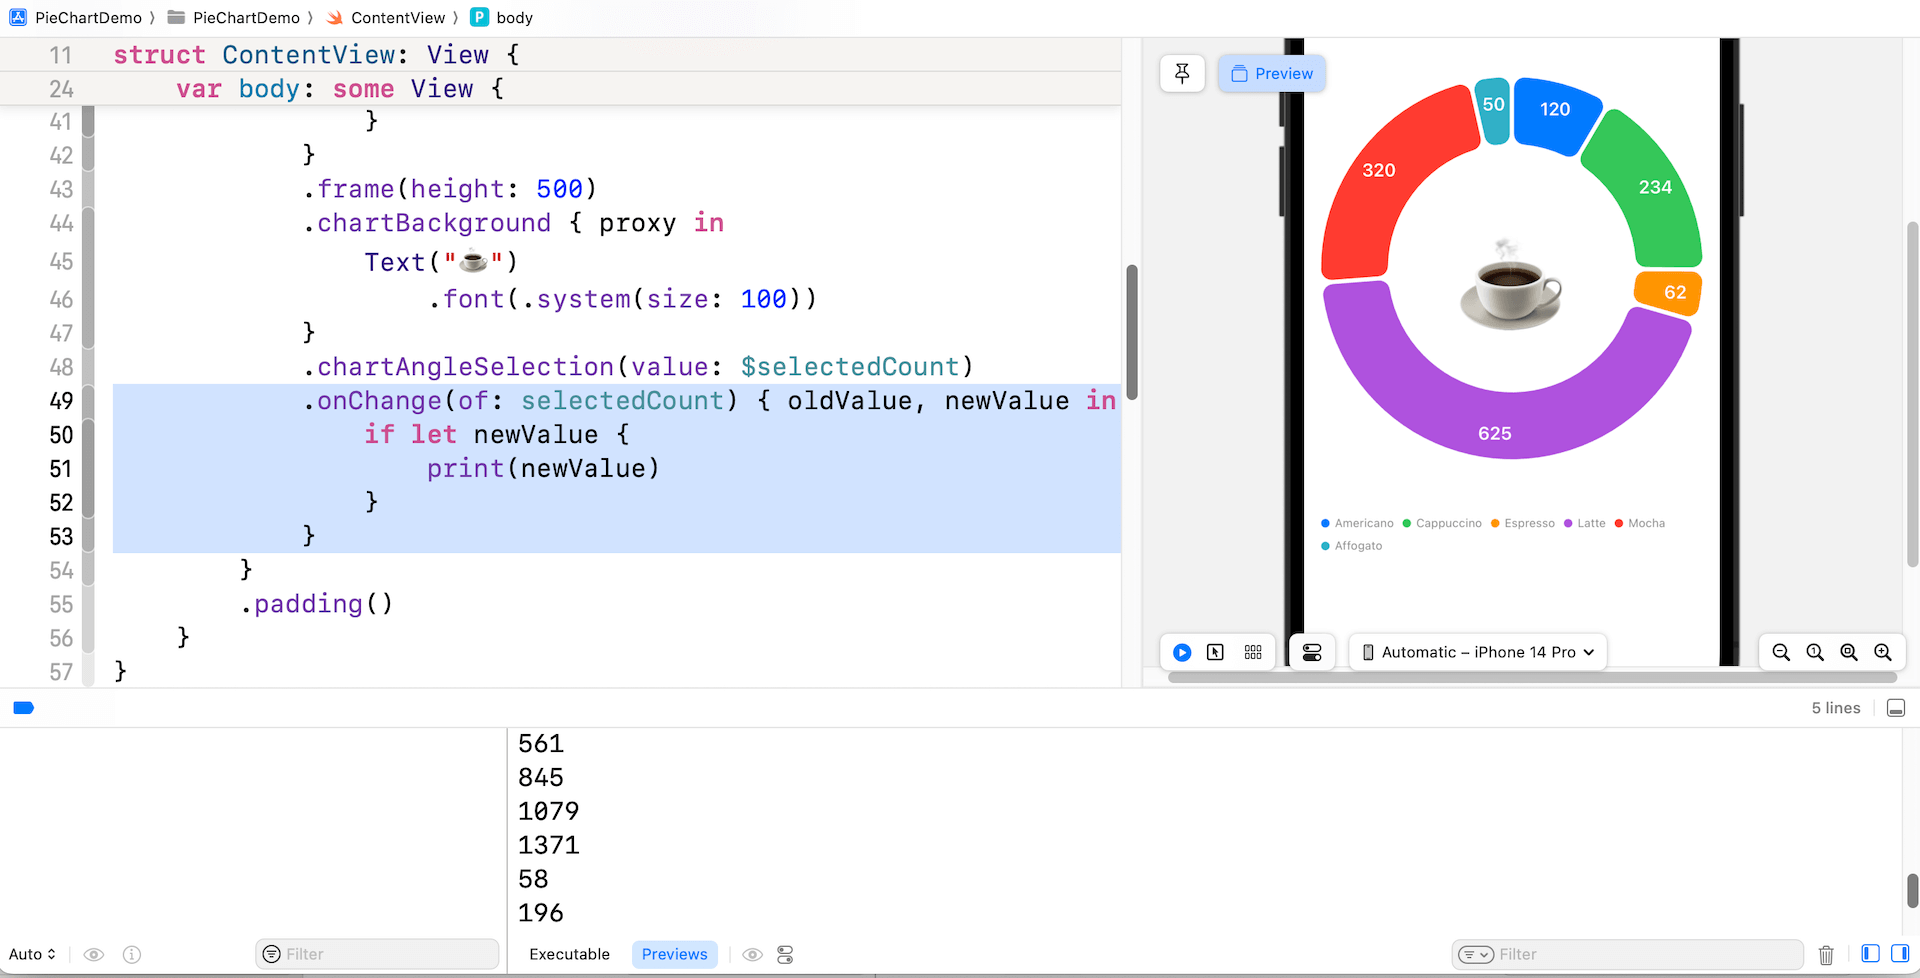
Chances are you’ll connect the onChange modifier to the chart to disclose the chosen worth.
|
.onChange(of: selectedCount) { oldValue, newValue in if let newValue { print(newValue) } } |
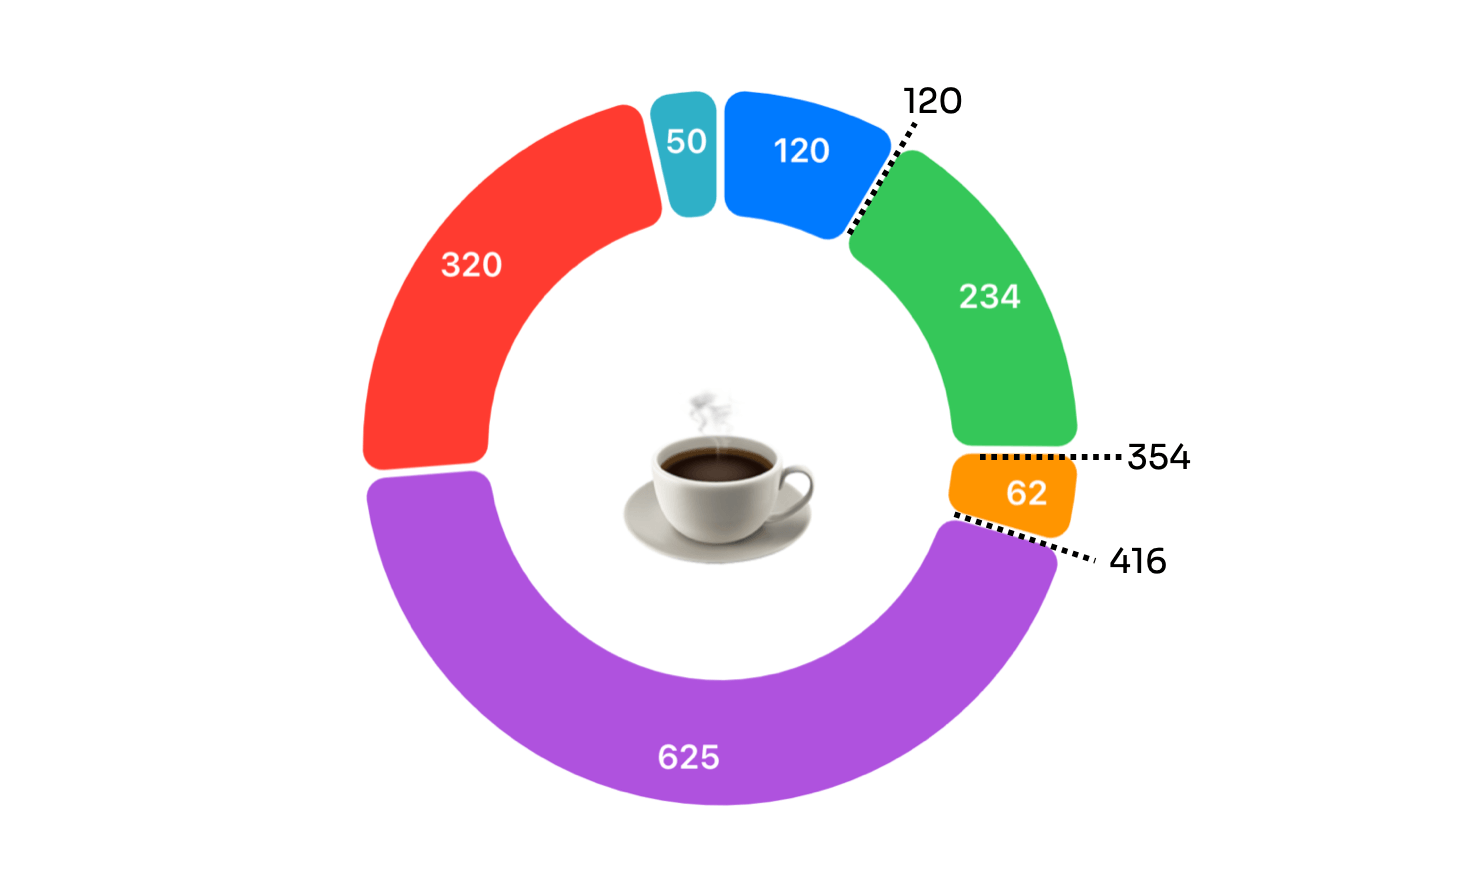
The worth captured doesn’t straight let you know the precise sector the person touched. As a substitute, it offers a price of the chosen espresso rely. For instance, if the person faucets the trailing fringe of the inexperienced sector, SwiftUI returns you a price of 354.
To determine the sector from the given worth, we have to create a brand new operate. This operate takes the chosen worth and returns the identify of the corresponding sector.
|
personal func findSelectedSector(worth: Int) –> String? {
var accumulatedCount = 0
let espresso = coffeeSales.first { (_, rely) in accumulatedCount += rely return worth <= accumulatedCount }
return espresso?.identify } |
With the implementation above, we will declare a state variable to carry the chosen sector and make some fascinating adjustments to the donut chart.
|
@State personal var selectedSector: String? |
When a sector of the chart is chosen, we’ll dim the remaining sectors to focus on the chosen sector. Replace the onChange modifier like this:
|
.onChange(of: selectedCount) { oldValue, newValue in if let newValue { selectedSector = findSelectedSector(worth: newValue) } else { selectedSector = nil } } |
After which connect the opacity modifier to SectorMark like this:
|
SectorMark {
...
} .opacity(selectedSector == nil ? 1.0 : (selectedSector == espresso.identify ? 1.0 : 0.5)) |
We maintain the unique opacity when there isn’t any chosen sector. As soon as a person touches a particular sector, we alter the opacity of these unselected sectors. Beneath reveals the looks of the donut chart when the Latte sector is chosen.
Abstract
On this tutorial, we’ve guided you thru the method of constructing pie charts and donut charts utilizing SwiftUI. Previous to iOS 17, in case you wished to create a majority of these charts utilizing SwiftUI, you needed to construct the charts by yourself utilizing parts like Path. Nevertheless, with the introduction of the brand new Chart API known as SectorMark, it’s now simpler than ever to create all types of pie and donut charts. As you possibly can see, turning a bar chart right into a pie (or donut) chart solely requires some easy adjustments.
We additionally mentioned with you the way to add interactivity to the charts. That is one other new function of the SwiftUI Charts framework. With a couple of strains of code, you possibly can detect customers’ touches and spotlight a sure a part of the chart.
I hope you take pleasure in studying this tutorial and begin constructing nice charts with all the brand new functionalities offered in iOS 17.