

Introduction
The Web of Issues (IoT) business continues to develop at an aggressive tempo. Because the variety of related gadgets ramps up, managing safety of those gadgets at scale could be difficult. One of many potential dangers that IoT gadgets face is unintended USB entry, which may happen when an unauthorized connection is made by means of its USB port. For instance, if a person beneficial properties bodily entry to a safety digicam system, there’s a danger they might plugin an unauthorized USB system that gives entry to the digicam system and its knowledge. This might end in unauthorized entry to delicate knowledge or a disruption in system availability.
Defending IoT gadgets from unintended USB entry requires a multi-layered safety strategy that features each {hardware} and software program options. {Hardware} options embody implementing an extra layer of safety to the USB ports and limiting bodily entry to gadgets. Software program options embody implementing firmware and software program updates, in addition to implementing safety protocols that may detect and stop unintended USB entry.
The entry degree for a tool can be completely different relying on whether or not it’s in service or in debug mode. When a tool is in service, you might have considered trying its USB ports to be totally protected. When it’s in debug mode, you generally must open up its USB ports to permit a technician to plug in prognosis software program. The management over the system’s mode must be securely carried out by a safety or DevOps workforce, as proven in Determine 1.
On this weblog, you’ll discover ways to defend Linux-based IoT gadgets and computer systems towards unintended USB entry with USBGuard and how one can securely change a tool from In-Service mode to Debug mode with AWS IoT Gadget Administration.
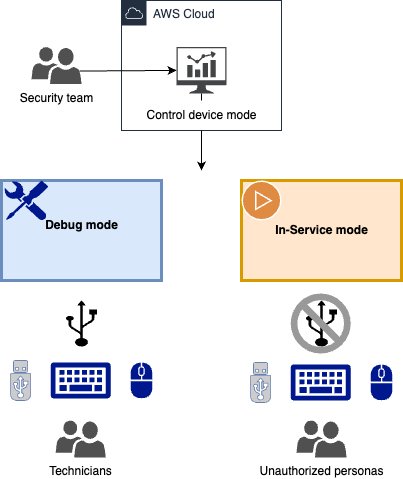
Determine 1: Use case clarification
Stipulations
Walkthrough
The next diagram, Determine 2, exhibits an structure of a Linux-based system connecting by means of AWS IoT Core utilizing MQTT. On the system, the USBGuard service has been put in and enabled. USBGuard is a software program framework that provides an permit/deny -listing mechanism for USB-devices. Inspiration for that is drawn from points like BadUSB. It makes use of a tool blocking infrastructure included within the Linux kernel.
The system has a tool mode attribute outlined. You may set the system mode to both in-service or debug mode by means of Jobs for AWS IoT. IoT Jobs outline a set of distant operations that may be despatched to and run on a number of gadgets related to AWS IoT. For this use case, there are two jobs outlined: set-debug-mode-job and set-in-service-mode-job. You may monitor system mode attributes and carry out jobs by means of AWS IoT Gadget Administration Fleet Hub.
When operating the set-in-service-mode-job, the IoT communication shopper will decide up the job, set a USBGuard coverage to limit USB ports entry solely to designated USB system, block different gadgets with a hidden keyboard interface in a USB flash disk, and set the system shadow attribute with in-service mode . Quite the opposite, when operating the set-debug-mode-job, it loosens the foundations on the USB ports (e.g. a USBGuard coverage to permit all USB ports entry), and units the system shadow attribute with debug mode. This manner, a technician can plug in a mouse and a keyboard and run debugging software program by means of USB ports.
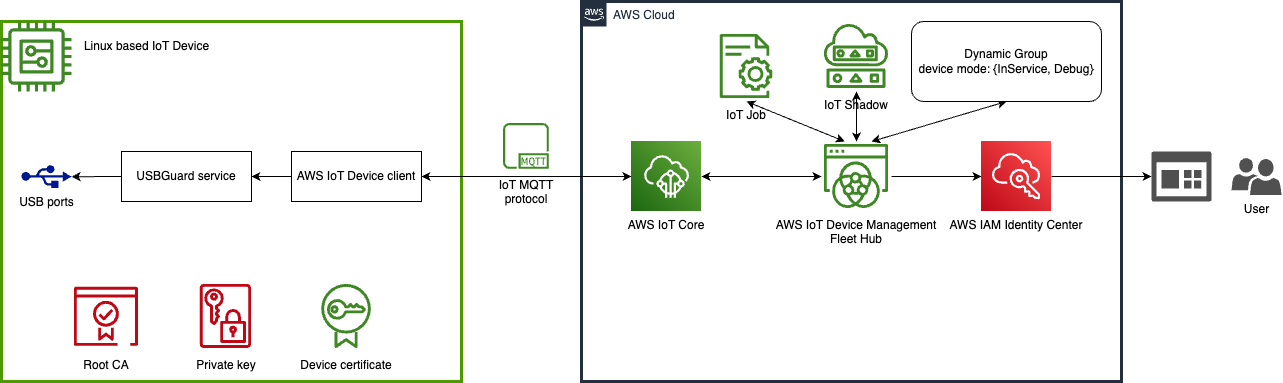
Determine 2: Answer structure
This may be completed by means of the next procedures:
- Configure AWS IoT Core coverage and system attributes
- Provision the system
- Set up USBGuard on the system
- Implement the IoT communication shopper code
- Configure job docs in IoT Jobs
- Create AWS IoT Gadget Administration Fleet Hub software
Steps 1 and a couple of could be carried out both in AWS IoT Core console or by means of AWS CLI. We use AWS CLI instructions within the walkthrough. Step 3 and 4 are configured on the IoT system. And step 5 and 6 are carried out in AWS IoT console.
Step 1: Configure AWS IoT Core coverage and system attributes
POLICY_NAME=IoTJobDemo_Policy
THING_TYPE_NAME=DemoDevice

# Create an IoT coverage
# NOTE: This coverage is for demonstration goal solely! Please don't use in manufacturing setting.
# Exchange us-east-1:123456789012 together with your AWS_REGION:AWS_ACCOUNT_ID
# Exchange uniqueThingName together with your IoT system factor title
aws iot create-policy --policy-name $POLICY_NAME --policy-document '{
  "Model": "2012-10-17",
  "Assertion": [
    {
      "Effect": "Allow",
      "Action": "iot:Connect",
      "Resource": "arn:aws:iot:us-east-1:123456789012:client/uniqueThingName"
    },
    {
      "Effect": "Allow",
      "Action": "iot:Publish",
      "Resource": [
        "arn:aws:iot:us-east-1:123456789012:*"
      ]
    },
    {
      "Impact": "Enable",
      "Motion": "iot:Subscribe",
      "Useful resource": "arn:aws:iot:us-east-1:123456789012:*"
    },
    {
      "Impact": "Enable",
      "Motion": "iot:Obtain",
      "Useful resource": [
        "arn:aws:iot:us-east-1:123456789012:topic/test/dc/subtopic",
        "arn:aws:iot:us-east-1:123456789012:topic/$aws/things/uniqueThingName/jobs/*"
      ]
    },
    {
      "Impact": "Enable",
      "Motion": [
        "iot:DescribeJobExecution",
        "iot:GetPendingJobExecutions",
        "iot:StartNextPendingJobExecution",
        "iot:UpdateJobExecution"
      ],
      "Useful resource": "arn:aws:iot:us-east-1:123456789012:matter/$aws/issues/uniqueThingName"
    }
  ]
}
'


# Create factor sort
aws iot create-thing-type --thing-type-name $THING_TYPE_NAME

# Create dynamic factor teams
aws iot create-dynamic-thing-group --thing-group-name "Debug" --query-string "shadow.title.device-mode.reported.mode:Debug" > /dev/null
aws iot create-dynamic-thing-group --thing-group-name "InService" --query-string "shadow.title.device-mode.reported.mode:InService" > /dev/null
Step 2: Provision the system
THING_NAME="<your system distinctive identifier>"
THING_PATH="<your work listing>/$THING_NAME"

aws iot create-thing --thing-name $THING_NAME --thing-type-name $THING_TYPE_NAME

# Create keys and certificates
aws iot create-keys-and-certificate --set-as-active
    --private-key-outfile $THING_PATH/non-public.key
--certificate-pem-outfile $THING_PATH/certificates.pem > $THING_PATH/keys_response

# Get Root CA
wget https://www.amazontrust.com/repository/AmazonRootCA1.pem -O $THING_PATH/rootCA.pem

# Parse output for certificates ARN and ID
CERTIFICATE_ARN=$(jq -r ".certificateArn" $THING_PATH/keys_response)
CERTIFICATE_ID=$(jq -r ".certificateId" $THING_PATH/keys_response)
# Connect coverage to certificates
aws iot attach-policy --policy-name $POLICY_NAME --target $CERTIFICATE_ARN
# Connect certificates to factor
aws iot attach-thing-principal --thing-name $THING_NAME --principal $CERTIFICATE_ARN
Step 3: Set up USBGuard on the system
Comply with the public documentation to put in USBGuard.
Generate two USBGuard insurance policies, debug-rules.conf and in-service-rules.conf. in-service-rules.conf incorporates strict guidelines and might be utilized in system’s in-service mode. debug-rules.conf loosens the foundations on the USB ports and might be utilized in system’s debug mode.
For instance, a debug-rules.conf is usually a coverage permitting all entry to all USB ports:
echo "permit id *:*" > debug-rules.confin-service-rules.conf can comprise guidelines to reject any USB flash disk which implements a keyboard or a community interface.
permit with-interface equals { 08:*:* }
reject with-interface all-of { 08:*:* 03:00:* }
reject with-interface all-of { 08:*:* 03:01:* }
reject with-interface all-of { 08:*:* e0:*:* }
reject with-interface all-of { 08:*:* 02:*:* }
Step 4: Implement the IoT communication shopper code
On the IoT system itself, create a piece listing:
WORKDIR="<your work listing>"
THING_PATH="$WORKDIR/$THING_NAME"
mkdir -p $THING_PATH
Put the certificates.pem, non-public.key, rootCA.pem from Step 2 below the $THING_PATH.
We use the AWS IoT Gadget Shopper on the system. The AWS IoT Gadget Shopper is free, open-source, modular software program written in C++ which you can compile and set up in your Embedded Linux based mostly IoT gadgets to entry AWS IoT Core, AWS IoT Gadget Administration, and AWS IoT Gadget Defender options by default. To put in and configure the shopper:
# Constructing
cd $WORKDIR
git clone https://github.com/awslabs/aws-iot-device-client
cd aws-iot-device-client
mkdir construct
cd construct
cmake ../
cmake --build . --target aws-iot-device-client

# Setup
cd ../
./setup.sh
At this level you’ll want to reply to prompts for info, together with paths to your factor certs:
Do you need to interactively generate a configuration file for the AWS IoT Gadget Shopper? y/n
y
Specify AWS IoT endpoint to make use of:
<That is the iot:Knowledge-ATS endpoint. Try https://docs.aws.amazon.com/iot/newest/developerguide/iot-connect-devices.html>
Specify path to public PEM certificates:
$THING_PATH/certificates.pem
Specify path to non-public key:
$THING_PATH/non-public.key
Specify path to ROOT CA certificates:
$THING_PATH/rootCA.pem
Specify factor title (Additionally used as Shopper ID):
$THING_NAME
Would you prefer to configure the logger? y/n
n
Allow Jobs function? y/n
y
Specify absolute path to Job handler listing:
$WORKDIR/.aws-iot-device-client/jobs
…
Allow Pattern Shadow function? y/n
y
Specify a shadow title for the function to create or replace:
device-mode
Specify the trail of a file for the function to learn from:
$WORKDIR/.aws-iot-device-client/device-mode-input.json
Specify a the trail of a file for the function to put in writing shadow doc to:
$WORKDIR/.aws-iot-device-client/device-mode-output.json
…
Do you need to set up AWS IoT Gadget Shopper as a service? y/n
N
Within the $WORKDIR/.aws-iot-device-client/jobs, create a usbguard-policy listing and put the debug-rules.conf and in-service-rules.conf generated from step 3 in there.
Create two corresponding job handler scripts within the $WORKDIR/.aws-iot-device-client/jobs to deal with set system mode. They are going to be triggered by IoT Job docs.
The script to set system to debug mode: set-debug-mode.sh
#!/usr/bin/env sh
set -e

BASEDIR=$(dirname $0)
echo '{"mode": "Debug"}' > $BASEDIR/../device-mode-input.json
cat $BASEDIR/usbguard-policy/debug-rules.conf > /and so on/usbguard/guidelines.conf
systemctl restart usbguard.service
The script to set system to in-service mode: set-in-service-mode.sh
#!/usr/bin/env sh
set -e

BASEDIR=$(dirname $0)
echo '{"mode": "InService"}' > $BASEDIR/../device-mode-input.json
cat $BASEDIR/usbguard-policy/in-service-rules.conf > /and so on/usbguard/guidelines.conf
systemctl restart usbguard.service
Now, every thing has been configured on the system, we are able to run the system shopper by:
cd $WORKDIR/aws-iot-device-client
sudo ./construct/aws-iot-device-client
Step 5: Configure job docs in IoT Jobs
Two job docs must be created in IoT Jobs. set_debug_mode.json and set_in_sevice_mode.json. They’ll set off the set-debug-mode.sh and set_in_sevice_mode.sh handlers that we wrote in Step 4 respectfully.
Instance of set_debug_mode.json:
{
  "_comment": "This pattern JSON file can be utilized for set debug mode.",
  "model": "1.0",
  "steps": [
    {
      "action": {
        "name": "Set Device Mode to Debug",
        "type": "runHandler",
        "input": {
          "handler": "set-debug-mode.sh"
        },
        "runAsUser": "root"
      }
    }
  ]
}
Create an Amazon S3 bucket and add the job docs. In AWS IoT Jobs console, configure the Job templates with the 2 job docs:

Step 6: Create AWS IoT Gadget Administration Fleet Hub software
Comply with the weblog put up Get Began with Fleet Hub for AWS IoT Gadget Administration to arrange Fleet Hub. In your Fleet Hub software, it’s best to be capable of see your system and its mode.

You may as well management to vary the mode by run jobs from the dashboard.

On the system, it’s best to be capable of observe that entry to any USB port is comparable to the foundations you’ve gotten set for the system mode.
Cleansing up
To keep away from incurring future fees, delete all assets that you’ve got created.
The Fleet Hub software could be deleted by first navigating to Fleet Hub within the AWS IoT console after which deciding on purposes. Choose your software and select delete.
AWS IoT Core Fleet indexing could be turned off by navigating to the AWS IoT Core console, deciding on Settings, then navigating to Handle fleet Indexing after which Factor indexing and group indexing.
Within the AWS IoT Core console, delete Issues, Factor teams and Factor sorts below All gadgets. Detach ‘factor’ and IoT coverage from registered certificates. Delete system certificates, ‘factor,’ and IoT coverage.
Conclusion
On this put up, we confirmed you how one can defend Linux-based IoT gadgets and computer systems towards unintended USB entry with USBGuard and securely management USB entry based mostly on the system mode. View and management gadgets’ modes in AWS IoT Gadget Administration Fleet Hub software. The answer is versatile and could be tailored to different use instances. For instance, when the system is in debug mode, seize debug logs and ship them to the cloud for additional examination.
To be taught extra about how one can use AWS IoT Core, you possibly can check with the documentation.
Writer bio

Sharon Li
Sharon Li is a options architect at AWS, based mostly within the Boston, MA space. She works with enterprise prospects serving to them resolve troublesome issues and construct on AWS. Outdoors of labor, she likes to spend time along with her household and discover native eating places.