
This machine can acknowledge gadgets like greens and fruits and assist in segregating them in addition to classify them as per their dimension and different options. It makes use of the sting Impulse ML software that may be deployed on varied platforms and boards, similar to Arduino, ESP32 digital camera, ESPEye, laptop computer, PC, cellphone, Raspberry Pi laptop, and extra. You’ll be able to create the output within the type of a C++ library, which can be utilized virtually wherever.
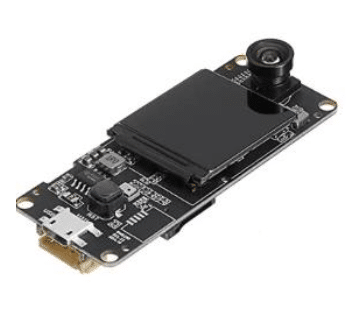
Allow us to say you might want to segregate greens like lemons, onions, and tomatoes, or pens and pencils. You want only a Raspberry Pi board or ESP32 digital camera and some relays to segregate them. Right here, we’re utilizing an ESP32 cam to determine greens, for example.
When the cam detects a tomato, onion, or lemon, as an illustration, the relays will get actuated to open the basket containing the greens.
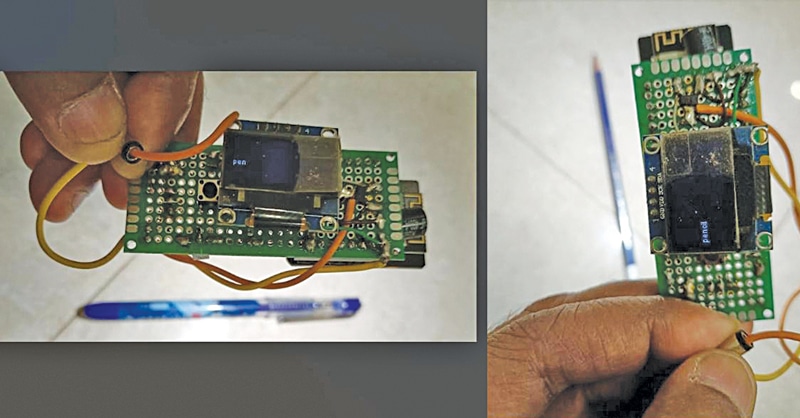
The thing classification machine prototype is proven in Fig. 1. The elements wanted for the challenge are talked about within the desk beneath.
Parts Required
| Invoice of Materials | |
| Parts | Amount |
| ESP32 cam/ESP32 TTT GO (MOD1) | 1 |
| LM117 voltage regulator (MOD3) | 1 |
| 5V with relay | 1 |
| BC547 transistor (T1) | 1 |
| SSD1306 OLED (MOD2) | 1 |
| 100µF capacitor (C1) | 2 |
| Diode (D1) | 1 |
| FTDI USB programmer | 1 |
Organising Edge Impulse and ESP32 Cam
ML Mannequin Preparation
To begin the challenge, open edgeimpulse.com and create a brand new challenge. You need to accumulate pictures of the gadgets to be segregated in teams and as single items from a number of angles for the machine to acknowledge them appropriately, and edge impulse will construct the challenge for you.
To gather footage of the gadgets, join a Raspberry Pi laptop and begin the sting impulse challenge utilizing Raspberry Pi and a cellphone digital camera or a laptop computer digital camera.
Step-by-step Information
The next steps would make the method clear:
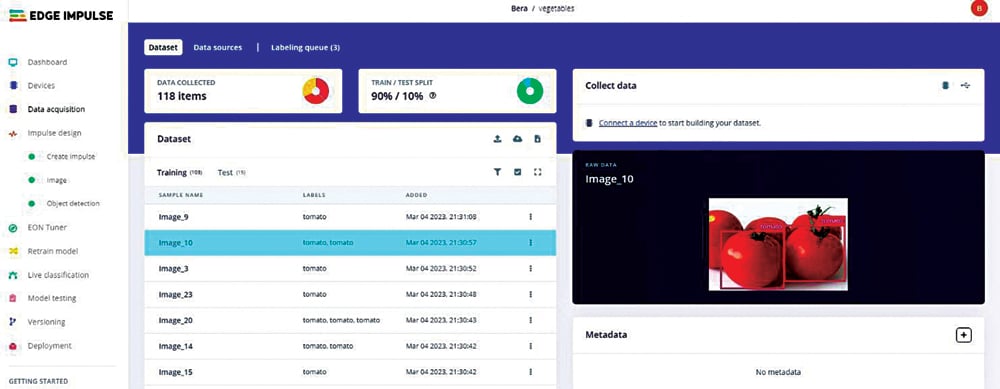
- Collect a considerable quantity of knowledge for the objects from varied angles and combos. Determine 3 illustrates the gathering of such a dataset.
- Log in to edgeimpulse.com, create a brand new challenge, and click on on “Accumulate knowledge” on the prime proper. Then, below “Join a tool to begin constructing your dataset” choose “Knowledge Supply” and configure it to make use of your smartphone or laptop computer digital camera because the supply for capturing the required footage.
- Create the challenge by navigating to Dashboard → Units → Knowledge acquisition (Impulse design → create impulse → picture → object detection). After getting collected a enough variety of footage (e.g., 200) of all of the gadgets you want to segregate, divide them into an 80:20 ratio for coaching and testing. Every picture needs to be labeled with a surrounding field. To expedite the labeling course of, make the most of the “labeling queue” function below “label options” and select “Classify utilizing YOLOv5“.
- For simplicity, novices can stick to the default settings within the “create impulse” and “picture” sections.
- After coaching, examine the “F1 rating” which needs to be 85% or greater. To enhance the rating, you would possibly want to regulate the mannequin or eradicate outlier pictures that might negatively affect the general accuracy.
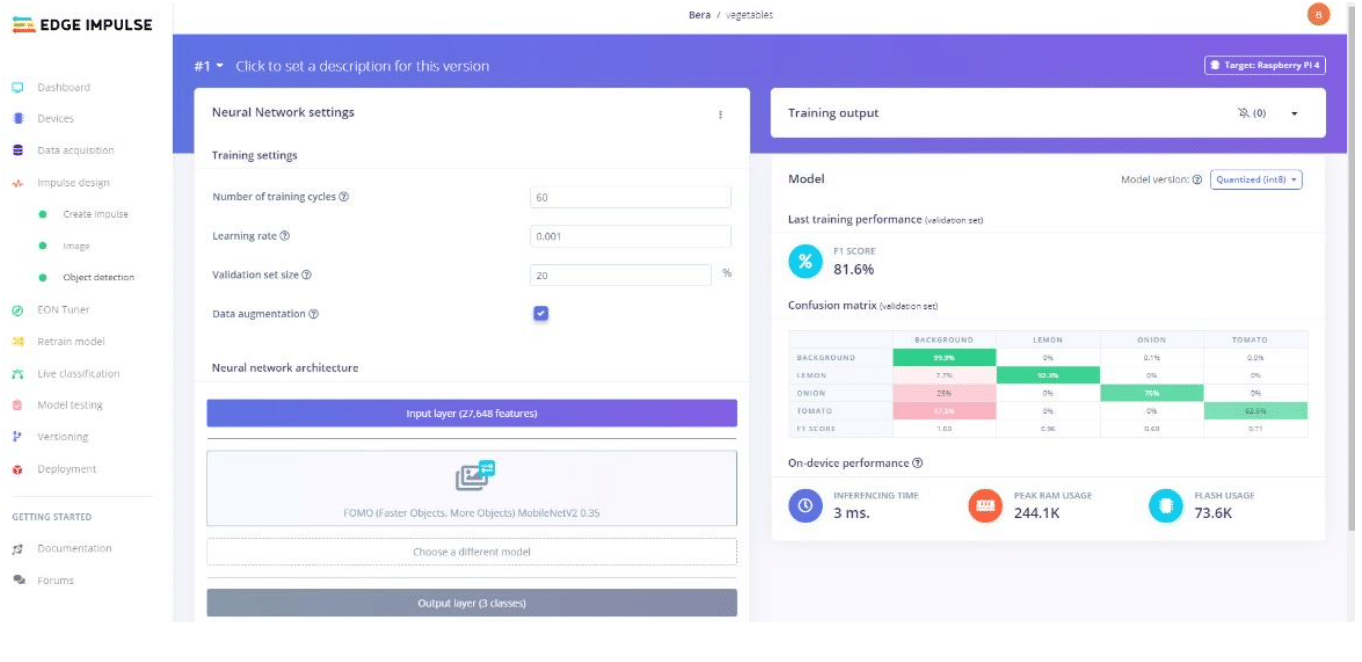
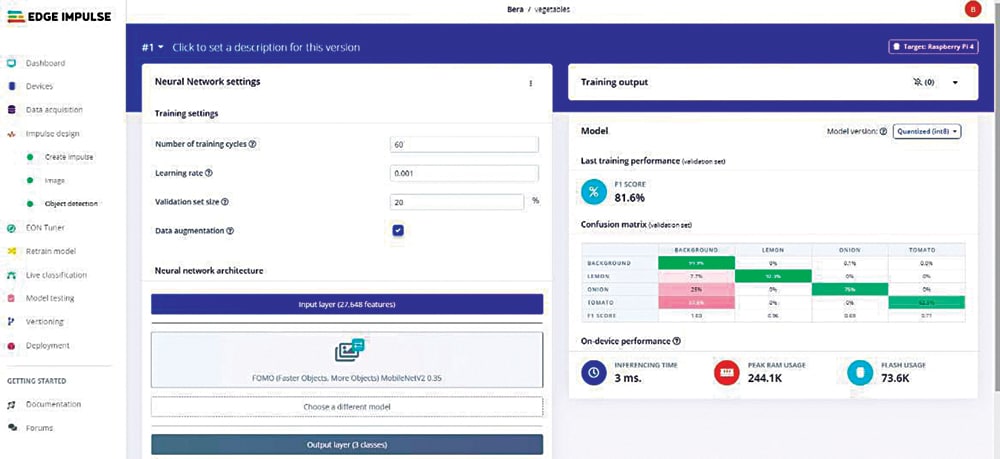
- Within the “Object detection” part, select an appropriate mannequin for classification. YOLO and FOMO are beneficial fashions recognized for his or her ease of use and acceptable efficiency ranges. Choose the specified mannequin and provoke the coaching course of. Please notice that this course of might take a while. Determine 4 showcases the coaching of the ML mannequin.
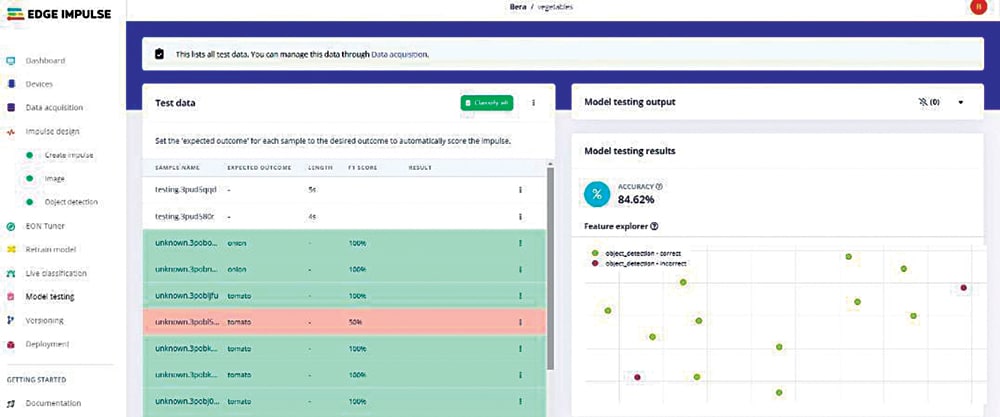
To check the mannequin, make the most of 20% of the beforehand set-aside knowledge. Click on on every picture individually or collectively. The accuracy ought to fall inside an appropriate vary of 81% to 91%. Nevertheless, attaining 100% accuracy will not be superb for the mannequin. In such circumstances, intentional errors may be launched. Determine 5 illustrates the testing of the mannequin.
Deployment of Mannequin
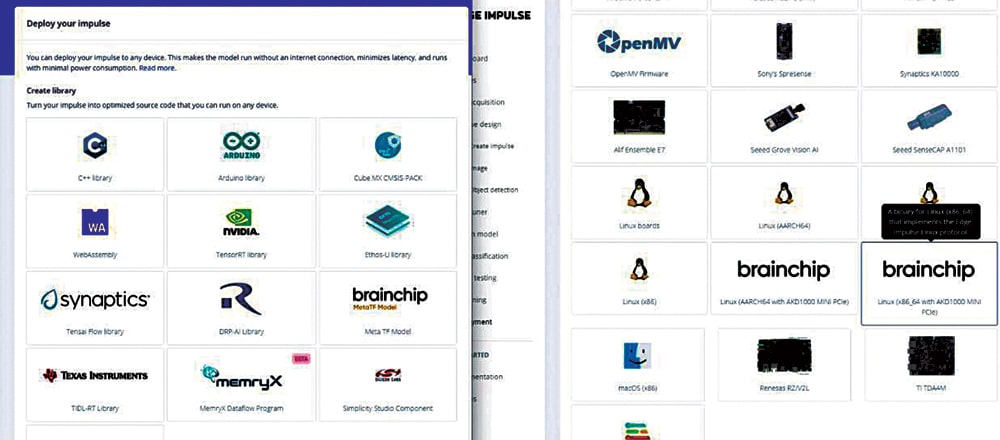
Now after testing the ML mannequin, we will deploy it on many boards. As we’re utilizing ESP32 cam, choose the Arduino IDE. Fig. 5 exhibits the exporting of mannequin code for deployment.
After deciding on the mannequin (Arduino), press ‘Construct’ button on the backside. The Arduino sketch, together with the required library, will probably be downloaded in your native laptop. In Arduino IDE, use this zip file to put in it as a brand new library (Sketch→Embrace library→Add .zip library…).
As soon as the library is put in, go to file→library→discover the most recent
library→examples→esp32_camera →your-sketch-is-here
Importing the Sketch
The mannequin below ESP32 is all set for the ESP-EYE digital camera board. The low-cost ESP32 digital camera out there within the open market is normally the ‘ESP32 AI Thinker cam’ or a bit of costlier ‘ESP32 TTGO T plus digital camera’ mannequin. We’ve set the pin particulars for each of those and inserted these digital camera fashions within the sketch software program. You simply should uncomment the appropriate mannequin and the sketch is all set to get put in.
Gentle is required in the course of the identification course of. The ESP AI Thinker cam has a super-bright LED, which is switched on for additional mild and it helps in simpler detection.
The importing course of takes substantial time, typically 7 to eight minutes. Due to this fact, have endurance whereas importing the sketch.
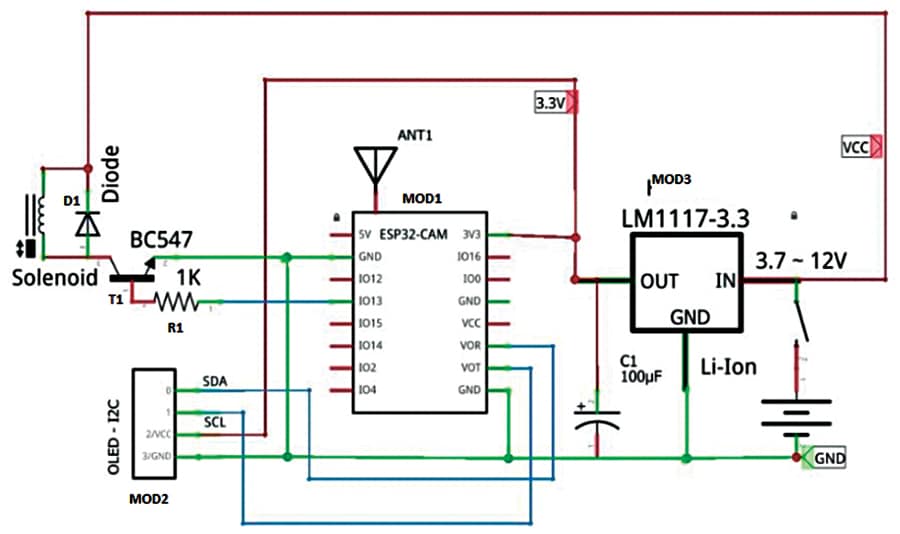
Fig. 6 exhibits the connections required for this vegetable detection challenge. It’s constructed round ESP32 cam (MOD1), SSD1306 OLED (MOD2), LM117 voltage regulator (MOD3), and 5V solenoid with related relays.
The ESP32 cam detects the articles and the output sign at its GPIO13 pin prompts the solenoid. For higher efficiency, it’s possible you’ll use a TTGO T digital camera with ESP32-DOWDQ6 8MB SPRAM OV2640 digital camera module, which has a 3.3cm (1.3-inch) show, Wi-Fi Bluetooth board, and a Fish-eye lens, which has extra RAM. Its digital camera pins are already outlined within the sketch; simply change the digital camera choice and will probably be prepared.
Circuit Diagram and Working
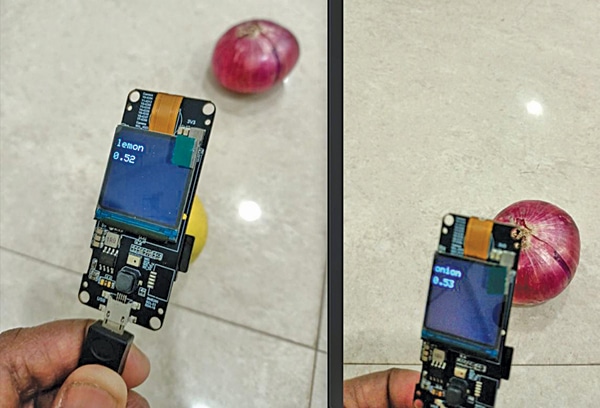
After importing the supply code, join the ESP32 cam as proven in Fig. 7 for the circuit diagram, and in addition the creator’s prototype in Fig. 1. Energy the ESP32 cam and place the greens in entrance of the cam. It can show the outcomes and transfer the relays to type the greens.
The prototype for figuring out greens is proven in Fig. 8. It is a rudimentary challenge, which can want additional refining to make it really helpful in a retailer.
EFY Notice: For programming ESP32, you need to use the FTDI USB programmer. Right here now we have described a challenge primarily based for vegetable detection primarily based on TTGO T plus digital camera. You can also make one other for pens and pencils detection primarily based on an ESP32 digital camera. Each require comparable connections and each challenge information and codes may be downloaded from electronicsforu.com.
Obtain Supply Code
Somnath Bera is an electronics and IoT fanatic working as Common Supervisor at NTPC