
MetalKit is a high-level framework which makes attending to grips with Steel simpler. Here is the best way to get began utilizing Apple’s 3D framework.
Getting began
Steel is Apple’s 3D graphics and sport pipeline to render 3D objects on Apple gadgets. Designed to exchange OpenGL and different 3D frameworks Steel has the benefit of being optimized for Apple {hardware} to realize most efficiency.
Apple offers buttery-smooth 3D rendering on Apple gadgets at efficiency ranges not potential with different 3D frameworks.
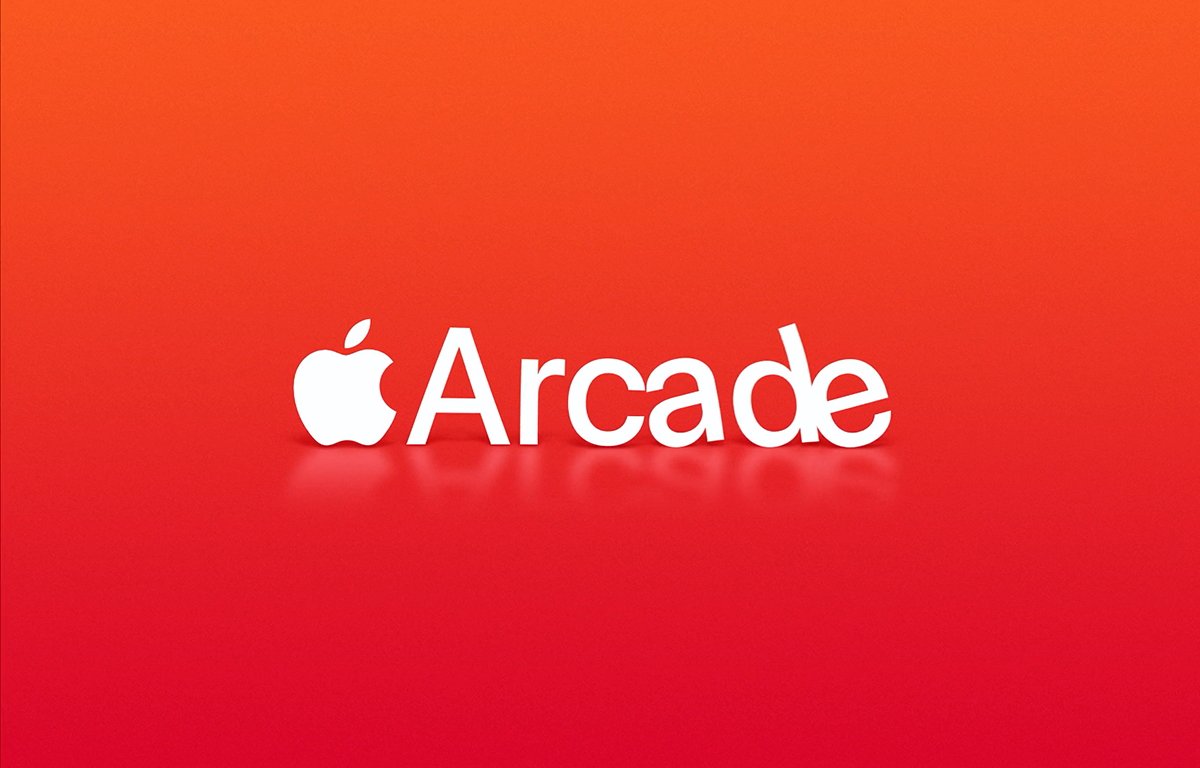
You might have most likely seen an instance of Steel rendering on an iOS or macOS machine in case you’ve subscribed to and run Apple’s Arcade sport app. The transient introduction animation in Arcade is rendered with Steel:
In 2015 at WWDC, Apple launched one other, higher-level framework for Steel known as MetalKit. This framework makes it simpler to make use of Steel by offering some higher-level features which make 3D app improvement easier.
Particularly, MetalKit offers further Steel APIs within the following areas:
Texture loading
Mannequin I/O
View administration
Texture loading
Utilizing MetalKit, asset and texture loading is simpler through the use of the MTKTextureLoader class. This class offers a simple option to load belongings and textures in addition to set texture choices.
These choices embody mipmap utilization and loading, cache and storage modes, texture coordinate transformation, dice texture utilization, and RGB colour choices.
A mipmap (or MIP map) is only a multi-layered picture with every layer being a progressively decrease decision than the previous layer. Mipmaps are used to hurry picture rendering and take away aliasing artifacts comparable to Moire patterns.
A Moire sample is a distracting banding or colour artifact sample that typically seems in laptop graphics consisting of strains or common pixel patterns comparable to alternating pixel grids:
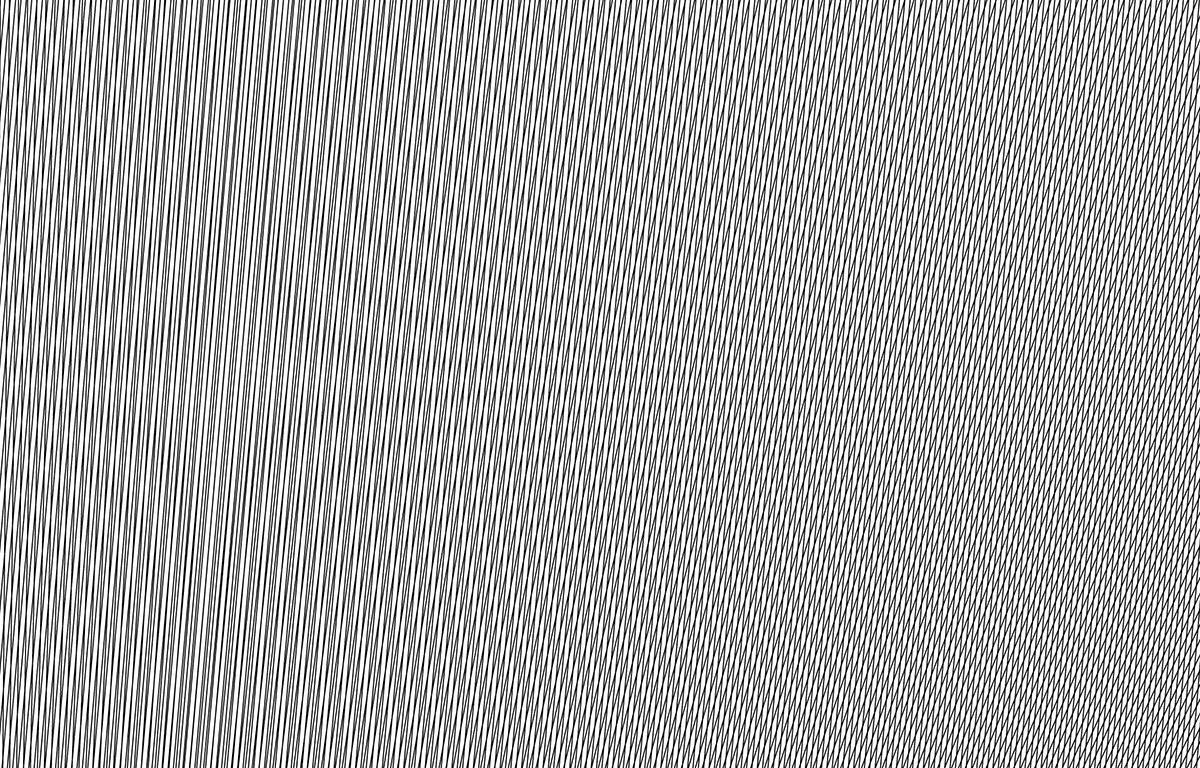
A Moire sample.
Full documentation for MTKTextureLoader is offered on Apple’s developer web site within the Steel framework documentation at Documentation/MetalKit/MTKTextureLoader.
Mannequin I/O
Mannequin I/O is Apple’s developer framework for managing 3D and 2D belongings. MetalKit’s Mannequin I/O integration consists of APIs for rapidly loading textures into Steel buffers and use mesh knowledge utilizing containers.
There are at present a few half-dozen Mannequin I/O-related courses in MetalKit, largely coping with meshes. (We’ll get to courses and object-oriented programming in a minute).
View administration
Most iOS and macOS apps use views – customary courses that current visible info and UI parts on-screen. Completely different view subclasses present several types of views.
For instance, in iOS a UIView is the view base class, however UIButton is a button view class derived from UIView. By utilizing object-oriented view courses in iOS or macOS, you’ll be able to construct further performance which depends on customary performance already outlined by Apple courses.
This is named object inheritance. Consider an object in an app as a bundle of code that encapsulates each code and knowledge that code operates on. By bundling each collectively into objects, code will be simply reused and repurposed by further objects.
Specifically in MetalKit, a brand new class – MTKView – is offered which permits builders to create fully-fledged Steel views in apps. By having a devoted Steel view class, the view will be drawn and managed optimally by Steel with none further code.
Apple’s documentation for MTKView is on the developer web site at Documentation/MetalKit/MTKView. MTKView additionally requires you to first set an MTLDevice in one among its properties to inform it which machine and display to render Steel objects into.
MTKView additionally offers an MTLRenderPassDescriptor when requested which you’ll render your textures into. Take a look at the Documentation/Steel/Render Passes part of Apple’s developer website.
Just a little OOP
In Object-Oriented Programming (OOP), objects are outlined by courses. A category is a definition in a supply code file that defines what an object comprises, and in Swift, the precise implementation of an object.
A category defines strategies (features) that may obtain messages despatched to them by different objects to carry out some operate. Every technique comprises code to carry out some work.
A category additionally defines properties or variables that may include knowledge. Sometimes a category’s strategies carry out some work on the category’s properties. Most, however not all strategies can learn most (however not all) properties contained within the class or in one among its superclasses (mother or father courses).
The entire above is named object encapsulation. Objects encapsulate each knowledge and strategies to maintain the whole lot tidy and arranged. It is simpler to move, reference, copy, and use objects with their related knowledge in a single place than it’s to must maintain observe of the info individually.
Inheritance is an OOP characteristic by which new courses will be outlined from one other class. The derived object is named a subclass and the mother or father class is named the superclass.
Lengthy chains of objects will be outlined by subclassing. Inheritance is highly effective as a result of it lets you reuse present code with nearly no work.
Subclasses inherit all of the conduct and properties of their mother or father courses with nearly no further work. Subclasses can add further strategies solely they (or their subclasses) find out about.
Even higher, once you instantiate (create) an occasion (one copy) of an object in a program it additionally instantiates a replica of all its superclass objects mechanically.
With one line of code, you’ll be able to acquire huge ranges of program performance simply by creating one occasion of a category.
Instantiation is just creating an object, allocating reminiscence for it in RAM, and making it accessible to a program.
All of that is normally outlined in a single or, within the case of Goal-C, two supply code recordsdata – normally one or two recordsdata per class.
So in our dialogue above, an MTKView is outlined as a category (by Apple) and is instantiated when created in code (by you). The result’s an MTKView object in reminiscence, prepared to be used. When the MTKView object is now not wanted, it’s de-allocated which removes it from reminiscence, destroying it.
Most apps are packages that create, use, handle, and destroy lots of of such objects.
The OOP programming paradigm is highly effective as a result of it vastly reduces the quantity of code wanted through subclassing and reuse, and retains packages extra modular and reusable by encapsulating code and knowledge.
As soon as you’ve got written a category to do some particular work, you’ll be able to merely reuse the category or subclass it in one other program to create one other app rapidly.
Like many iOS or macOS customary views, MTKView additionally has a Core Animation Layer. Core Animation is Apple’s high-performance 2D animation framework.
Most views have a CALayer – a Core Animation layer object which may draw and animate 2D graphics. CALayers will be grouped and mixed to create complicated animations.
MTKView has its personal CALayer subclass known as CAMetalLayer which Steel can render into. You’ll be able to mix CAMetalLayer with different CA layers to create mixed 2D and 3D animations.
Normally for each 2D and 3D CALayers, drawing is way sooner and extra environment friendly than the drawing that happens in UIViews. It’s also possible to set the opacity, or alpha of CA layers to make components of them clear.
MTKView modes
MTKView helps three modes of drawing:
Timed
Notifications
Specific
In Timed drawing the view updates at common intervals set internally within the object. Most video games use this mode when a sport scene is rendered or drawn at a particular charge described in frames per second (fps).
With Timed mode, you may as well set or clear the isPaused property to start out and cease the view animation.
In Notification mode, redraw occurs when some a part of the entire view turns into invalidated. This lets you redraw only a portion of the view or layer – which takes much less time and improves sport efficiency.
To drive a redraw utilizing Notification mode merely ship the view object a setNeedsDisplay() message to drive it to redraw. This forces the view to redraw all its subviews by sending them every a setNeedsDisplay() message additionally.
In Specific drawing, you redraw view content material by sending the view object a draw() message instantly. That is usually discouraged until you may have some customized drawing workflow you employ that does one thing outdoors the usual view/subview hierarchy.
It’s also possible to redraw solely components of a view by sending their subviews setNeedsDisplay() message additionally, thereby bypassing the top-level view redraw. Generally, the less objects that get redrawn, the higher the efficiency.
Within the case of an MTKView or a subclass thereof, in your drawing technique, you acquire an MTLRenderPassDescriptor from the view, render into it, then current the ensuing drawable for show.
A drawable is any Steel object which has been encoded and is able to be displayed.
MTKViewDelegate
In Apple’s Swift and Goal-C programming languages, a delegate is an object that performs some work on behalf of one other object.
Often, one object will declare a delegate object as one among its properties, and the delegate declares which strategies (features) it offers.
Delegates are highly effective as a result of you’ll be able to change the conduct of an object just by altering its delegate property. Delegates are additionally used to offer further performance to things with out having to subclass an object to create one other object.
MTKView has its personal delegate object known as MTKViewDelegate class additionally described in Apple’s documentation. MTKViewDelegate largely responds to view redraw and resize occasions.
MTKViewDelegate additionally inherits from a typical Goal-C protocol widespread to all Apple objects known as NSObjectProtocol.
Consider delegates and protocols as further objects and strategies which will be hooked up to or “glued” onto different objects.
In Goal-C and Swift, a protocol is just a listing of further strategies a category should implement. The contents of every technique in a protocol are as much as every class to outline.
The MTKViewDelegate is generally involved with altering a view’s structure (on machine rotation, for instance), and drawing.
For instance, you possibly can outline a number of MTKViewDelegate objects, every with a special conduct, then change your MTKView‘s drawing or rotation conduct just by resetting its delegate property to any one of many delegate objects at will and redrawing.
Rendering
When utilizing MTKView, implement the strategies of the MTKViewDelegate in your renderer. This permits your renderer to work together with the MTKView and supply drawing and structure modifications.
You’ll be able to acquire information when it’s time to render every body through the use of the MTKView’s currentRenderPassDescriptor property. This lets you work together with every body to be rendered.
if let onscreenDescriptor = view.currentRenderPassDescriptor
This will get the MTKView‘s present render cross descriptor and shops it in a variable known as onscreenDescriptor.
After rendering, it’s essential to use the drawable to replace the view’s contents. To take action name the current(_:) technique on the MTLCommandBuffer object, then ship the commit() message and the command buffer to the GPU for show.
There is a extra detailed dialogue of this course of within the MTKView‘s documentation.
SIMD
Apple additionally has a math-related framework known as SIMD which is useful when manipulating 3D and 2D objects and performing calculations on them and matrices. Most of those features are used to carry out quick, environment friendly floating level math prevalent in 3D calculations.
SIMD can turn out to be useful when that you must rework 3D objects and vertices on objects. The most typical and helpful knowledge construction in SIMD is simd_float4x4, which is a four-by-four matrix of single-precision floating values.
Tying all of it collectively in Xcode
Armed with all this background data, you are now able to create a MetalKit app in Xcode. Within the following instance, we’ll assume you will be making a easy 3D app containing a single scene that comprises a single Steel 3D object.
To put in writing an Xcode MetalKit app you will should be accustomed to Apple’s Swift and Goal-C programming languages, and a bit of little bit of ANSI-C – an earlier C-only language invented at Bell Labs in 1972 when UNIX was created.
To get began open Xcode, and choose File->New Challenge from the File menu. From the undertaking template chooser, select iOS or macOS on the prime, then select Sport from the icons beneath and click on Subsequent:
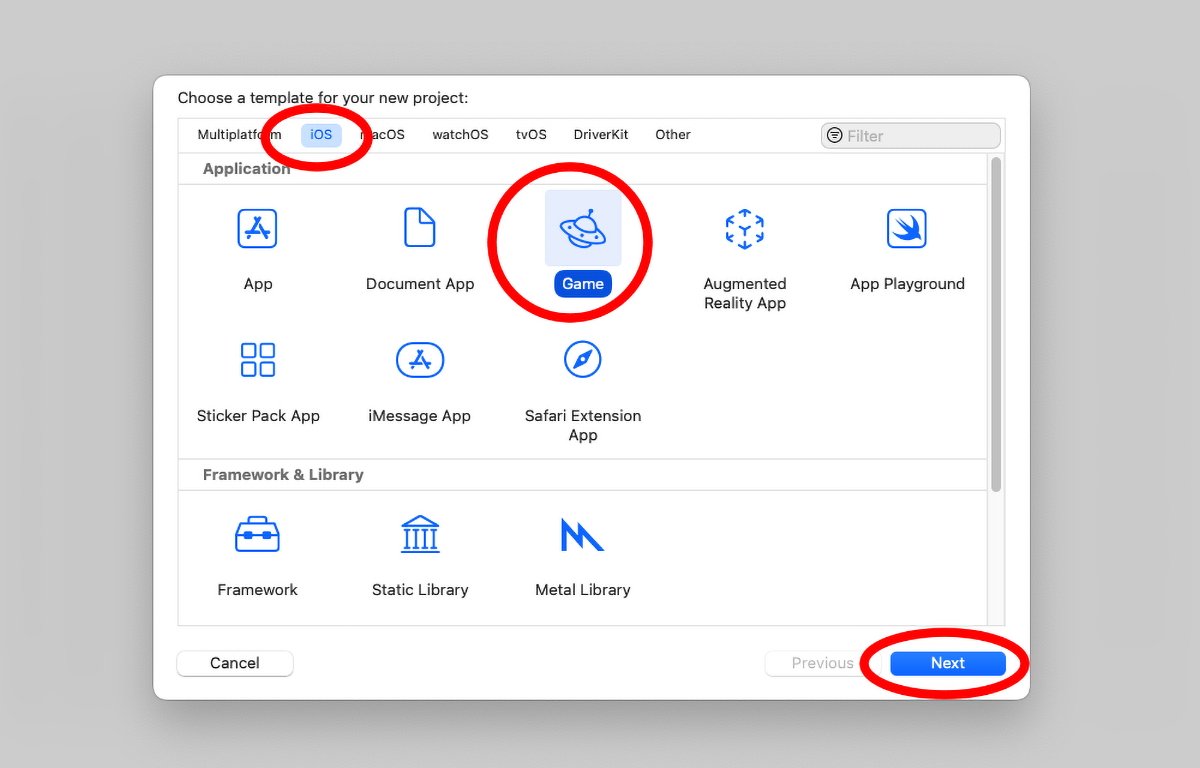
Selected the “Sport” template.
On the following pane enter an app identify, bundle ID, and group information and choose Swift and Steel from the 2 decrease popup menus:

Enter undertaking particulars.
Click on Subsequent and save your new Xcode undertaking to disk.
You will additionally must outline a texture picture to your 3D object as a .png file and add it to your Xcode undertaking. This texture file will get “wrapped” onto your 3D object at render time.
Xcode’s Steel sport template app offers the minimal default template supply recordsdata you will want to your app, however first, you will want so as to add the Steel frameworks to inform Xcode to hyperlink these frameworks to your app at runtime.
To take action, within the Xcode undertaking editor choose the identify of your undertaking by choosing the undertaking icon within the higher left nook of the undertaking window, then choose the goal identify to the best of that below the Targets part:
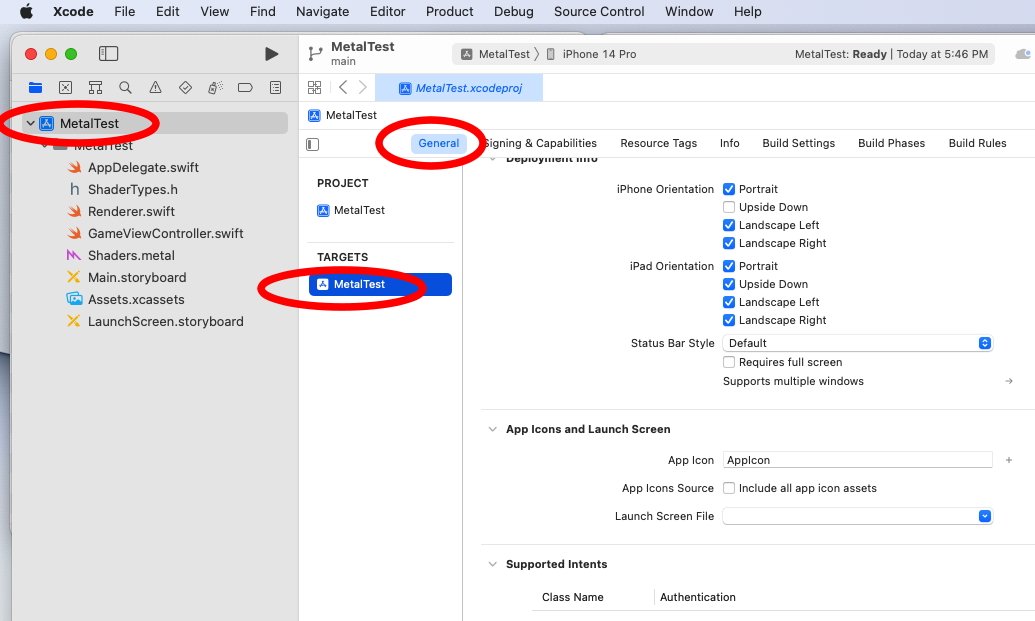
Choose the goal.
Scroll to the underside of the window and below the “Frameworks, Libraries, and Embedded Content material” part, click on the “+” button. The framework choice pane will seem.
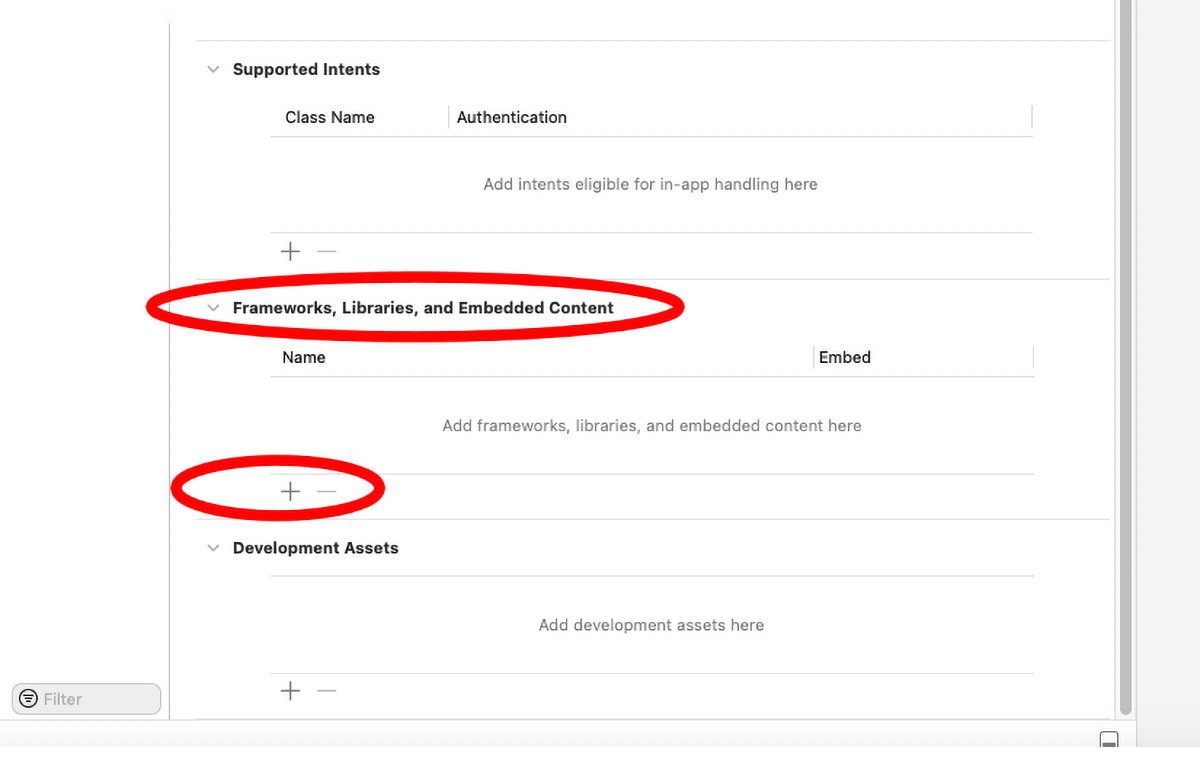
Click on the “+” button.
Kind “metallic” within the search field on the prime, and Command-click on six of the seven frameworks listed, excluding the “MetalFX.framework”. There are lots of of Xcode frameworks accessible.
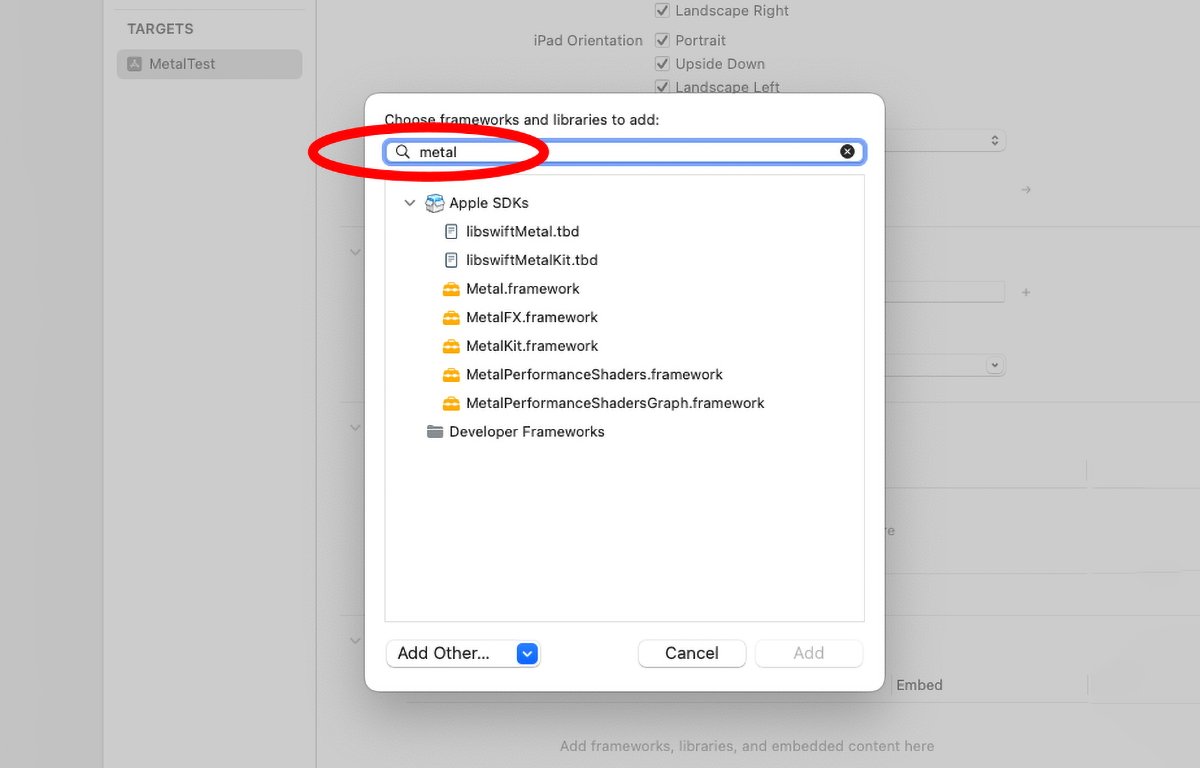
Add framework sheet.
You will additionally wish to add the libswiftsimd.tbd library, Core Providers frameworks, and optionally the Speed up framework.
“tbd” is a placeholder for “To be decided” because the model numbers of the particular code libraries can change. Together with a .tbd library in Xcode tells Xcode to make use of the most up-to-date model of that library.
If you wish to use Mannequin I/O to handle belongings, additionally add “libswiftModelIO.tbd” and “ModelIO.framework”.
When you created an iOS app within the template chooser, additionally add UIKit.framework. When you created a macOS app within the template chooser, additionally add Cocoa.framework.
Lastly, embody the Basis.framework and CoreFoundation.framework. Basis is a core C-language framework that almost all iOS and macOS apps use. All Basis API calls are in plain C.
Shaders
Full code for a Steel sport app is past the scope of this text so we’ll briefly cowl simply the fundamentals right here for our one-object instance. Apple’s pattern undertaking template creates a single 3D dice that rotates in house.
Xcode creates an app delegate file that controls the final occasion loop of the app itself, and a ShaderTypes.h file which is a header file defining the shader’s mesh and vertex information together with a C struct defining the projection matrix and mannequin view matrix.
These are utilized by the shader when drawing.
The “Shaders.metallic” file imports the “ShaderTypes.h” header file outlined above which is shared between the renderer and the GameViewController.swift file which we’ll get it in a second. You import header recordsdata into different Swift or Goal-C supply code recordsdata utilizing the import preprocessor directive:
Preprocessor directives are compiler directions that run prior to precise compilation and normally start with a “#” signal.
“Shaders.metallic” additionally imports two different recordsdata, metal_stdlib and simd.h utilizing the sooner ANSI-C import directive #embody. Each #import and #embody are related and we can’t get into the detailed variations between the 2 right here.
Under that you will see this line:
Namespaces are a C++ idiom that enables related or an identical sections of code to be outlined and remoted by defining them below a namespace. Every namespace has its personal identify, on this case metallic.
In Shaders.metallic you outline a Vertex and ColorInOut construction, and a number of other features which outline the shaders – on this case solely a vertex shader and fragment shader. The fragment shader additionally comprises a sampler variable which lets you outline and use mipmaps if you want.
The fragmentShader operate takes as its arguments colour info, a Uniforms construction outlined in SharderTypes.h, and a texture2d as outlined within the Steel library header “metal_texture”.
The Uniforms parameter comprises, as beforehand mentioned, the projection matrix and the mannequin view matrix.
Renderer
The subsequent file, Renderer.swift defines the item’s Renderer class which inherits from the bottom Goal-C class, NSObject and conforms to the MTKViewDelegate protocol.
As a little bit of a historic be aware, NSObject harkens all the way in which again to the NeXT Laptop days – Steve Jobs‘ second firm after he was fired from Apple in 1985. NeXT invented Goal-C and had an OS and framework known as NeXTStep. The “NS” in NSObject stands for “NeXTStep”.
Most early NeXTStep objects had the prefix “NS” to distinguish them from third-party objects. When Apple purchased NeXT Laptop Inc. in 1997 it acquired all of NeXT’s expertise, together with NeXTStep.
To at the present time macOS and iOS are primarily based on NeXTStep.
Properties of the Renderer class embody a MTLDevice, MTLCommandQueue, MTLBuffer, MTLRenderPipelineState, MTLDepthStencilState, and MTLTexture in addition to properties for the matrices, rotation, mesh, and a semaphore.
A semaphore is a thread (path of execution) that depends on a flag to inform it when it may possibly run and when it may possibly’t.
Once you instantiate a Render object, you cross it an MTKView in its init technique, which we’ll get to in a second.
As quickly as the item is created, its init technique runs, and all of the code in that technique runs.
The init technique units up and assigns all its properties on the prime of the tactic, then creates a render buffer through the self.machine.makeBuffer() line.
Then it units a couple of properties on the metalKitView handed in to the init technique, creates a vertex descriptor through Renderer.buildMetalVertexDescriptor(), after which builds the render pipeline through Renderer.buildRenderPipelineWithDevice().
Subsequent, the code creates depth and stencil information, after which creates a mesh through Renderer.buildMesh.
Lastly, it builds a colour map and texture through Renderer.loadTexture().
You will want to make use of the Renderer’s texture loader technique, loadTexture:machine:textureName: to load your texture from the .png file you created above – passing the tactic your texture’s filename – on this instance "ColorMap".
The do/catch Swift assemble is for error dealing with. The code contained in do is tried and if it fails, the catch block is run, else program execution continues usually.
The superclass’s init() technique
Lastly on the finish of the Renderer’s init technique the superclass’s init technique is run:
Sending the tremendous.init() message to the superclass on the finish of a Swift class’s init technique ensures your complete chain of objects within the class hierarchy will get created. It is a customary sample in Swift and Goal-C.
When you fail to name a superclass’s init technique, it is extremely possible the item will crash, or at finest not operate correctly – or your app itself will crash.
Since subclasses depend on superclass strategies whereas operating, if the superclass object does not exist, a subclass’s technique name could also be despatched off into random reminiscence house the place the code it’s anticipating does not exist.
When that occurs and the processor tries to execute the code at that reminiscence location, a crash is for certain – there is not any code there to run.
tremendous.init() is normally known as final in Swift and Goal-C with a view to give your object time to do any setup it wants earlier than the superclass object is about up.
Lastly, the Renderer’s init technique ends with the closing “}” brace.
Renderer strategies
Instantly after the init() technique in Renderer.swift are the precise implementations of the opposite strategies within the Renderer class. Every Swift operate is prefixed with class func adopted by the operate identify, and any operate parameters in parenthesis.
If a Swift technique returns a worth upon completion, that return worth kind is outlined by the -> assemble. For instance:
class func buildMetalVertexDescriptor() -> MTLVertexDescriptor defines a technique (operate) named buildMetalVertexDescriptor which returns a MTLVertexDescriptor on profitable completion. That is known as the return worth or return kind.
As we noticed beforehand the buildMetalVertexDescriptor technique is named internally on object instantiation from the init()technique. Many objects work this manner.
However most strategies may also be known as from exterior objects until a category definition explicitly prohibits it.
Sport loop
The Renderer sport loop drives most Steel video games, together with the Renderer and MTKView’s draw strategies. This mixed with the primary occasion loop monitored within the utility delegate object drives the app as it’s operating on a tool.
Within the Render.swift file you will discover a technique named non-public func updateGameState() this technique will be run periodically to replace any state saved within the sport comparable to object positions, mouse, keyboard, or sport controller inputs, place, timing, scores, and so forth.
The Swift key phrase non-public means this technique is non-public to and may solely be known as from this object and any extensions outlined on this supply file solely – exterior objects cannot ship that message to the Renderer object.
This extra entry management ensures appropriate program execution solely from inside and by sure objects – on this case for the reason that Renderer is answerable for the final execution and management of the sport, you would not need any exterior object interfering with it.
Apple has a complete object Entry Management part within the Swift developer documentation on the Swift Documentation web site.
Body rendering
Subsequent in Renderer.swift, we see the draw() technique:
func draw(in view: MTKView)
You cross within the MTKView you need the drawing accomplished into. Word this operate has no return worth. Such features in Swift and Goal-C are known as void features.
Within the draw() technique, which will get known as as soon as per body, the semaphore is informed to attend for a sure period of time:
Then the command buffer is created and despatched to the semaphore for rendering, including a completion handler.
A completion handler is a operate that will get run mechanically when another duties or thread finishes. Completion handlers are a manner of executing code in a sequential method however solely when another part of code finishes.
Completion handlers present assured execution of code, however with out having to jot down code to handle complicated timer algorithms and wait circumstances.
Subsequent, the 3D object buffers and sport state are up to date in that order:
self.updateDynamicBufferState()
Subsequent, a render cross descriptor is obtained from the MTKView and the render cross encoder properties are up to date:
let renderPassDescriptor = view.currentRenderPassDescriptor
Then a brief loop runs to get the mesh vertex descriptor layouts and buffers and retailer them within the render encoder. Then the render encoder’s fragment texture information is about:
renderEncoder.setFragmentTexture(colorMap, index: TextureIndex.colour.rawValue)
Subsequent, for every mesh (object) within the .submeshes array, renderEncoder.drawIndexedPrimitives() is named. That is the place every object within the scene is encoded.
To finish the encoding section renderEncoder.endEncoding() is named. The objects at the moment are all able to be drawn.
The view’s drawable is then obtained through:
if let drawable = view.currentDrawable
and if profitable, your complete command buffer is then drawn with:
The decision to commit truly sends the scene’s body to the GPU for show onscreen.
The entire above occurs at thirty, sixty, or one-hundred twenty fps.
The Renderer.swift file ends with a couple of normal 3D math transformations and rotation features.
Displaying the scene in a view onscreen
You’ll discover two further recordsdata within the Xcode undertaking: GameViewController.swift and Foremost.storyboard. These are typical recordsdata present in most iOS apps.
A typical iOS app comprises a central top-level UIViewController class outlined within the UIKIt framework. A UIViewController is a category that manages and controls one other UIKIt class – UIView.
A UIView class is a category that comprises different UIView subclasses comparable to buttons, photos, textual content, and different UIKIt objects. UIView is how an iOS app’s consumer interface is represented onscreen.
Each UIViewController class has a property named view which is an occasion of UIView. The view controller manages the UIView.
When you have a look at Apple’s documentation for UIViewController, you will discover a half dozen strategies for managing the view – particularly strategies for loading the view, being notified when the view masses, and unloading views.
In most iOS apps, you do not load the top-level view instantly – you load it by instantiating a UIViewController subclass you outline (on this instance a GameViewController). The consumer interface a part of the view is created in Xcode’s Interface Builder editor, or through a text-only SwiftUI view.
Sometimes when creating an iOS app, you lay out every view in Interface Builder by dragging visible parts from the Xcode library and dropping them right into a view controller object onscreen.
As soon as your UI objects are all laid out onscreen you join them to a view controller’s properties through a Management-click and drag from every UI aspect to the view controller’s first responder. A primary responder is the primary object in a view controller object hierarchy that’s able to responding to that object’s messages.
Once you launch the mouse button out of your Management-click and drag above, Xcode shows a listing of obtainable object properties to attach the item to.
That is it – you usually do not must do any coding for every UI aspect – when the view controller will get instantiated and loaded into reminiscence, the Swift or Goal-C runtime makes all of the UI connections for you mechanically.
This vastly simplifies utility improvement.
Storyboards and Segues
Storyboard recordsdata had been later added to Xcode to simplify UI structure even additional: with Storyboards you outline Segues between view transitions – when customers navigate between every view on the machine, the Segue operate you point out will get known as the place you’ll be able to then do any preliminary view setup or cleanup.
Segues eradicate most view-loading code.
viewDidLoad()
In any case when a view controller finishes loading a view, the controller’s viewDidLoad() technique will get known as. It is in viewDidLoad() that you just do any further view setup you want. As soon as viewDidLoad() exits, the view is able to use and is displayed onscreen to the consumer.
You’ll be able to subclass each UIViewController and UIView to make your views extremely customizable. The one factor to recollect is that almost all UI parts in iOS are saved as properties in a UIViewController subclass.
It’s potential to create views and examine controllers solely in code with no Storyboard or Interface Builder, however doing so is rather more complicated and time-consuming.
GameViewController.swift
Let’s check out GameViewController.swift
The category is outlined on the prime of the file:
class GameViewController: UIViewController
This implies GameViewController is a subclass of UIViewController.
The category definition is contained in matching open and closed brackets (“{“, and “}”).
Word that the GameViewController class may be very brief – simply over a web page. A lot of the sport processing work occurs within the shaders and renderers.
Subsequent, we see two Swift properties as outlined by the var key phrase:
Subsequent we see that GameViewController overrides the UIViewController technique viewDidLoad() utilizing the Swift override key phrase:
override func viewDidLoad()
Which means that when the view controller masses the view and sends the viewDidLoad() message, the GameViewController model of the tactic can be run as an alternative of the UIViewController model. It is a good instance of inheritance in motion: you’ll be able to select to let a superclass’s technique run, or override it in a subclass and use that technique as an alternative.
Word that to ensure that this to work, the declarations of each strategies in each courses have to be an identical.
The very first thing the override func viewDidLoad() does is ship the superclass (UIViewController) a viewDidLoad() message. This permits the UIViewController to do any UI view structure initialization it must do.
With out this “tremendous” name the view will not work accurately as a result of a few of its inner components will not ever get initialized.
Subsequent, the GameViewController object masses the MTKView and shops it in its inner property mtkView:
guard let mtkView = view as? MTKView else
guard is just a Swift conditional take a look at to see if one thing succeeded – just like if.
GameViewController then additionally shops a reference to the machine’s Steel machine in its inner defaultDevice property.
guard let defaultDevice = MTLCreateSystemDefaultDevice() else
The necessary factor to know right here is that the 2 inner properties or variables:
retailer references to different objects in reminiscence – on this case the renderer and the Steel view. As soon as saved, the GameViewController object can entry these objects at will. This sample is how most objects work in Swift and Goal-C.
In Goal-C these two properties would have been declared as:
Renderer *renderer = nil;
nil is an Goal-C placeholder which suggests “nothing” or extra particularly no tackle in reminiscence. nil is used to point an Goal-C property or variable does not include something.
The '*' is a typical indicator for a C or Goal-C pointer – a variable that holds a reminiscence tackle to an object as an alternative of a worth. Pointers are complicated topic so we can’t get into them right here.
Additionally be aware that Goal-C and C code strains should finish with a ';' (semicolon). This is not elective – with out the semicolon, the code will not compile and you will get an error.
Swift dropped semicolons (however you’ll be able to truly nonetheless use them in order for you).
Subsequent the GameViewController shops extra references to different objects however this time contained in the mtkView property object:
mtkView.machine = defaultDevice
mtkView.backgroundColor = UIColor.black
This implies retailer the default rendering machine within the mtkView.machine property, and retailer a black UIColor within the tkView.backgroundColor.
UIColor is a typical UIKit object to point colour – on this case set to black, which can be used because the scene’s background colour. Each UIColor object has a .backgroundColor property.
Word what you are truly doing right here is storing references to things in properties that are themselves properties of this class’s properties. That is complicated at first however when you get the cling of it it is easy to know.
By chaining properties throughout objects, you are actually simply Dasiy-chaining objects collectively.
You’ll be able to have properties pointing to properties, pointing to different objects. There’s theoretically no restrict on how deep property references can go.
Earlier than you launch (destroy) an object you must set all its properties to nil within the class’s deinit() technique to make sure all references to different objects get launched. Failure to take action may end up in reminiscence leaks and undesirable retain cycles.
In Goal-C deinit() is named dealloc.
Persevering with, the Renderer object is created, passing within the MTKView object and a reference (pointer) to the Renderer is saved within the view controller’s renderer property:
guard let newRenderer = Renderer(metalKitView: mtkView) else
First, you create the item, then you definately retailer a reference to it in a property.
Then the renderer’s pointer to the MTKView is distributed the drawableSizeWillChange message:
renderer.mtkView(mtkView, drawableSizeWillChange: mtkView.drawableSize)
This lets the renderer know what the view’s present drawable dimension is so it is aware of how and the place to scale the scene when it will get despatched to the GPU. Word that the drawable dimension is saved within the MTKView already in its .drawableSize property.
This demonstrates you can cross an object’s properties to strategies as parameters.
Lastly, the view’s delegate is about to the renderer itself:
mtkView.delegate = renderer
Recall that within the Renderer.swft file the Renderer class is said as conforming to the MTKViewDelegate protocol:
class Renderer: NSObject, MTKViewDelegate
That is what permits the mtkView.delegate property to be set to a Renderer object. With out the MTKViewDelegate protocol conformance within the Renderer class definition, the mtkView.delegate = renderer line would possible throw a warning or error when compiled saying that the renderer property does not conform to the MTKViewDelegate protocol.
Additionally be aware that one essential gotcha for newcomers to Xcode is that earlier than you destroy a view controller object it’s essential to first set its .delegate property to nil. Failure to take action will assure your app will crash.
This in reality applies to any Swift or Goal-C object which comprises delegates – not simply to view controllers.
Why? As a result of in case you do not launch the reference saved within the delegate property first, between the time the containing object truly disappears from reminiscence and the time the system realizes the item has been destroyed, some different object might have despatched the delegate object one other message.
Not realizing the item which contained the delegate property now not exists, the message despatched to the delegate should be ready to be processed – and when it does get processed the delegate is now invalid as a result of its containing object now not exists.
The delegate will get left dangling in reminiscence however its containing object is lengthy gone – and the system thus has no option to find the delegate object the message is sure for.
Sending a message to nil in Swift and Goal-C will not have any dangerous results, and is legitimate, however sending a message to an tackle in reminiscence the place an object is meant to be however is not will certainly trigger a crash.
Run the app
Now you are lastly able to run the Steel pattern app.
Click on the Play button on the prime of the Xcode window and the code will compile. If there aren’t any errors and the whole lot works, Xcode will launch the iOS Simulator and run the app in it:
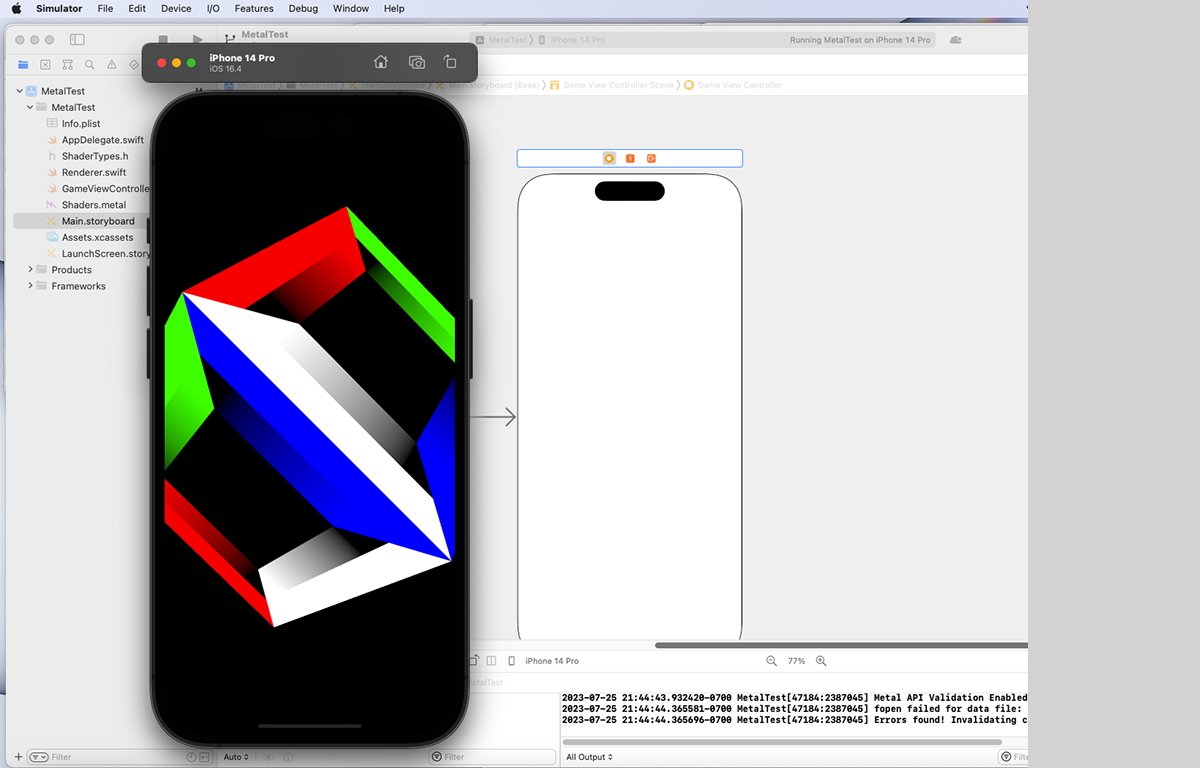
Pattern app operating in iOS Simulator.
Word some, however not all, Steel code will not run within the simulator. You will must run these Steel packages on an actual iOS machine as an alternative.
Last Interface Builder suggestions
As one final have a look at the pattern undertaking, we have to go over a couple of objects in Interface Builder.
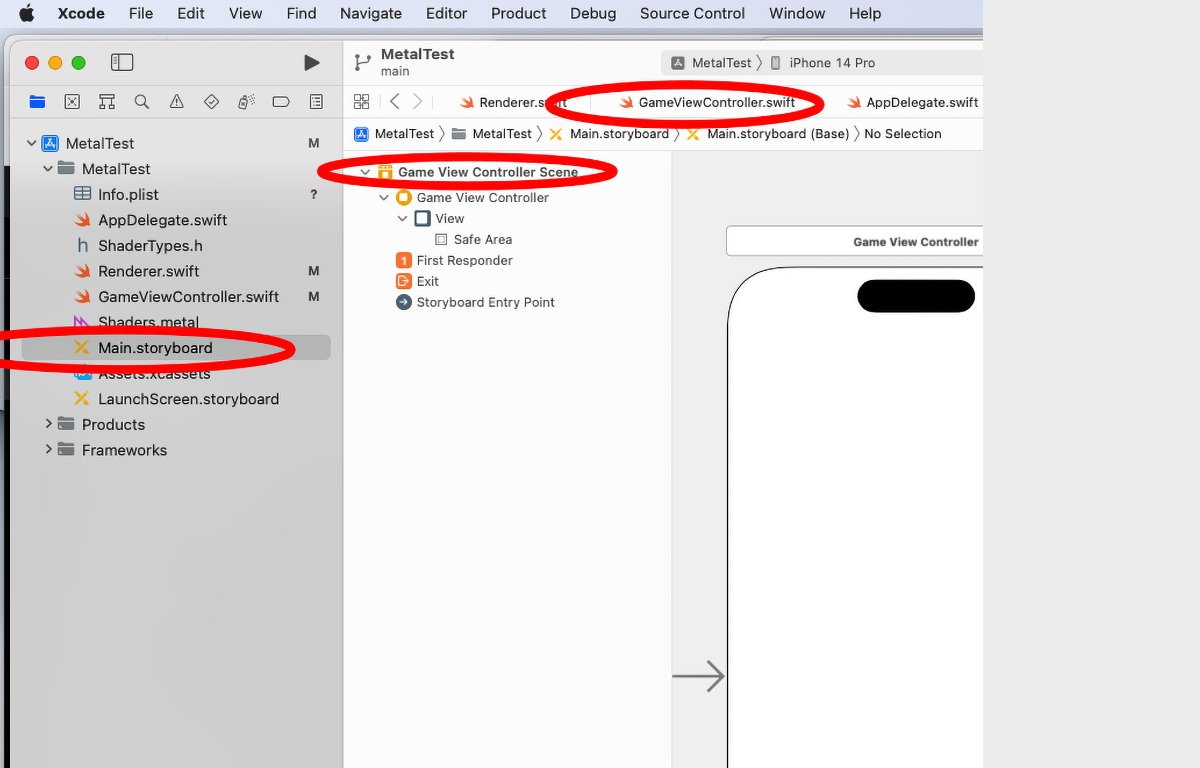
Choose the Foremost.storyboard file in Xcode.
If you’re new to Xcode and Interface Builder, be aware that one essential facet of iOS improvement most newcomers overlook is that of sophistication names. The category names every merchandise has in Xcode should match precisely every class identify as outlined within the supply code recordsdata.
If they do not, your app will not work.
For instance, the view controller should have its class identify set within the Customized Class area in Xcode’s object information panel on the best aspect. To take action it’s important to click on the Storyboard or .nib (Interface Builder) file, then click on the category identify within the Scene or view hierarchy, then confirm or set the category identify within the inspector on the best:
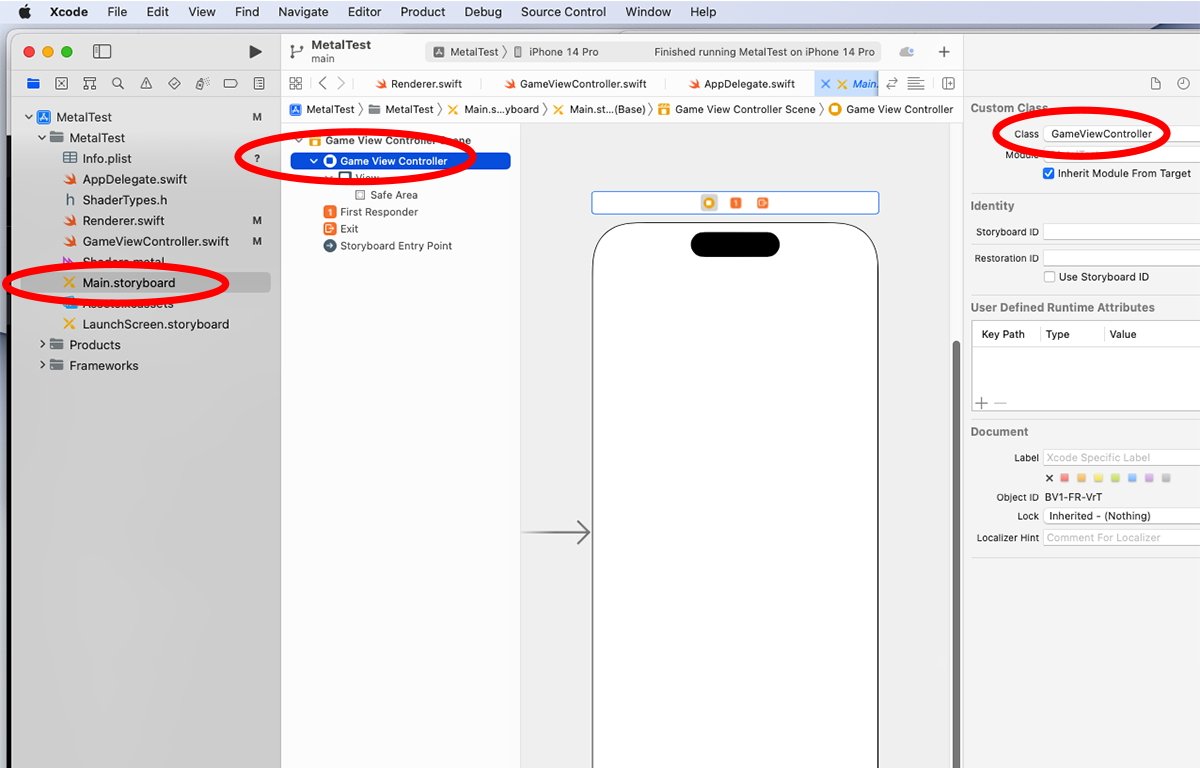
Be sure class names are set within the Storyboard file.
The identical holds true for Views and their class names, and different objects comparable to delegate properties. Failure to set even one class identify or property could cause an app to not work.
Most of those normally get set in template recordsdata created by Xcode, however it does not damage to test.
One factor that oddly does not get set in Xcode template recordsdata are the connections between view controllers and their View properties. You need to make these connections manually or else your app will not work.
For instance in our pattern undertaking, in case you Management-click on the Sport View Controller object within the view hierarchy you will discover that the View property is about to nil. You will want to attach the View to the Sport View Controller by Management-clicking after which dragging from the Sport View Controller to the View within the hierarchy.
Once you do, the “Retailers” panel will seem and that you must hook up with the “view” property to the Sport View Controller object manually:
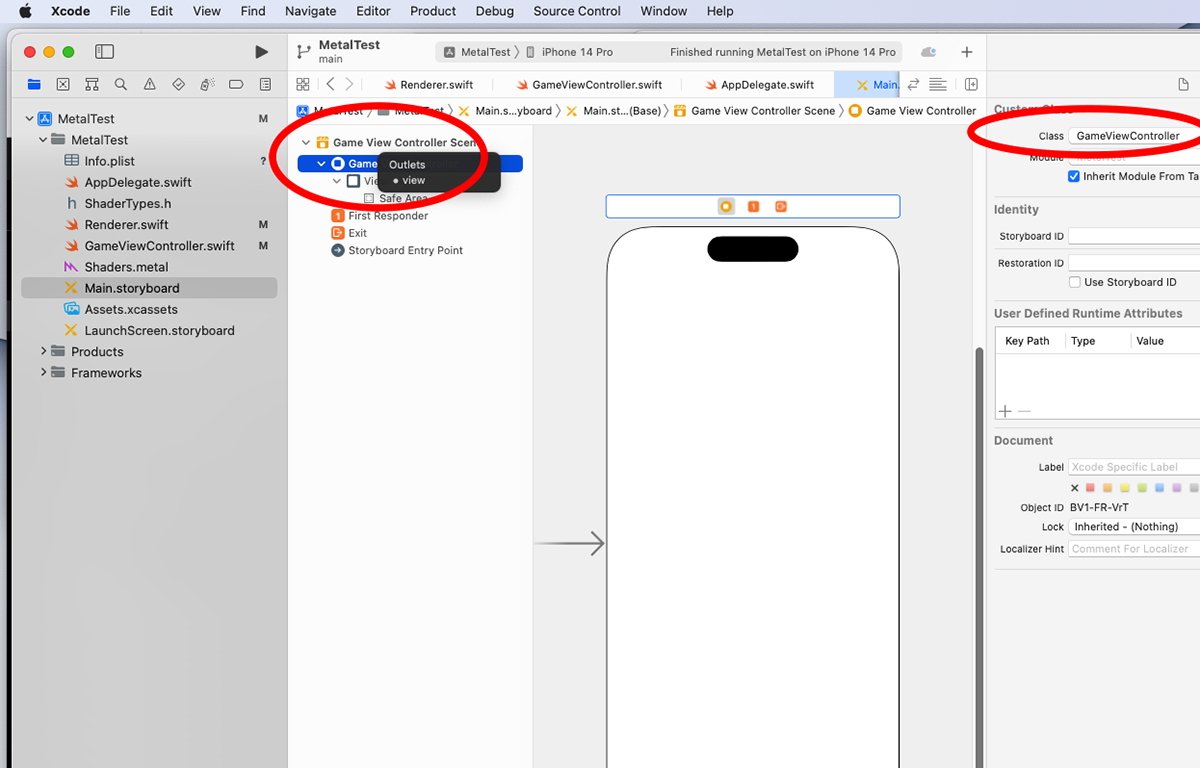
Join the view controller and examine through the Retailers pane.
With out this connection, the app will not work. And the pattern template recordsdata created by Xcode do not make this connection for you by default.
Word that the small dot subsequent to outlet names within the Outlet panel signifies whether or not any given outlet is linked or not.
You could have additionally observed that the AppDelegate.swift file comprises a subclass of AppDelegate which comprises empty boilerplate code however there aren’t any references to the GameViewController wherever within the app delegate file.
So how does the GameViewController get loaded when the app runs?
The reply is the Storyboard file defines the preliminary view controller and masses it mechanically for you when the app first runs. When you had been utilizing older .nib-style (Interface Builder) recordsdata and code to load the preliminary view controller, your app as an alternative would have manually created and loaded a GameViewController object occasion the AppDelegate’s utility:didFinishLaunchingWithOptions technique.
As soon as the view controller then loaded the view, you’d get the viewDidLoad() message on the app delegate in case you set the AppDelegate because the view controller’s delegate.
Extra assets
Along with Apple’s on-line MetalKit and Steel documentation, there are a selection of different good Steel assets you could wish to try.
Make sure you try metalkit.org and metalbyexample.com which have numerous nice tutorials on MetalKit and Steel itself.
This has been an extended tutorial, however now you must have a a lot larger understanding of how Steel apps work and the best way to use MetalKit in your apps to simply load textures and render Steel objects in views in iOS apps.