

A Looker dashboard is a set of visualizations, charts and tables that provide you with an summary of your information.
With Looker dashboards, you may monitor key efficiency indicators, monitor developments, spot alternatives, create experiences and share insights together with your crew. In case you are searching for learn how to leverage the highly effective visualization capabilities that Looker affords, you will need to discover ways to create a dashboard in Looker. On this information, we’ll cowl the step-by-step course of of making a dashboard in Looker.
In Looker, you may create customized dashboards to show the information that’s most vital to you. You may create Looker dashboards from a folder, Look or Discover.
Soar to:
Making a Looker dashboard from a folder
To create a dashboard in Looker from a folder:
- Within the Looker interface, navigate to the specified folder you need to create the dashboard (Determine A).
Determine A

- On the prime proper of the folder, click on New.
- Choose Dashboard from the pop-up menu on the prime of the display screen.
- Within the pop-up window, enter a reputation on your new dashboard (Determine B).
Determine B
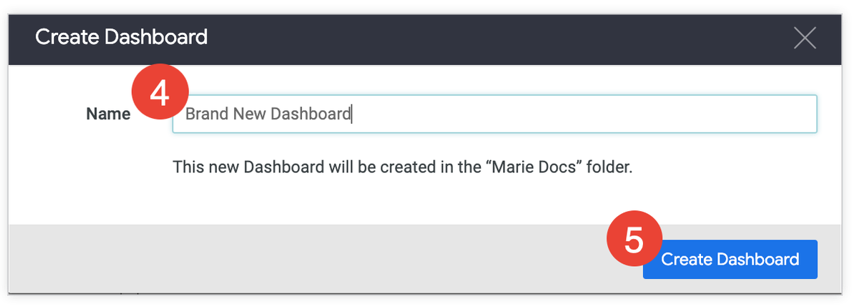
- Then, choose the Create Dashboard button.
- Edit the dashboard (Determine C).
Determine C
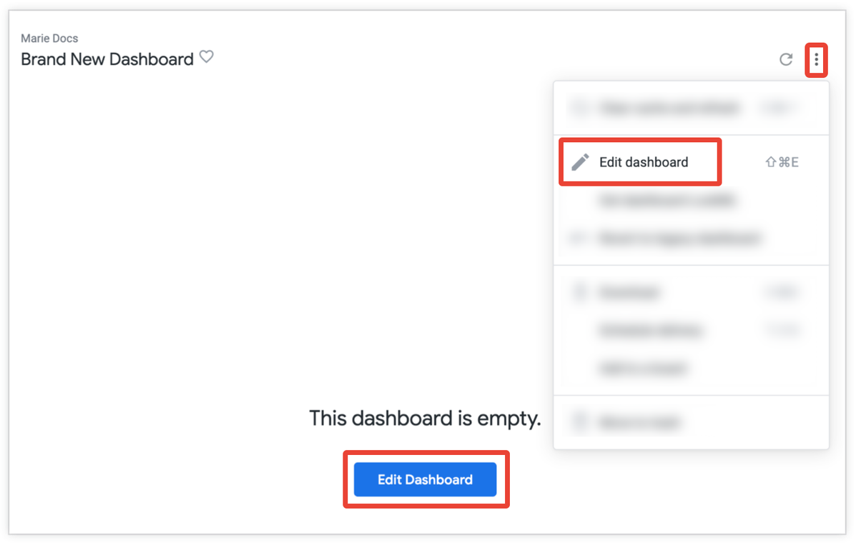
Whenever you first create a dashboard, it is going to seem clean. So as to add tiles or textual content, enter edit mode by clicking the Edit Dashboard button within the heart of the dashboard pane or choosing Edit dashboard from the dashboard menu.
SEE: Having hassle with Looker? Discover these different cost-effective information visualization instruments.
Making a Looker dashboard from a Look or Discover
The second methodology of making a user-defined dashboard in Looker is by way of a Look or Discover. The next is the method of establishing a brand new dashboard:
- Navigate to a Look or Discover.
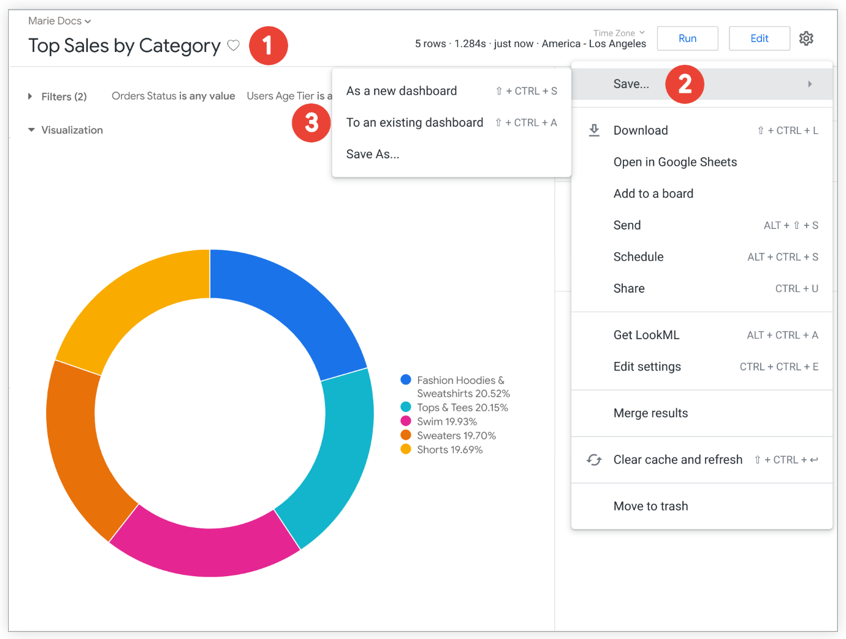
- When you’re on the Look or Discover web page, choose Save and a submenu will seem (Determine D).
Determine D

- Then, choose As A New Dashboard from the sub-menu. A Save As New Dashboard window will seem.
- Enter a reputation on your new dashboard underneath the Settings tab.
- Then, choose a folder the place you need to save your dashboard. Be aware that it’s essential to have Handle and Edit entry on your desired folder.
- You may select between utilizing the Look filters or the Discover filters for the dashboard on the Filters tab (Determine E). Though there isn’t any manner you need to use customized filters as dashboard filters, they might nonetheless be used on tiles.
Determine E

- Lastly, choose save on the underside proper nook of your display screen.
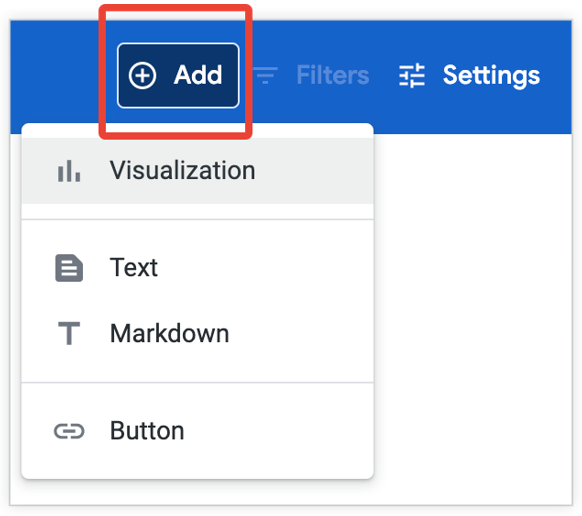
After you’ve created a dashboard, it’s often empty. The subsequent step is so as to add tiles and textual content (Determine F). You are able to do this by creating Question Tiles throughout the dashboard.
Determine F

Click on the Add button on the highest left of the dashboard. Then, choose Visualization. A menu with a number of Looker Explores will seem. Choose one to create your Question Tile.
Kinds of Looker dashboard tiles
There are three varieties of tiles you need to use to construct your dashboard.
Question Tiles
Question Tiles might be created in-dashboard or added to a dashboard from a Look or Discover. Not like common Looker searches, a Question Tile solely seems on Looker Dashboards. In case you don’t need to refill your folders with too many Appears to be like, Question Tiles might help you out. Even when the Look is erased, the tile stays on the dashboard and is unaffected by additional modifications to the Look.
So as to add a Question Tile:
- Within the dashboard’s edit mode, click on Add | Visualization.
- From the menu that pops up, select an Discover.
- Construct out your question from the Discover window, then give it a reputation (Determine G).
Determine G
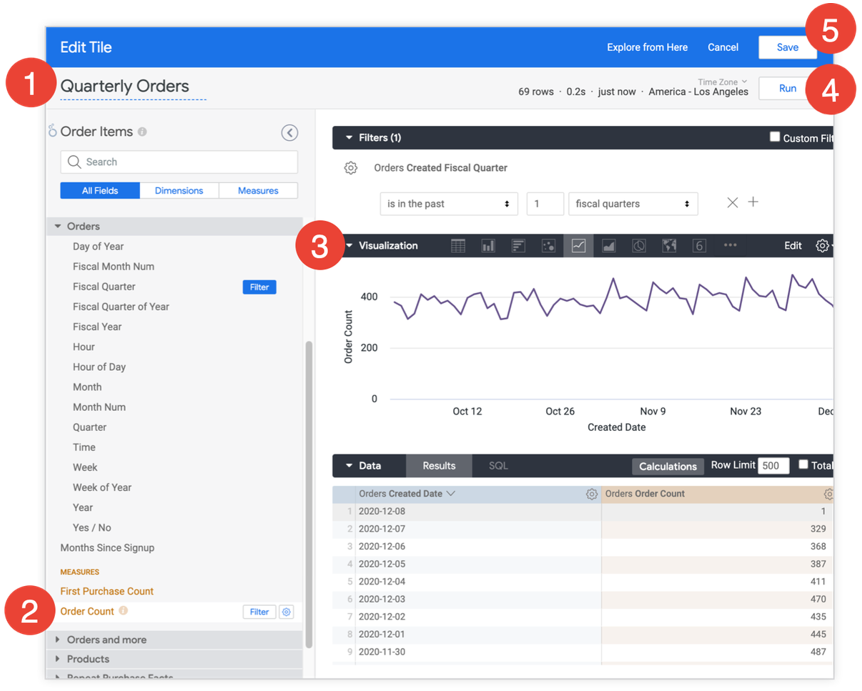
- Subsequent, you’ll have to make changes to any fields, filters or visualization preferences.
- When you’re performed, click on Run.
- So as to add the Question as a tile to your dashboard, merely click on the Save button.
Look-Linked Tiles
A Look-Linked Tile is an effective possibility if you wish to construct, modify and take a look at a question in a single location however use it in lots of dashboards. Any related tiles will even be up to date if the Look is altered. You may solely add a Look-Linked Tile to a dashboard from a Look. They join the underlying question of a Tile to a Look.
So as to add a Look-Linked Tile to your Looker dashboard:
- Make sure the Look is in the identical folder because the dashboard. This may occasionally imply it’s good to copy the Look into the dashboard’s folder.
- From the submenu, choose To an current dashboard (Determine H).
Determine H
- Within the Add to Dashboard window, be sure that the folder with the Look and dashboard is chosen (Determine I).
Determine I
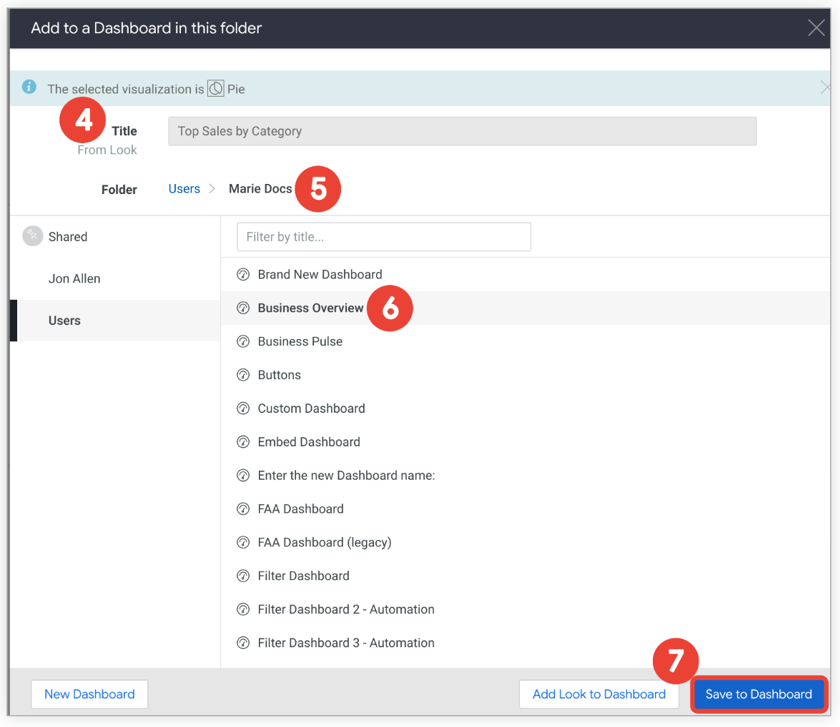
- Choose the dashboard, and click on Add Look to Dashboard.
Textual content Tiles
Textual content Tiles specify and label the assorted graphical parts of Looker dashboards. They’re formatted to resemble headlines and descriptions somewhat than Tiles and have a primary fashion that enables for a variety of customization choices. So as to add a Textual content Tile to a Looker dashboard:
- From the dashboard’s edit mode, click on Add, after which select both Textual content or Markdown (Determine J). Textual content enhancing is for visible enhancing, and Markdown is for HTML enhancing.
Determine J
- Add buttons (Determine Okay). This button might be linked to a Looker URL or exterior web page.
Determine Okay

When including a button, guarantee your dashboard is in edit mode. When you choose the button from the menu, a button dashboard will seem prompting you so as to add the button label, hyperlink and outline. It’s also possible to select to configure the button to open the hyperlink in a brand new browser tab or the identical tab when clicked.
Visualizing your information your manner
Dashboards are a visible illustration of the information we use day by day and assist us give attention to what’s most vital. Looker dashboards are simple to create for each technical and enterprise customers. We’ve got simplified the method on this information to allow you to make knowledgeable enterprise choices and monitor efficiency over time.
Undecided if Looker is the best device for your enterprise? Discover these different prime information visualization instruments.