

Taking a screenshot in your Mac is straightforward sufficient, however there are parts of the method that stay mysterious. Inexperienced persons could not realise the place the screenshot is saved, since by default it goes to the desktop quite than to the pasteboard (as on Home windows). However even fairly superior customers will not be conscious you could change the vacation spot—which you would possibly wish to do in case your Mac desktop is changing into actually cluttered.
On this article we present find out how to change the place screenshots are saved in your Mac. If you wish to make screenshots go to a folder and even your pasteboard, we’ll present you the way.
The place are screenshots saved on a Mac?
By default, Mac screenshots are saved to the Desktop and have a reputation akin to ‘Screenshot 2018-09-28 at 16.20.56’, indicating the date and time the screenshot was taken; on this case, a screenshot taken at 56 seconds previous 4.20pm on September twenty eighth 2018.
If you’re utilizing Desktop Stacks (which is one other characteristic that was launched in macOS Mojave) you may organise your Desktop so that each one your screenshots are neatly tidied away right into a folder. (We clarify how to try this, and another methods to tidy your desktop in Easy methods to organise your Mac desktop.)
Or comply with the steps under to pick or create a folder that may hold the screenshots in a single place and never littered throughout your display screen.
In case you haven’t put in macOS 10.14 Mojave or later in your Mac (Mojave arrived in 2018) you should have a screenshotting app known as Seize out there. Seize (which was situated in a Utilities folder within the Functions folder) may very well be used to take screenshots. Seize normally saved screenshots to your Paperwork folder, and when you didn’t change the identify of the picture it was save as Untitled.
Easy methods to change screenshot location on a Mac
You probably have macOS Mojave, Catalina, Huge Sur, Monterey or Ventura put in it is vitally simple to vary the place screenshots are saved.
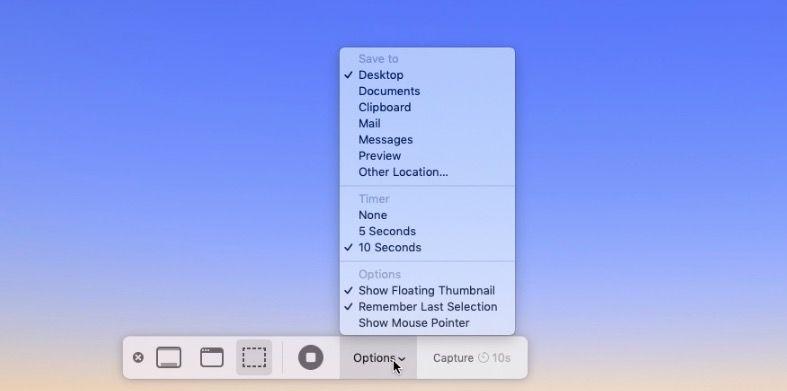
- Press Command + Shift + 5. This brings up a dotted-line screenshot placement.
- Look to the underside of the display screen and click on on Choices.
- Now both choose a folder that’s listed, or select Different Location.
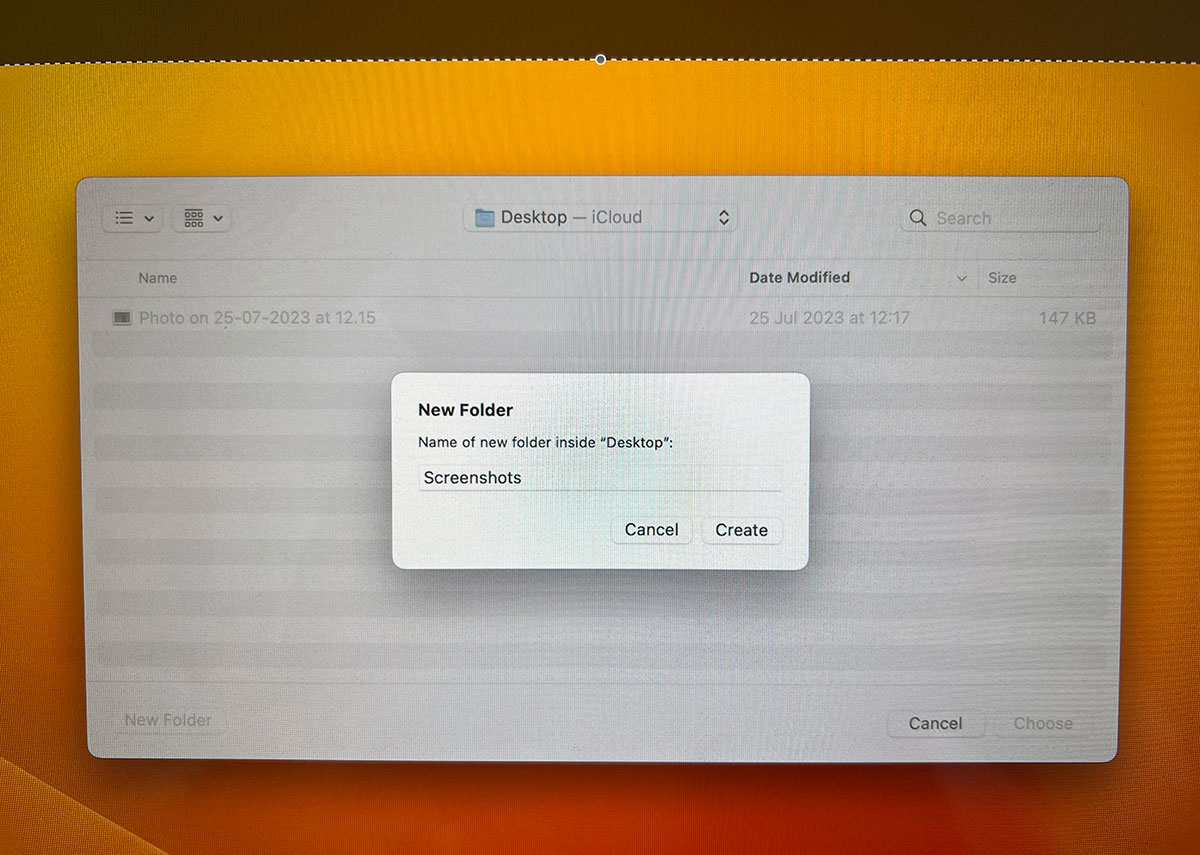
- In case you select Different Location you may navigate to the folder you want the screenshot to go to, or create a brand new folder if required.
- After getting modified the situation that’s the place your screenshots will go till you modify the situation once more.
- Faucet the keyboard Esc key to shut.
In addition to your self-defined ‘Different Location’ you may select from the next: Desktop, Paperwork, Clipboard, Mail, Messages, Preview.
For instance, you can hold all of your screenshots in a folder known as Screenshots that sits in your Desktop folder.
This implies they’ll reside someplace you would possibly anticipate them to however in a far neater group.
Foundry
Easy methods to change the place Mac screenshots are saved in older macOS variations
Pre-Mojave it wasn’t fairly really easy to inform macOS to avoid wasting screenshots some place else: in a folder labelled Screengrabs, for instance. Within the following instance we’ll assume we’ve created a desktop folder known as precisely that, however you may change this course of for various places supplied you recognize the file path.
- Click on on the Finder to open a brand new Finder window.
- Create a folder within the Finder by proper clicking on the Finder window. Title it Screenshots (or no matter you wish to name it)
- Now open Terminal (press Command + Area and begin typing Terminal till the icon seems) then click on on that icon to open the app.
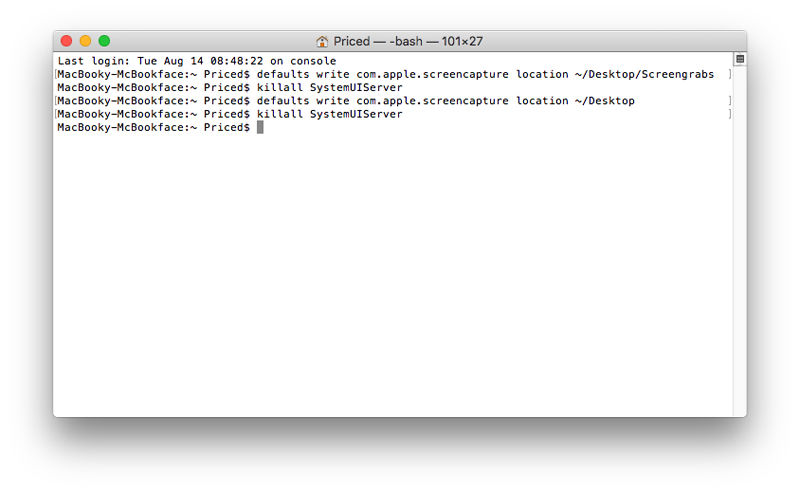
- In Terminal sort the next:
defaults write com.apple.screencapture location
(There must be an area after location – it received’t work with out it) - Now drag and drop your Screenshots folder on high of the Terminal window and it’ll routinely fill within the listing path.

- Now press Enter.
- Then sort the next to ensure the change take impact:
killall SystemUIServer - A phrase of warning – don’t delete the folder you created!
- In case you would nonetheless like easy accessibility to your screenshots from the desktop you can create an alias. Simply find the folder you created within the Finder and proper click on on it.
- Select Create Alias.
- Now drag and drop the Alias to the desktop.
- Take a few screenshots to test it’s working.
In case you’d prefer to revert to the default screenshot location, return to Terminal and sort “defaults write com.apple.screencapture location ~/Desktop” (with no citation marks) and hit Enter. Then sort “killall SystemUIServer” (no quotes) and hit Enter.
Save screenshots to the pasteboard
The Print Display screen operate on a Home windows PC works a bit in a different way to Mac.
As an alternative of saving a screenshot direct to the desktop, in Home windows it saves it to the pasteboard. You then must open Photoshop, Paint or whichever image-editing app you favor, create a brand new doc, and paste the screenshot on to it.
If you want, you may replicate this operate on a Mac by altering the keys you maintain when taking the screenshot.
When you’ve used Command + Shift + 4 to create the crosshairs, maintain Ctrl whereas dragging the cursor throughout the specified space. The resultant screengrab shall be copied to the pasteboard – in different phrases, you’ll be capable to paste it into Preview or a Keynote doc or related – as an alternative of it saving to the desktop.
This trick works on Macs whether or not or not they’ve Mojave or later put in.
Right here’s find out how to save a screenshot to the pasteboard on a Mac:
- Maintain down Command + Shift + 4. The crosshairs will seem. You possibly can let go of the keys.
- Press Ctrl and drag the crosshairs throughout space of display screen you wish to screenshot.
- Let go of the mouse button.
- Screenshot shall be saved to pasteboard.