
Whereas I’ve put React utility, there is not such a factor as React utility. I imply, there are
front-end functions written in JavaScript or TypeScript that occur to
use React as their views. Nevertheless, I feel it isn’t truthful to name them React
functions, simply as we would not name a Java EE utility JSP
utility.
As a rule, individuals squeeze various things into React
parts or hooks to make the applying work. This sort of
less-organised construction is not an issue if the applying is small or
largely with out a lot enterprise logic. Nevertheless, as extra enterprise logic shifted
to front-end in lots of instances, this everything-in-component exhibits issues. To
be extra particular, the trouble of understanding such sort of code is
comparatively excessive, in addition to the elevated danger to code modification.
On this article, I wish to talk about a couple of patterns and strategies
you should use to reshape your “React utility” into an everyday one, and solely
with React as its view (you possibly can even swap these views into one other view
library with out an excessive amount of efforts).
The important level right here is it is best to analyse what function every a part of the
code is enjoying inside an utility (even on the floor, they is likely to be
packed in the identical file). Separate view from no-view logic, break up the
no-view logic additional by their tasks and place them within the
proper locations.
The advantage of this separation is that it means that you can make adjustments in
the underlying area logic with out worrying an excessive amount of concerning the floor
views, or vice versa. Additionally, it will possibly enhance the reusability of the area
logic somewhere else as they aren’t coupled to every other elements.
React is a humble library for constructing views
It is easy to neglect that React, at its core, is a library (not a
framework) that helps you construct the person interface.
On this context, it’s emphasised that React is a JavaScript library
that concentrates on a selected side of internet improvement, specifically UI
parts, and presents ample freedom by way of the design of the
utility and its general construction.
A JavaScript library for constructing person interfaces
It might sound fairly easy. However I’ve seen many instances the place
individuals write the information fetching, reshaping logic proper within the place the place
it is consumed. For instance, fetching information inside a React part, within the
useEffect block proper above the rendering, or performing information
mapping/reworking as soon as they obtained the response from the server aspect.
useEffect(() => {
  fetch("https://tackle.service/api")
    .then((res) => res.json())
    .then((information) => {
      const addresses = information.map((merchandise) => ({
        road: merchandise.streetName,
        tackle: merchandise.streetAddress,
        postcode: merchandise.postCode,
      }));

      setAddresses(addresses);
    });
}, []);

// the precise rendering...
Maybe as a result of there may be but to be a common normal within the frontend
world, or it is only a unhealthy programming behavior. Frontend functions ought to
not be handled too in another way from common software program functions. Within the
frontend world, you continue to use separation of issues typically to rearrange
the code construction. And all of the confirmed helpful design patterns nonetheless
apply.
Welcome to the actual world React utility
Most builders have been impressed by React’s simplicity and the concept
a person interface will be expressed as a pure operate to map information into the
DOM. And to a sure extent, it IS.
However builders begin to wrestle when they should ship a community
request to a backend or carry out web page navigation, as these unintended effects
make the part much less “pure”. And when you contemplate these totally different
states (both international state or native state), issues rapidly get
sophisticated, and the darkish aspect of the person interface emerges.
Other than the person interface
React itself doesn’t care a lot about the place to place calculation or
enterprise logic, which is truthful because it’s solely a library for constructing person
interfaces. And past that view layer, a frontend utility has different
elements as properly. To make the applying work, you will want a router,
native storage, cache at totally different ranges, community requests, Third-party
integrations, Third-party login, safety, logging, efficiency tuning,
and so on.
With all this additional context, attempting to squeeze every part into
React parts or hooks is usually not a good suggestion. The reason being
mixing ideas in a single place usually results in extra confusion. At
first, the part units up some community request for order standing, and
then there may be some logic to trim off main house from a string and
then navigate elsewhere. The reader should always reset their
logic move and soar backwards and forwards from totally different ranges of particulars.
Packing all of the code into parts may go in small functions
like a Todo or one-form utility. Nonetheless, the efforts to grasp
such utility can be vital as soon as it reaches a sure degree.
To not point out including new options or fixing present defects.
If we might separate totally different issues into information or folders with
constructions, the psychological load required to grasp the applying would
be considerably lowered. And also you solely must give attention to one factor at a
time. Fortunately, there are already some well-proven patterns again to the
pre-web time. These design ideas and patterns are explored and
mentioned properly to resolve the frequent person interface issues – however within the
desktop GUI utility context.
Martin Fowler has an ideal abstract of the idea of view-model-data
layering.
On the entire I’ve discovered this to be an efficient type of
modularization for a lot of functions and one which I commonly use and
encourage. It is largest benefit is that it permits me to extend my
focus by permitting me to consider the three subjects (i.e., view,
mannequin, information) comparatively independently.
Layered architectures have been used to manage the challenges in massive
GUI functions, and definitely we are able to use these established patterns of
front-end group in our “React functions”.
The evolution of a React utility
For small or one-off initiatives, you would possibly discover that each one logic is simply
written inside React parts. You might even see one or only some parts
in complete. The code appears just about like HTML, with just some variable or
state used to make the web page “dynamic”. Some would possibly ship requests to fetch
information on useEffect after the parts render.
As the applying grows, and increasingly code are added to codebase.
With no correct strategy to organise them, quickly the codebase will flip into
unmaintainable state, which means that even including small options will be
time-consuming as builders want extra time to learn the code.
So I’ll record a couple of steps that may assist to aid the maintainable
drawback. It usually require a bit extra efforts, however it would repay to
have the construction in you utility. Let’s have a fast overview of those
steps to construct front-end functions that scale.
Single Element Utility
It may be referred to as just about a Single Element Utility:
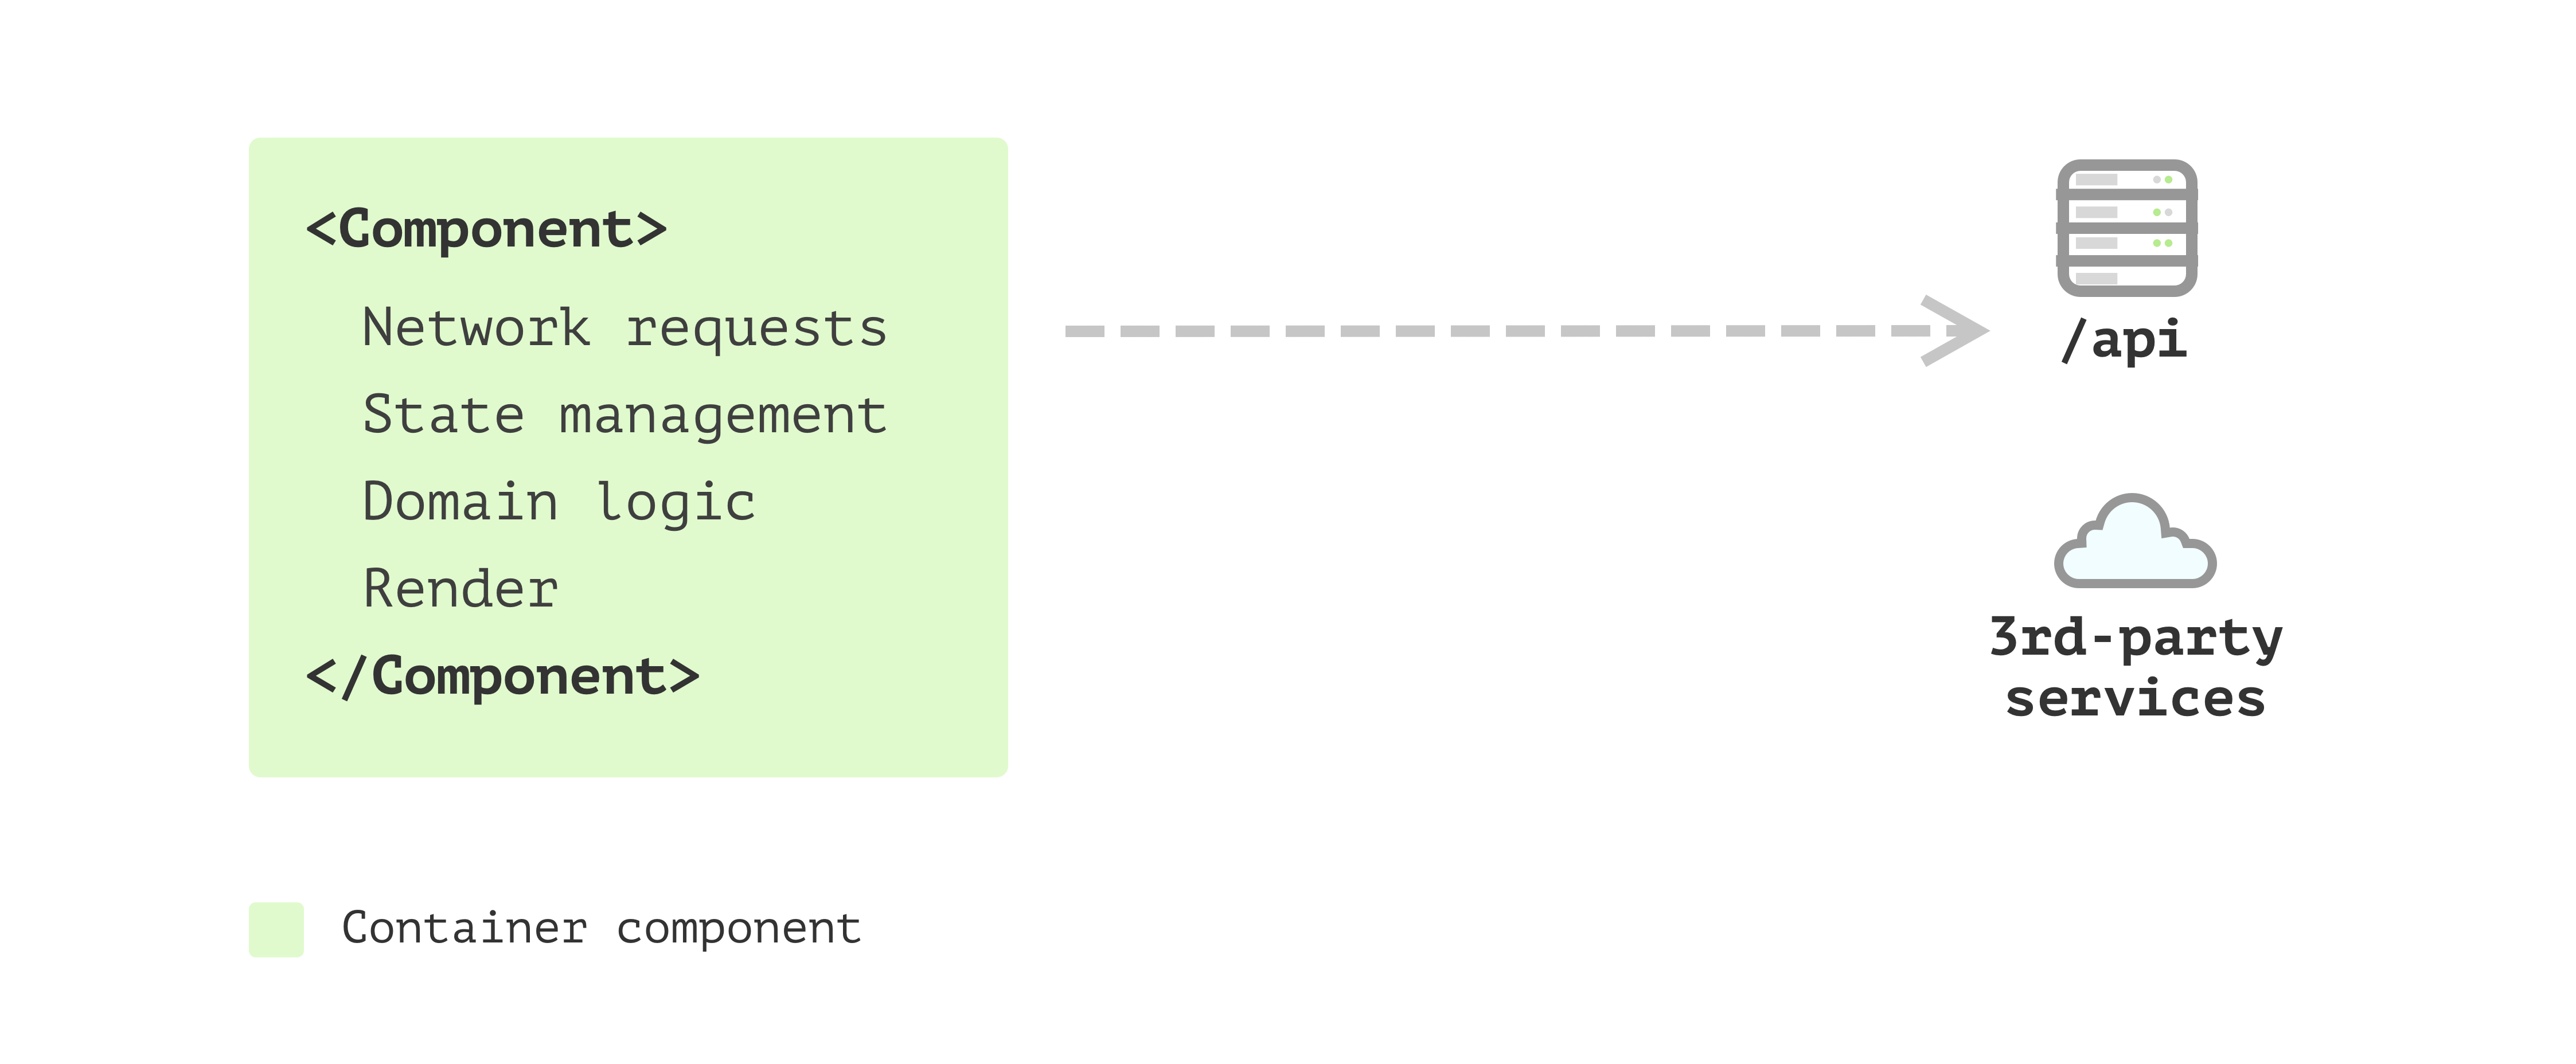
Determine 1: Single Element Utility
However quickly, you realise one single part requires lots of time
simply to learn what’s going on. For instance, there may be logic to iterate
via an inventory and generate every merchandise. Additionally, there may be some logic for
utilizing Third-party parts with only some configuration code, aside
from different logic.
A number of Element Utility
You determined to separate the part into a number of parts, with
these constructions reflecting what’s occurring on the outcome HTML is a
good concept, and it lets you give attention to one part at a time.
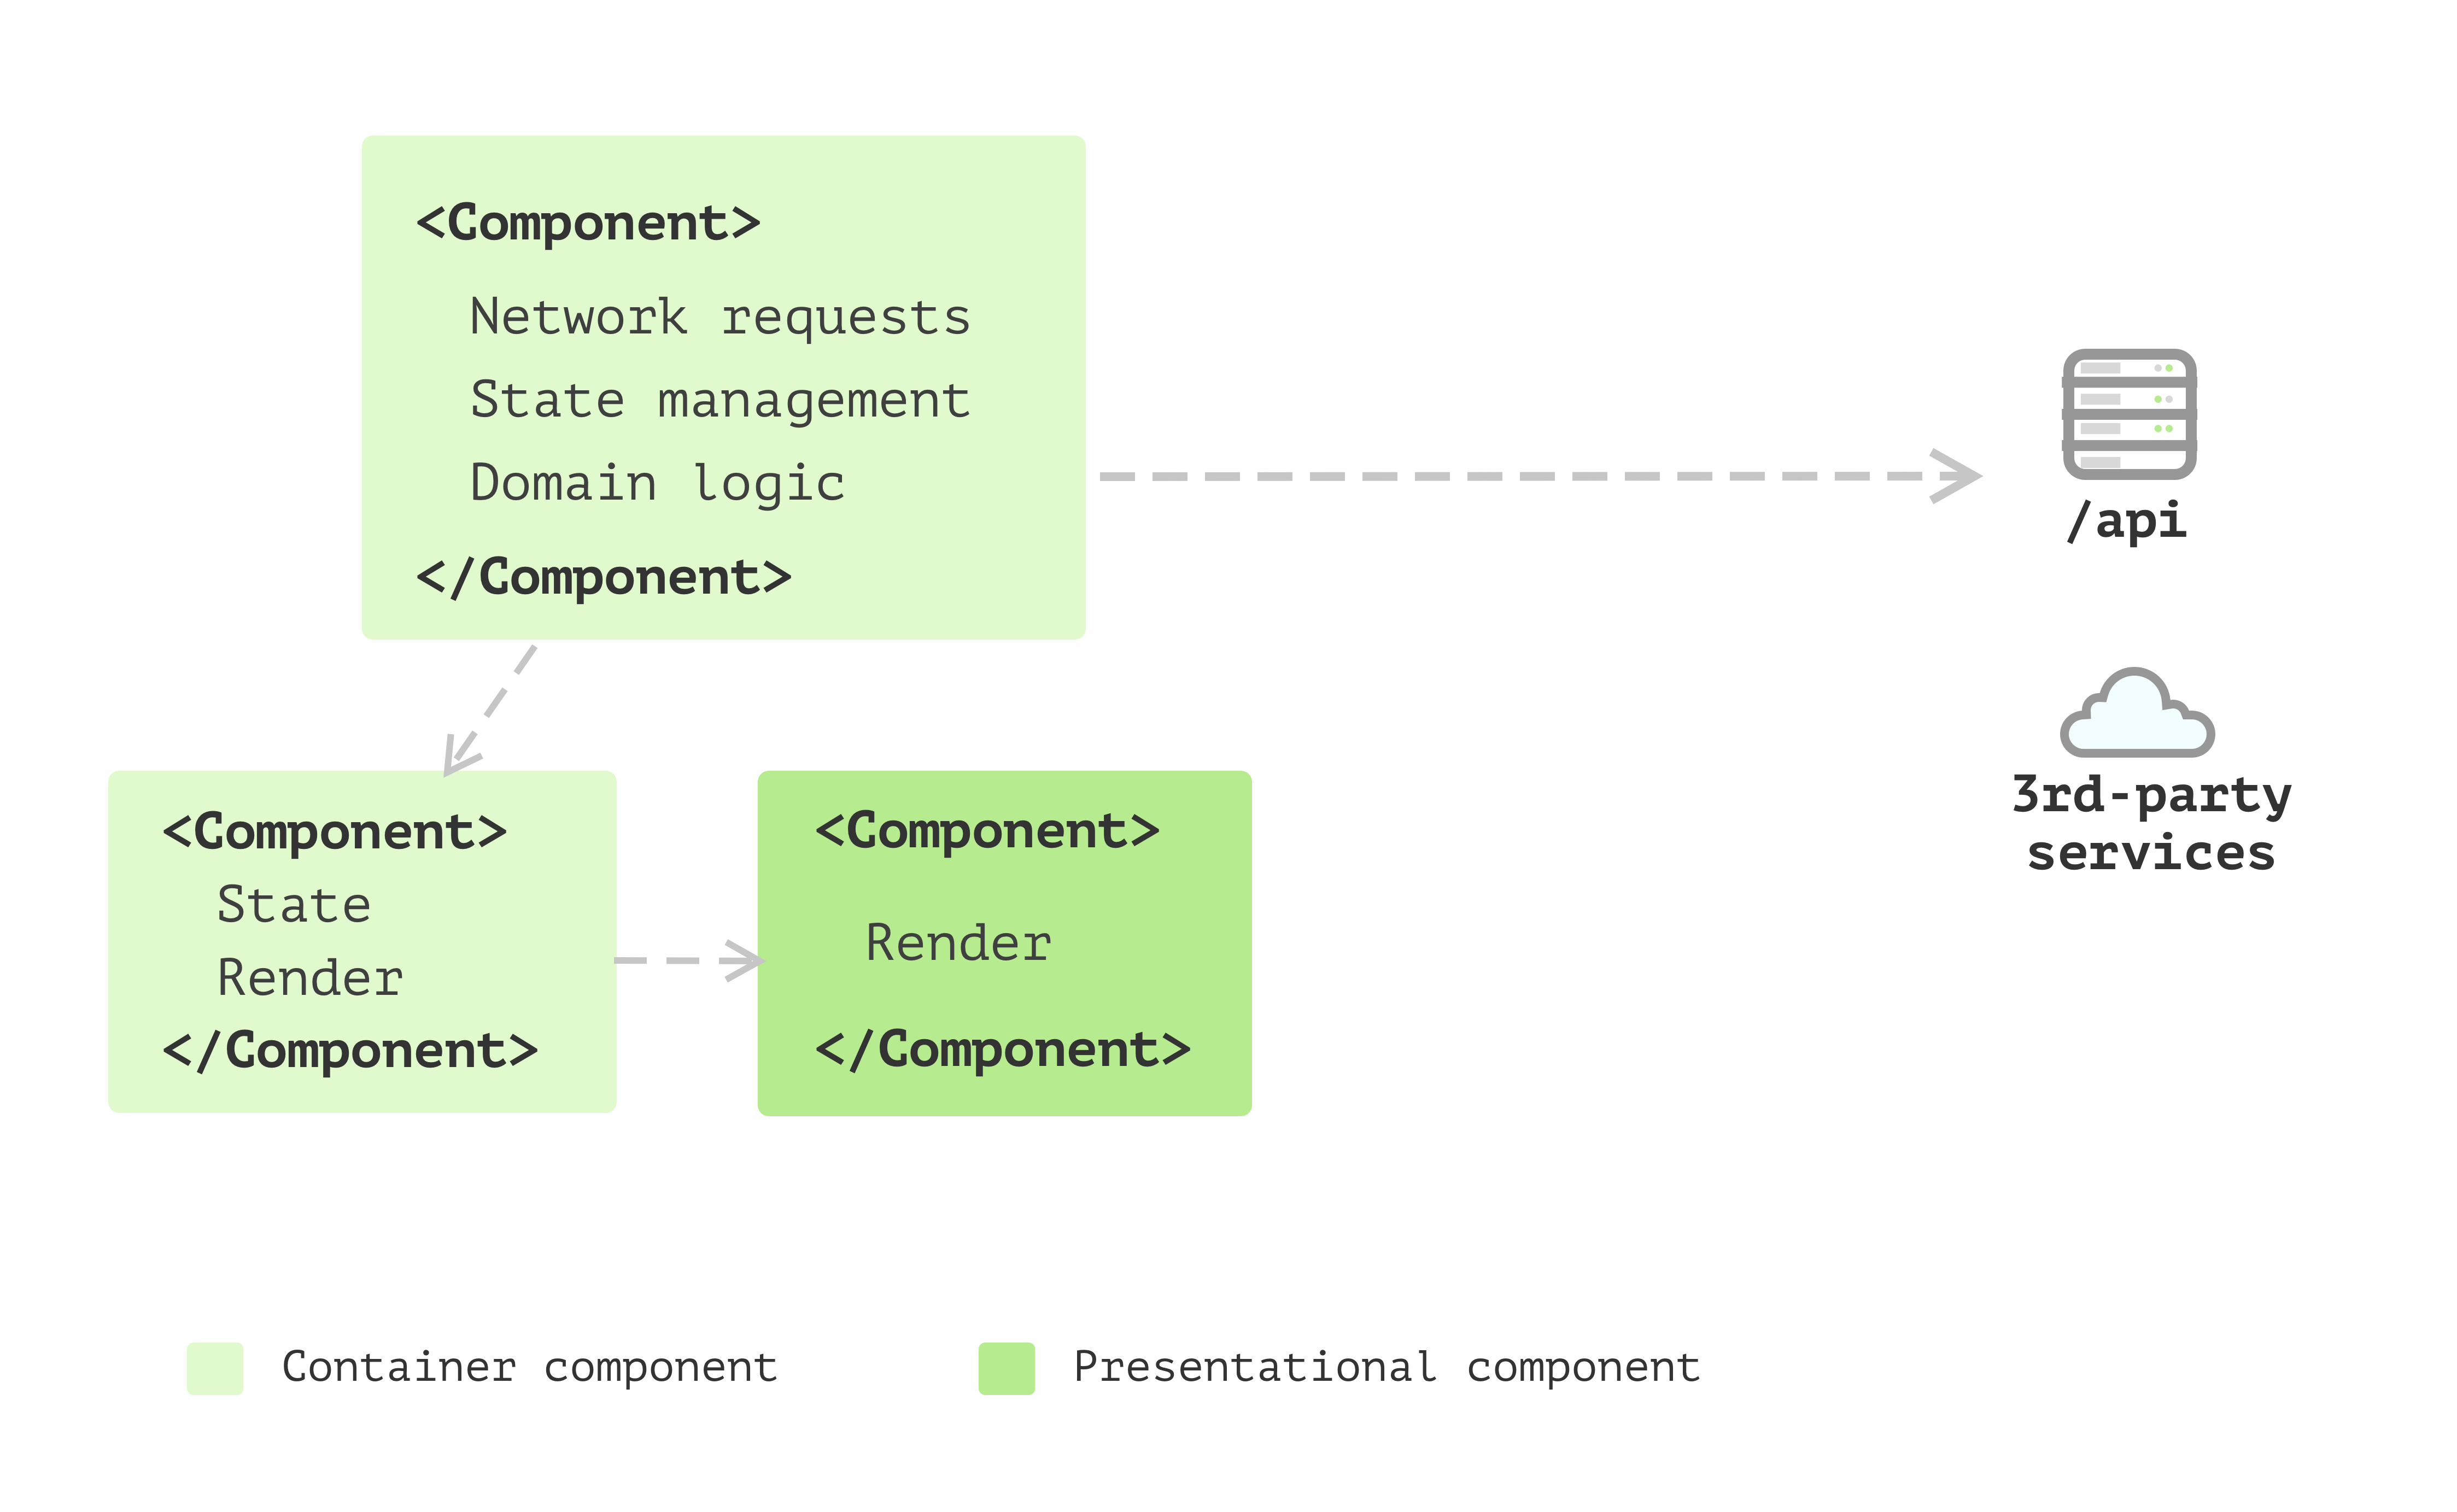
Determine 2: A number of Element Utility
And as your utility grows, other than the view, there are issues
like sending community requests, changing information into totally different shapes for
the view to eat, and accumulating information to ship again to the server. And
having this code inside parts doesn’t really feel proper as they’re not
actually about person interfaces. Additionally, some parts have too many
inner states.
State administration with hooks
It’s a greater concept to separate this logic right into a separate locations.
Fortunately in React, you possibly can outline your individual hooks. This can be a nice strategy to
share these state and the logic of each time states change.
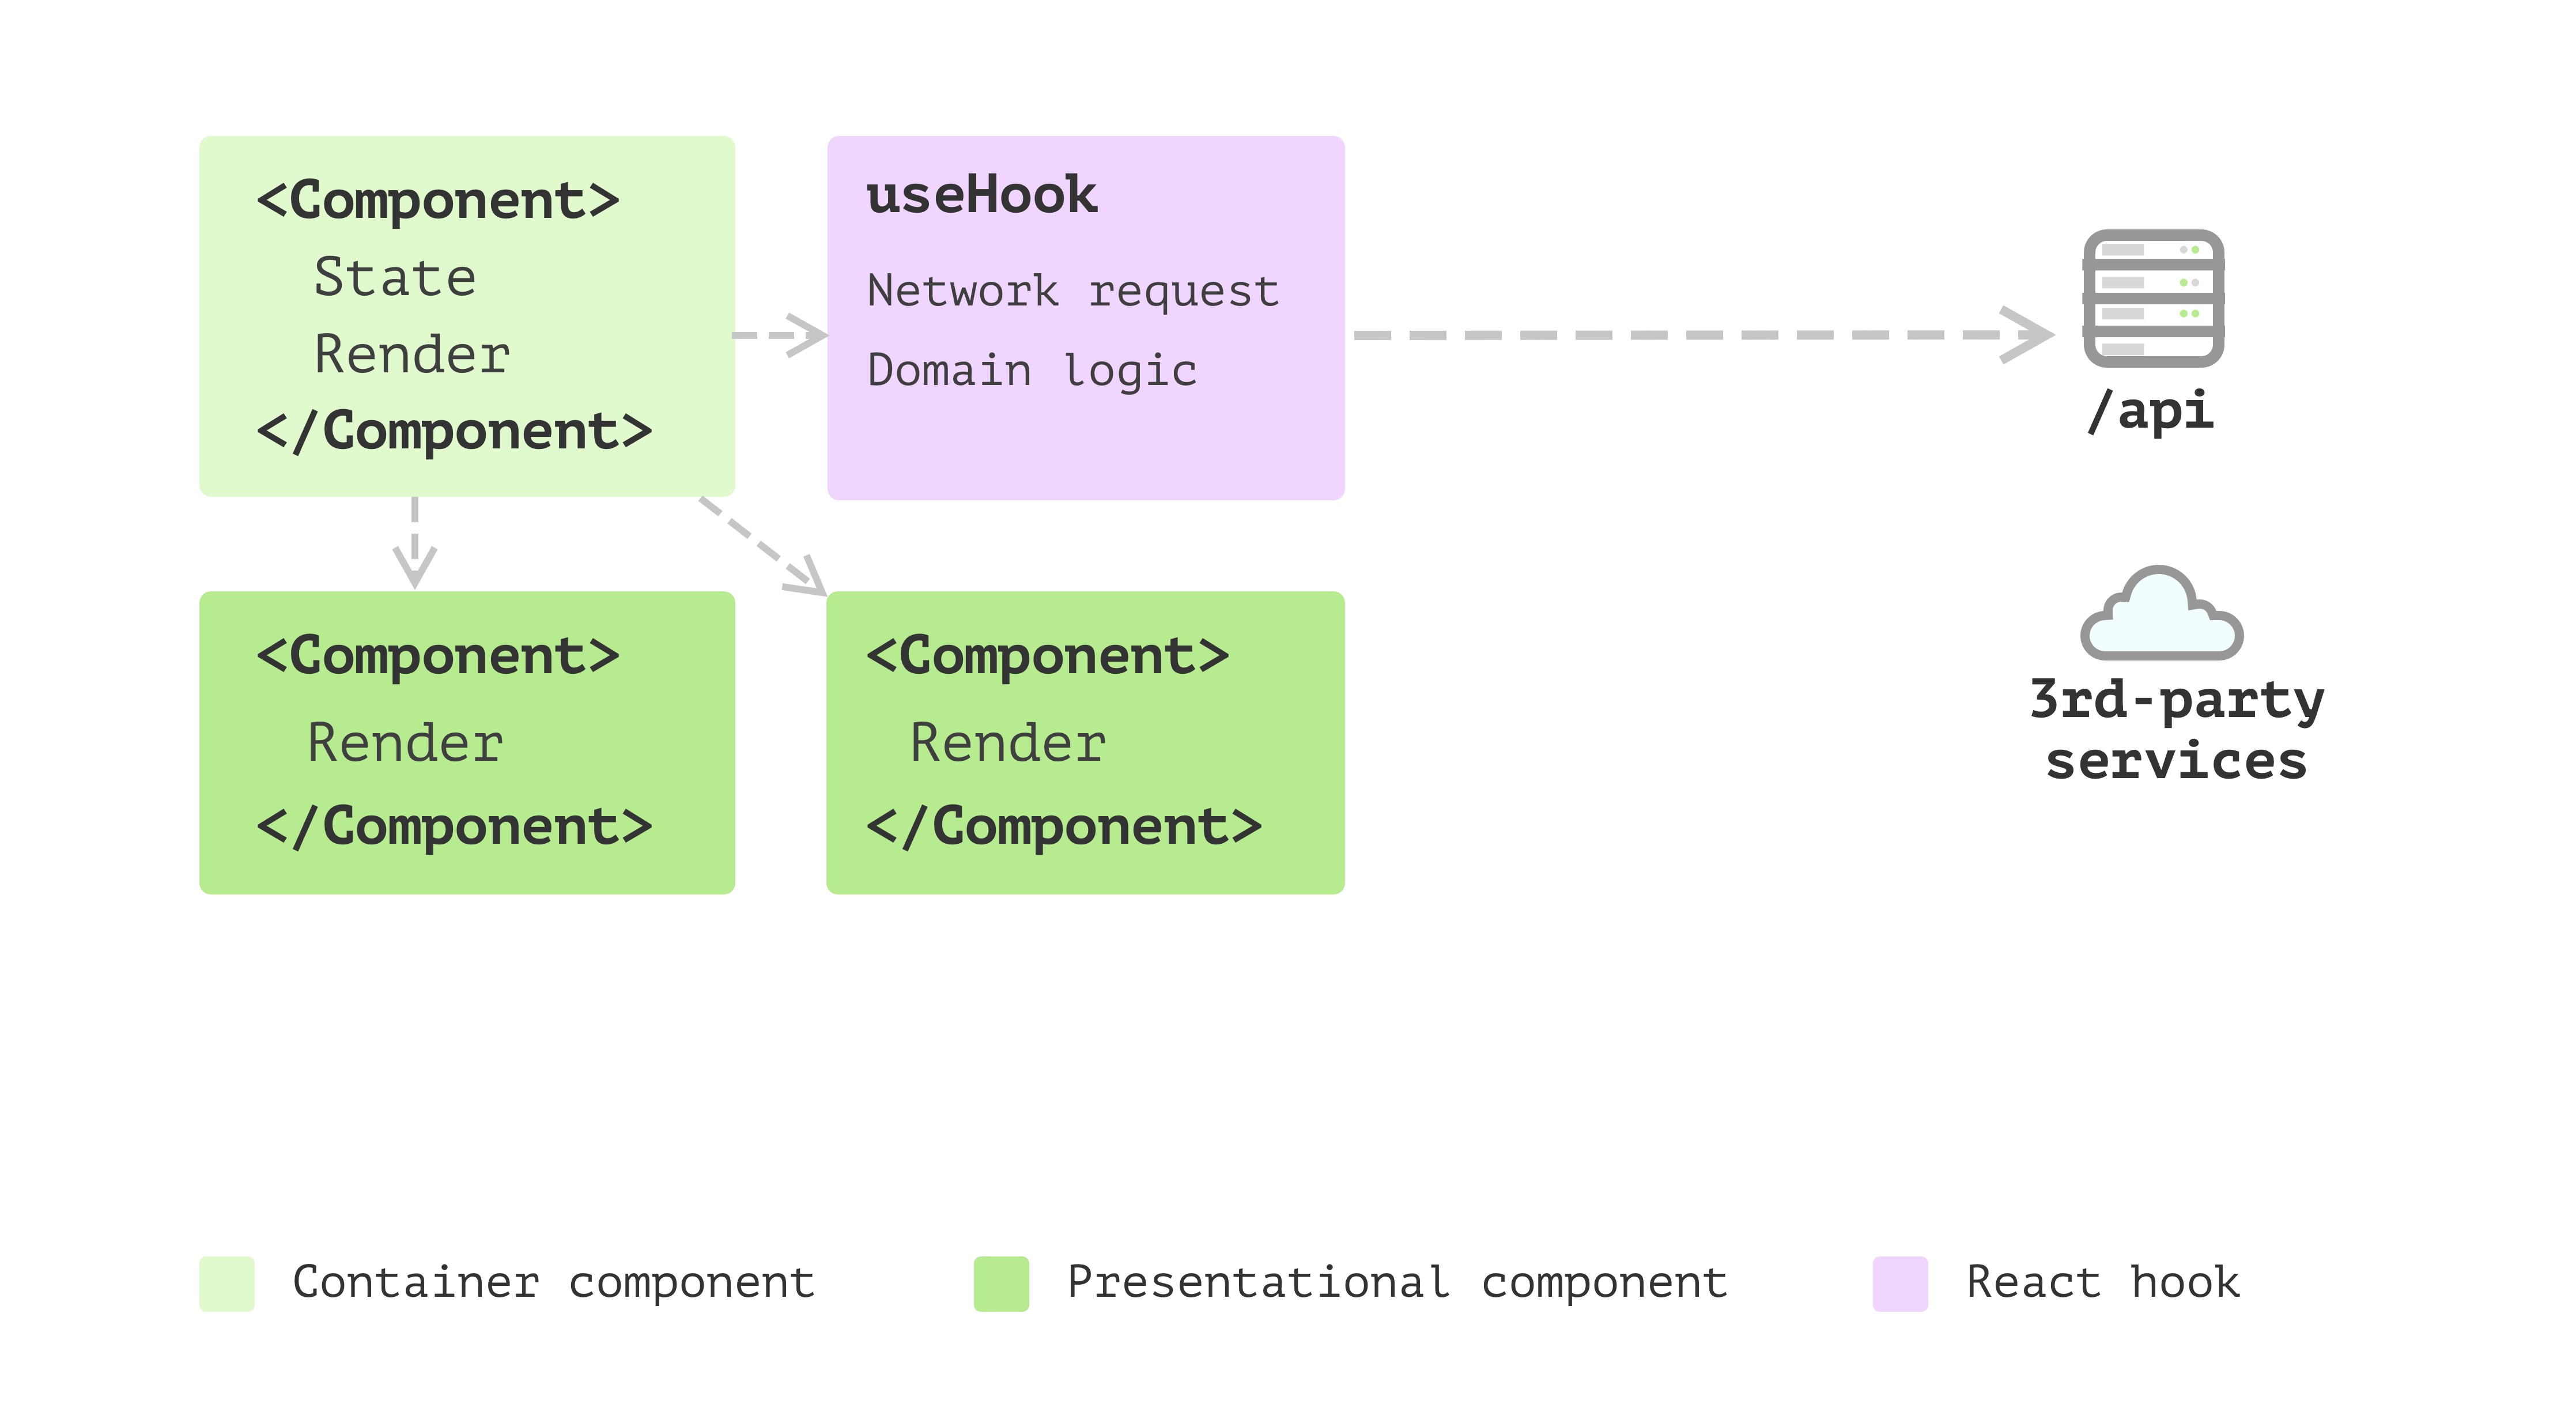
Determine 3: State administration with hooks
That’s superior! You will have a bunch of components extracted out of your
single part utility, and you’ve got a couple of pure presentational
parts and a few reusable hooks that make different parts stateful.
The one drawback is that in hooks, other than the aspect impact and state
administration, some logic doesn’t appear to belong to the state administration
however pure calculations.
Enterprise fashions emerged
So that you’ve began to change into conscious that extracting this logic into but
one other place can carry you a lot advantages. For instance, with that break up,
the logic will be cohesive and impartial of any views. You then extract
a couple of area objects.
These easy objects can deal with information mapping (from one format to
one other), verify nulls and use fallback values as required. Additionally, because the
quantity of those area objects grows, you discover you want some inheritance
or polymorphism to make issues even cleaner. Thus you utilized many
design patterns you discovered useful from different locations into the front-end
utility right here.
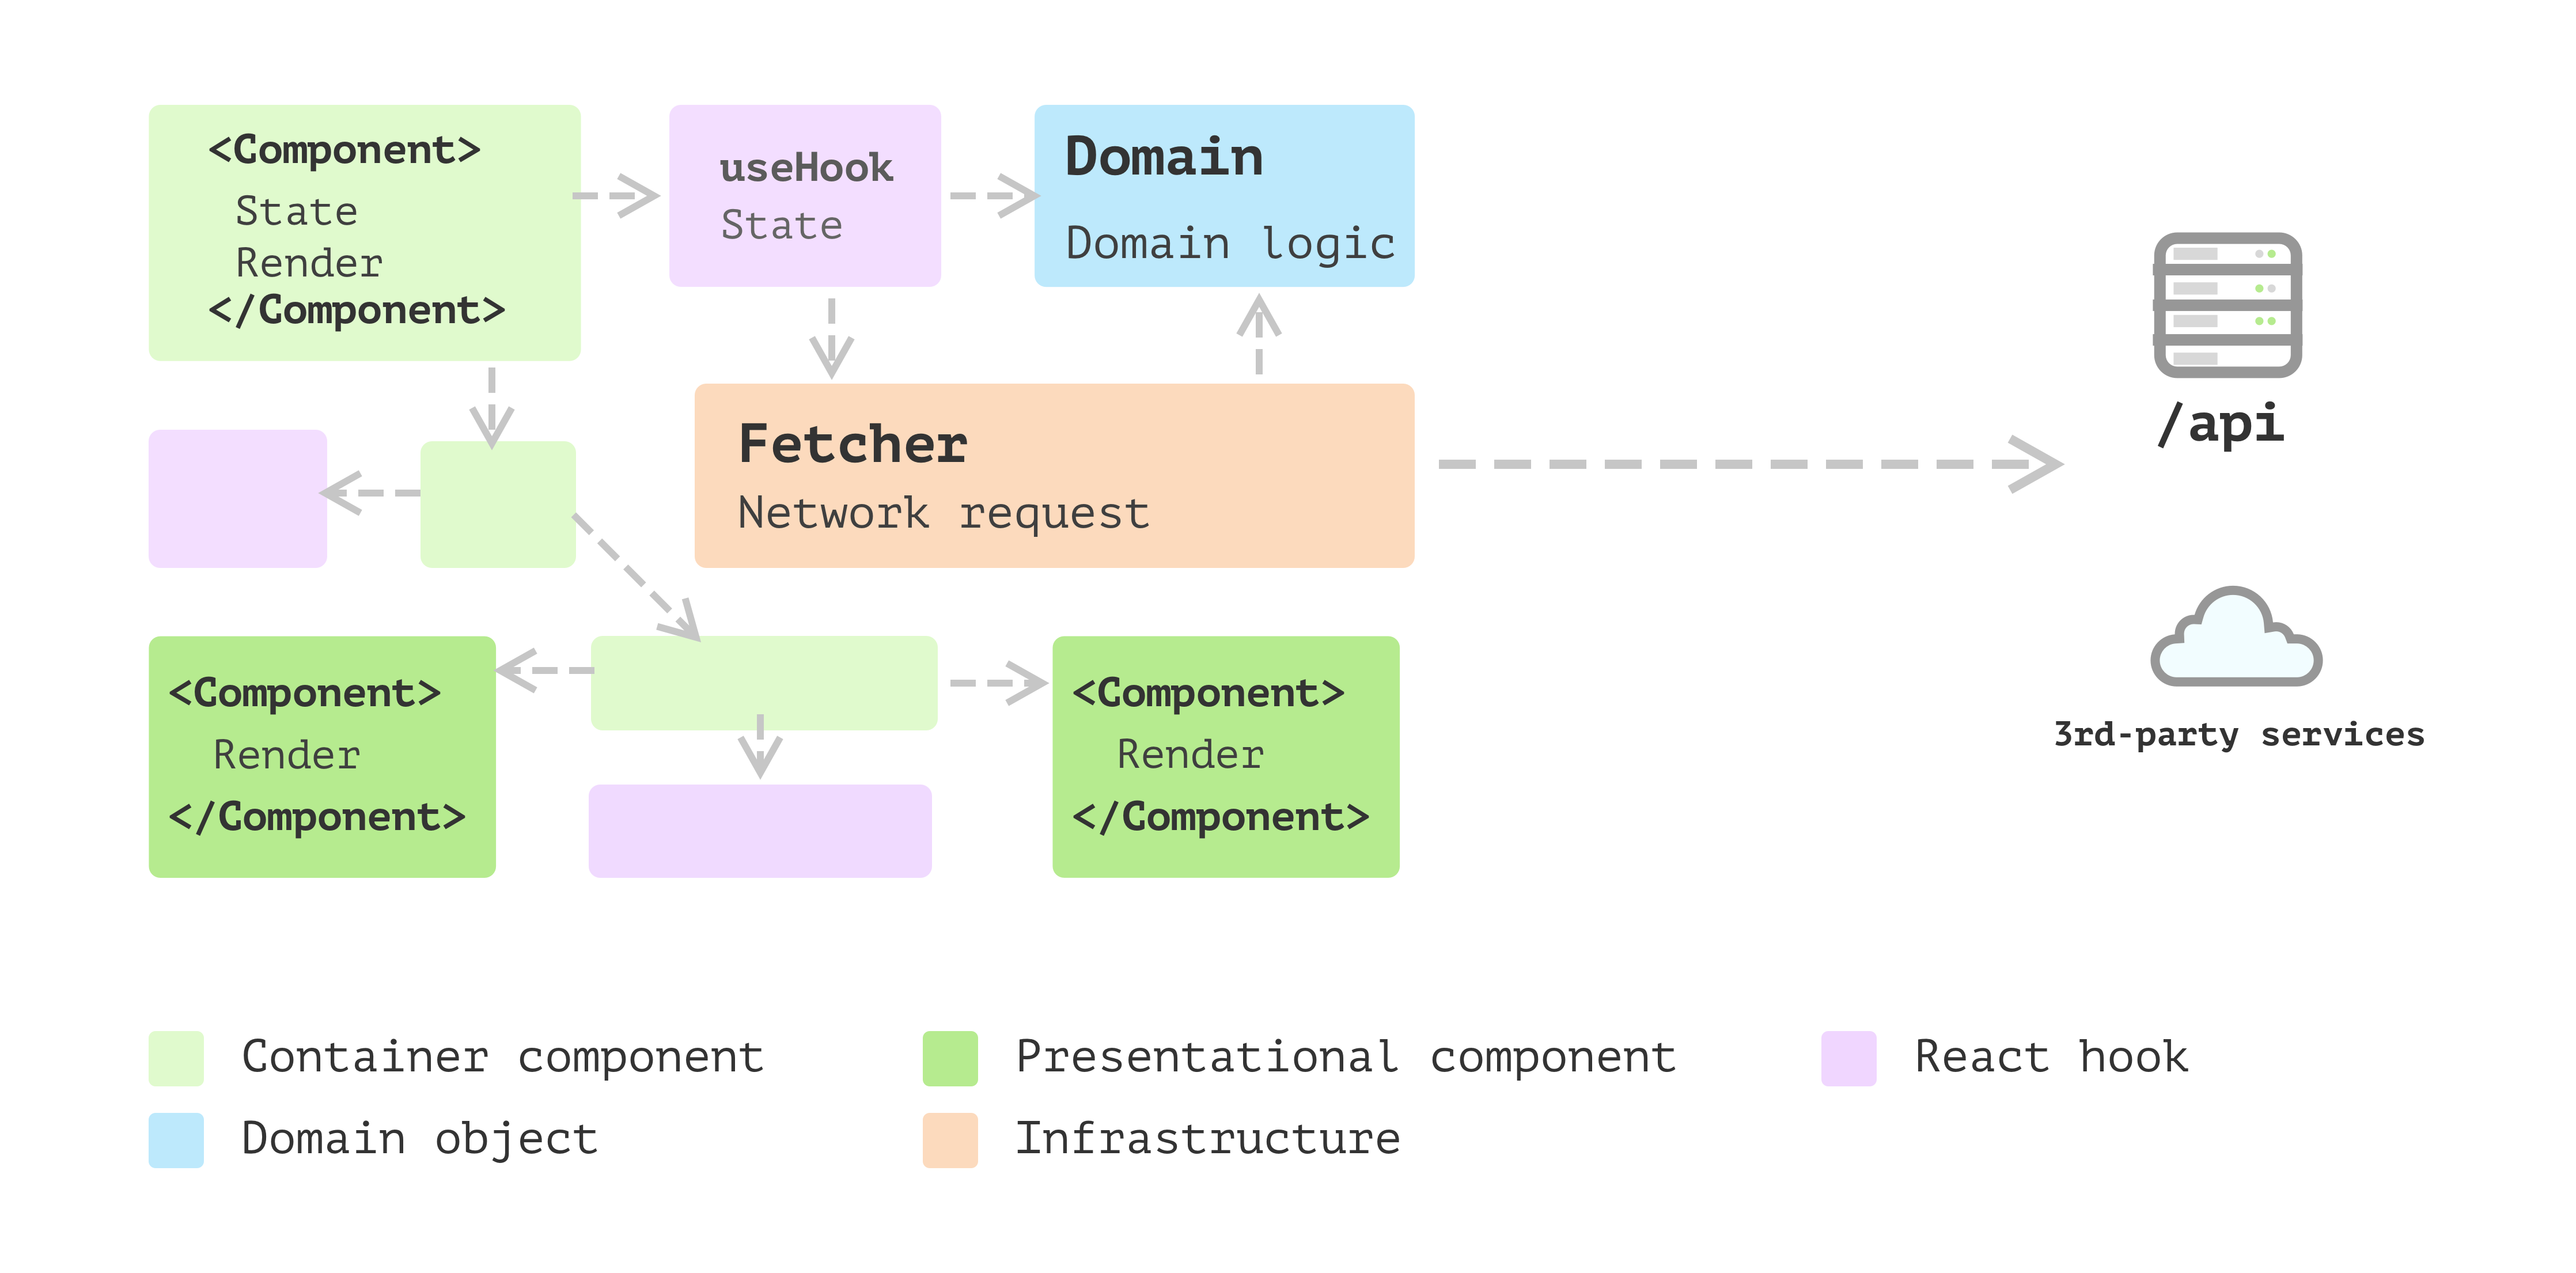
Determine 4: Enterprise fashions
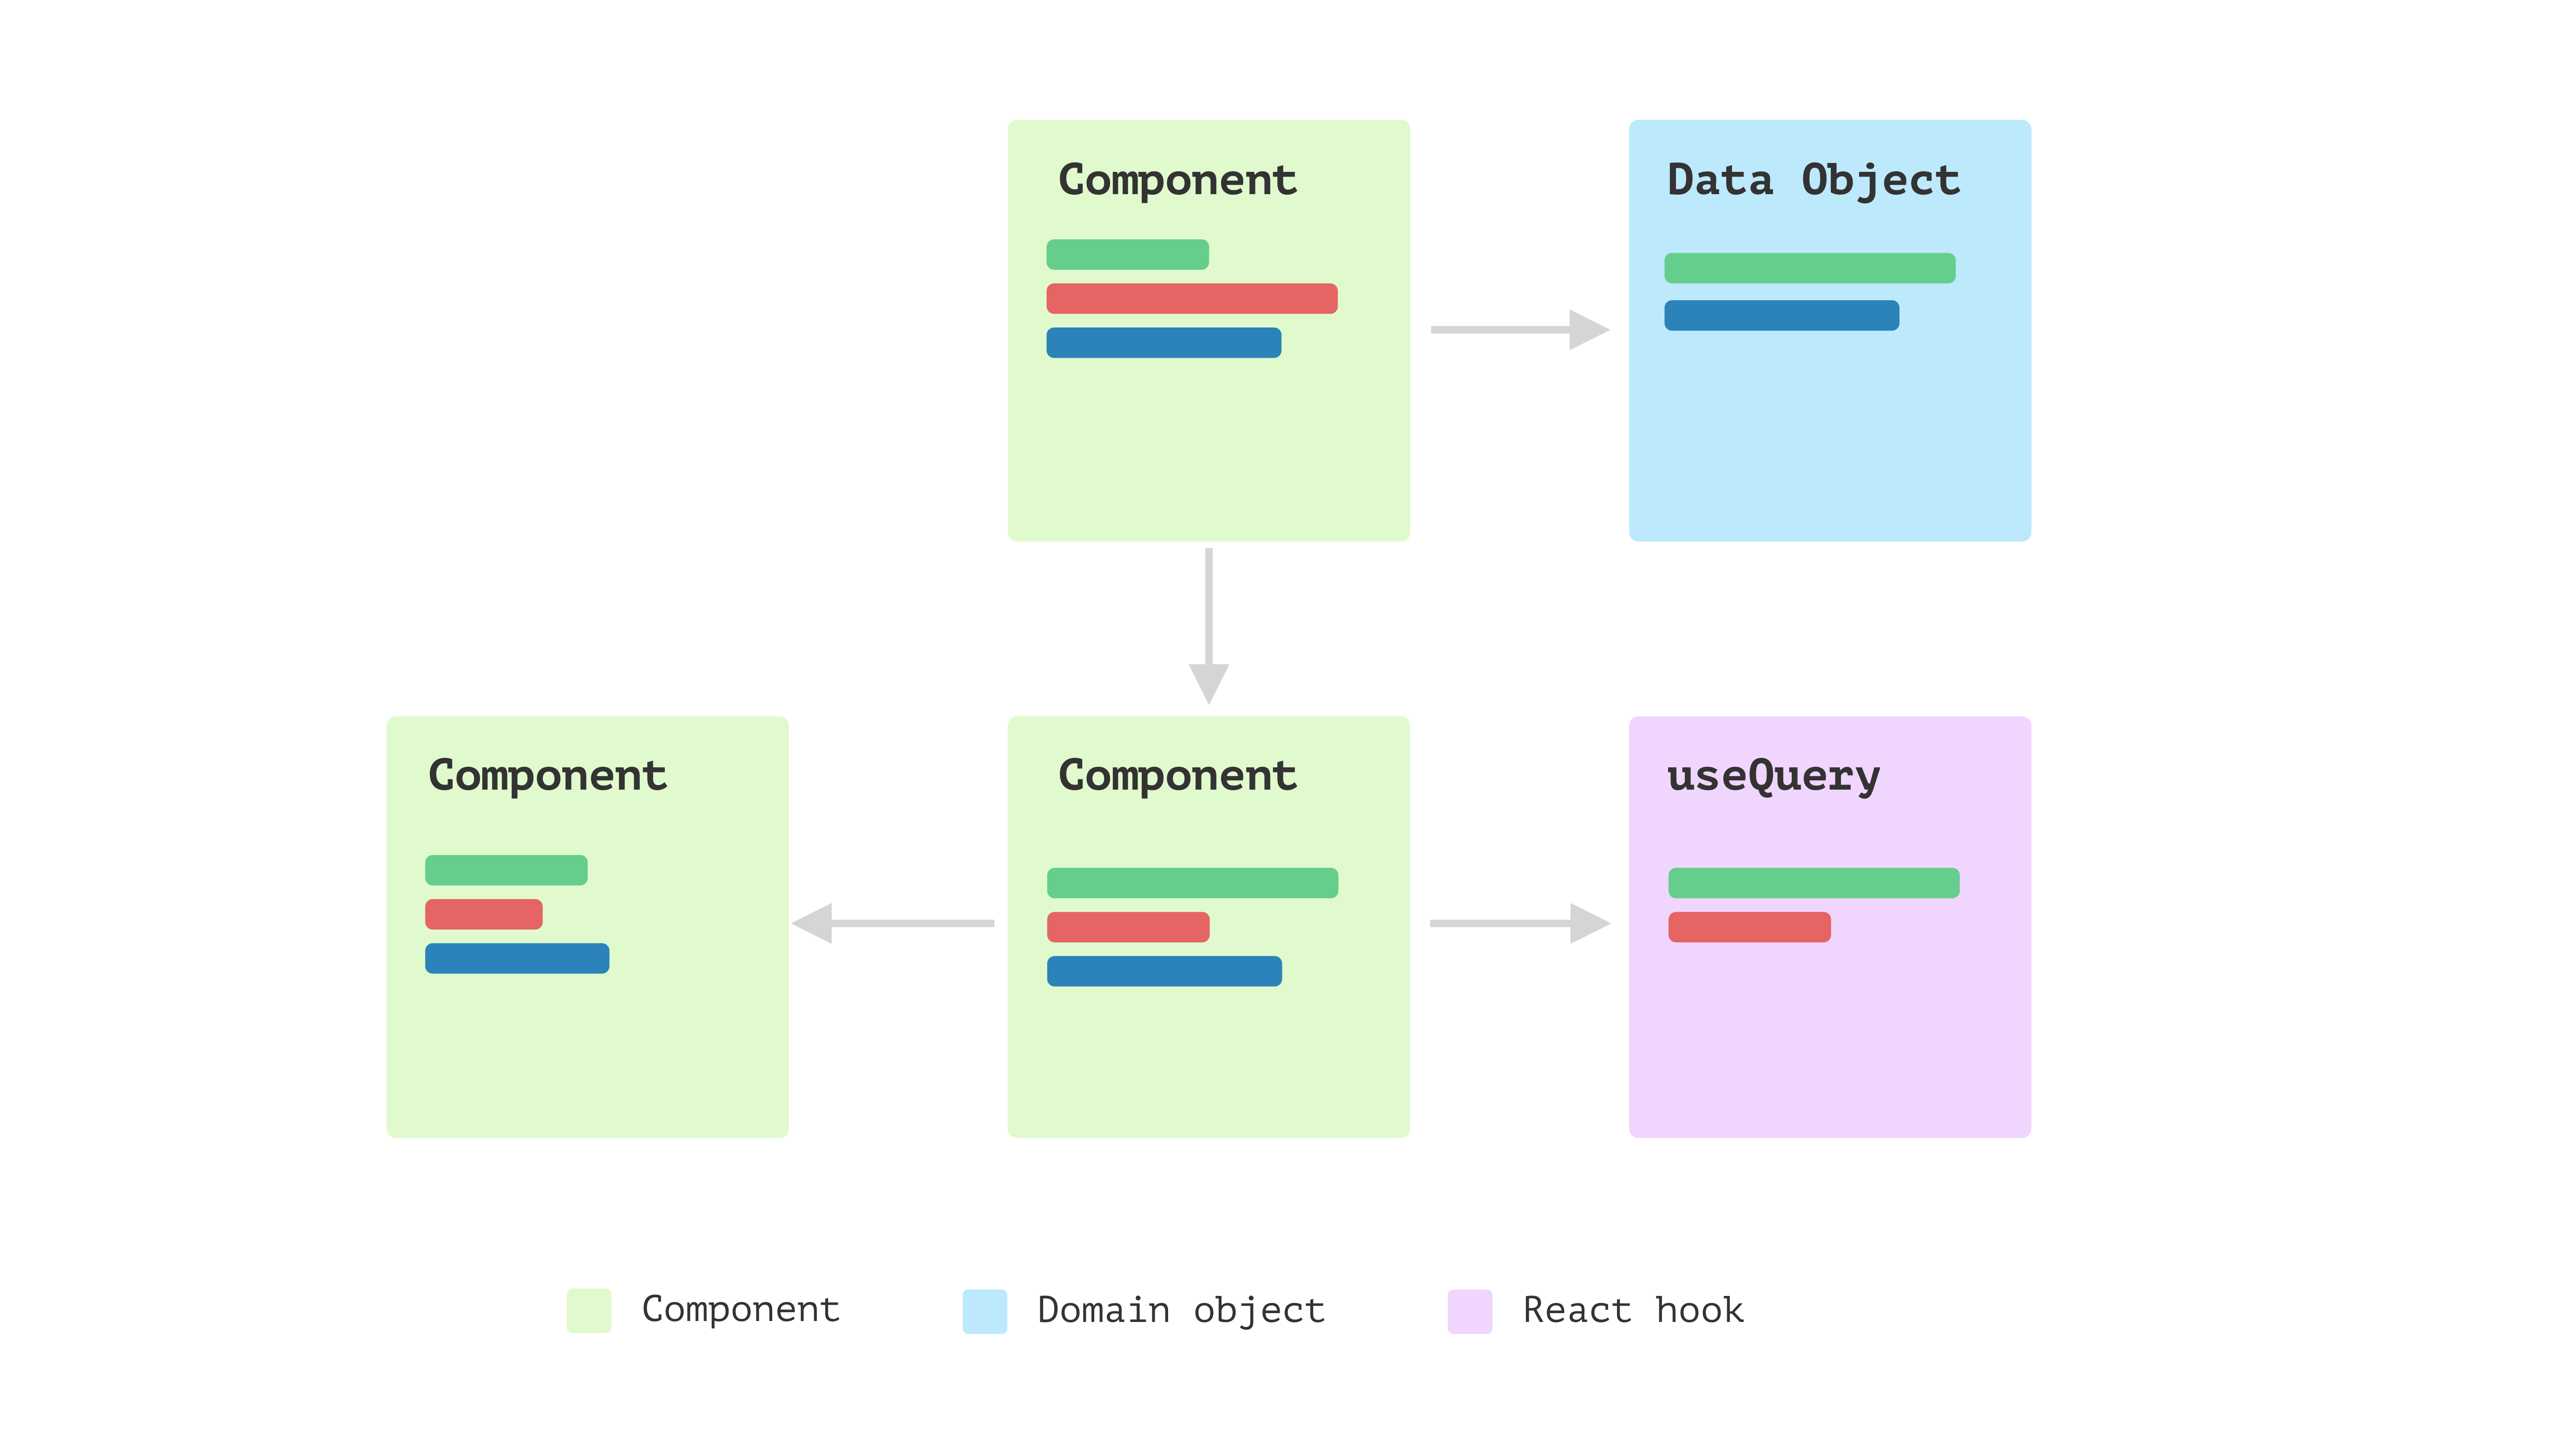
Layered frontend utility
The appliance retains evolving, and you then discover some patterns
emerge. There are a bunch of objects that don’t belong to any person
interface, they usually additionally don’t care about whether or not the underlying information is
from distant service, native storage or cache. After which, you wish to break up
them into totally different layers. Here’s a detailed rationalization concerning the layer
splitting Presentation Area Information Layering.
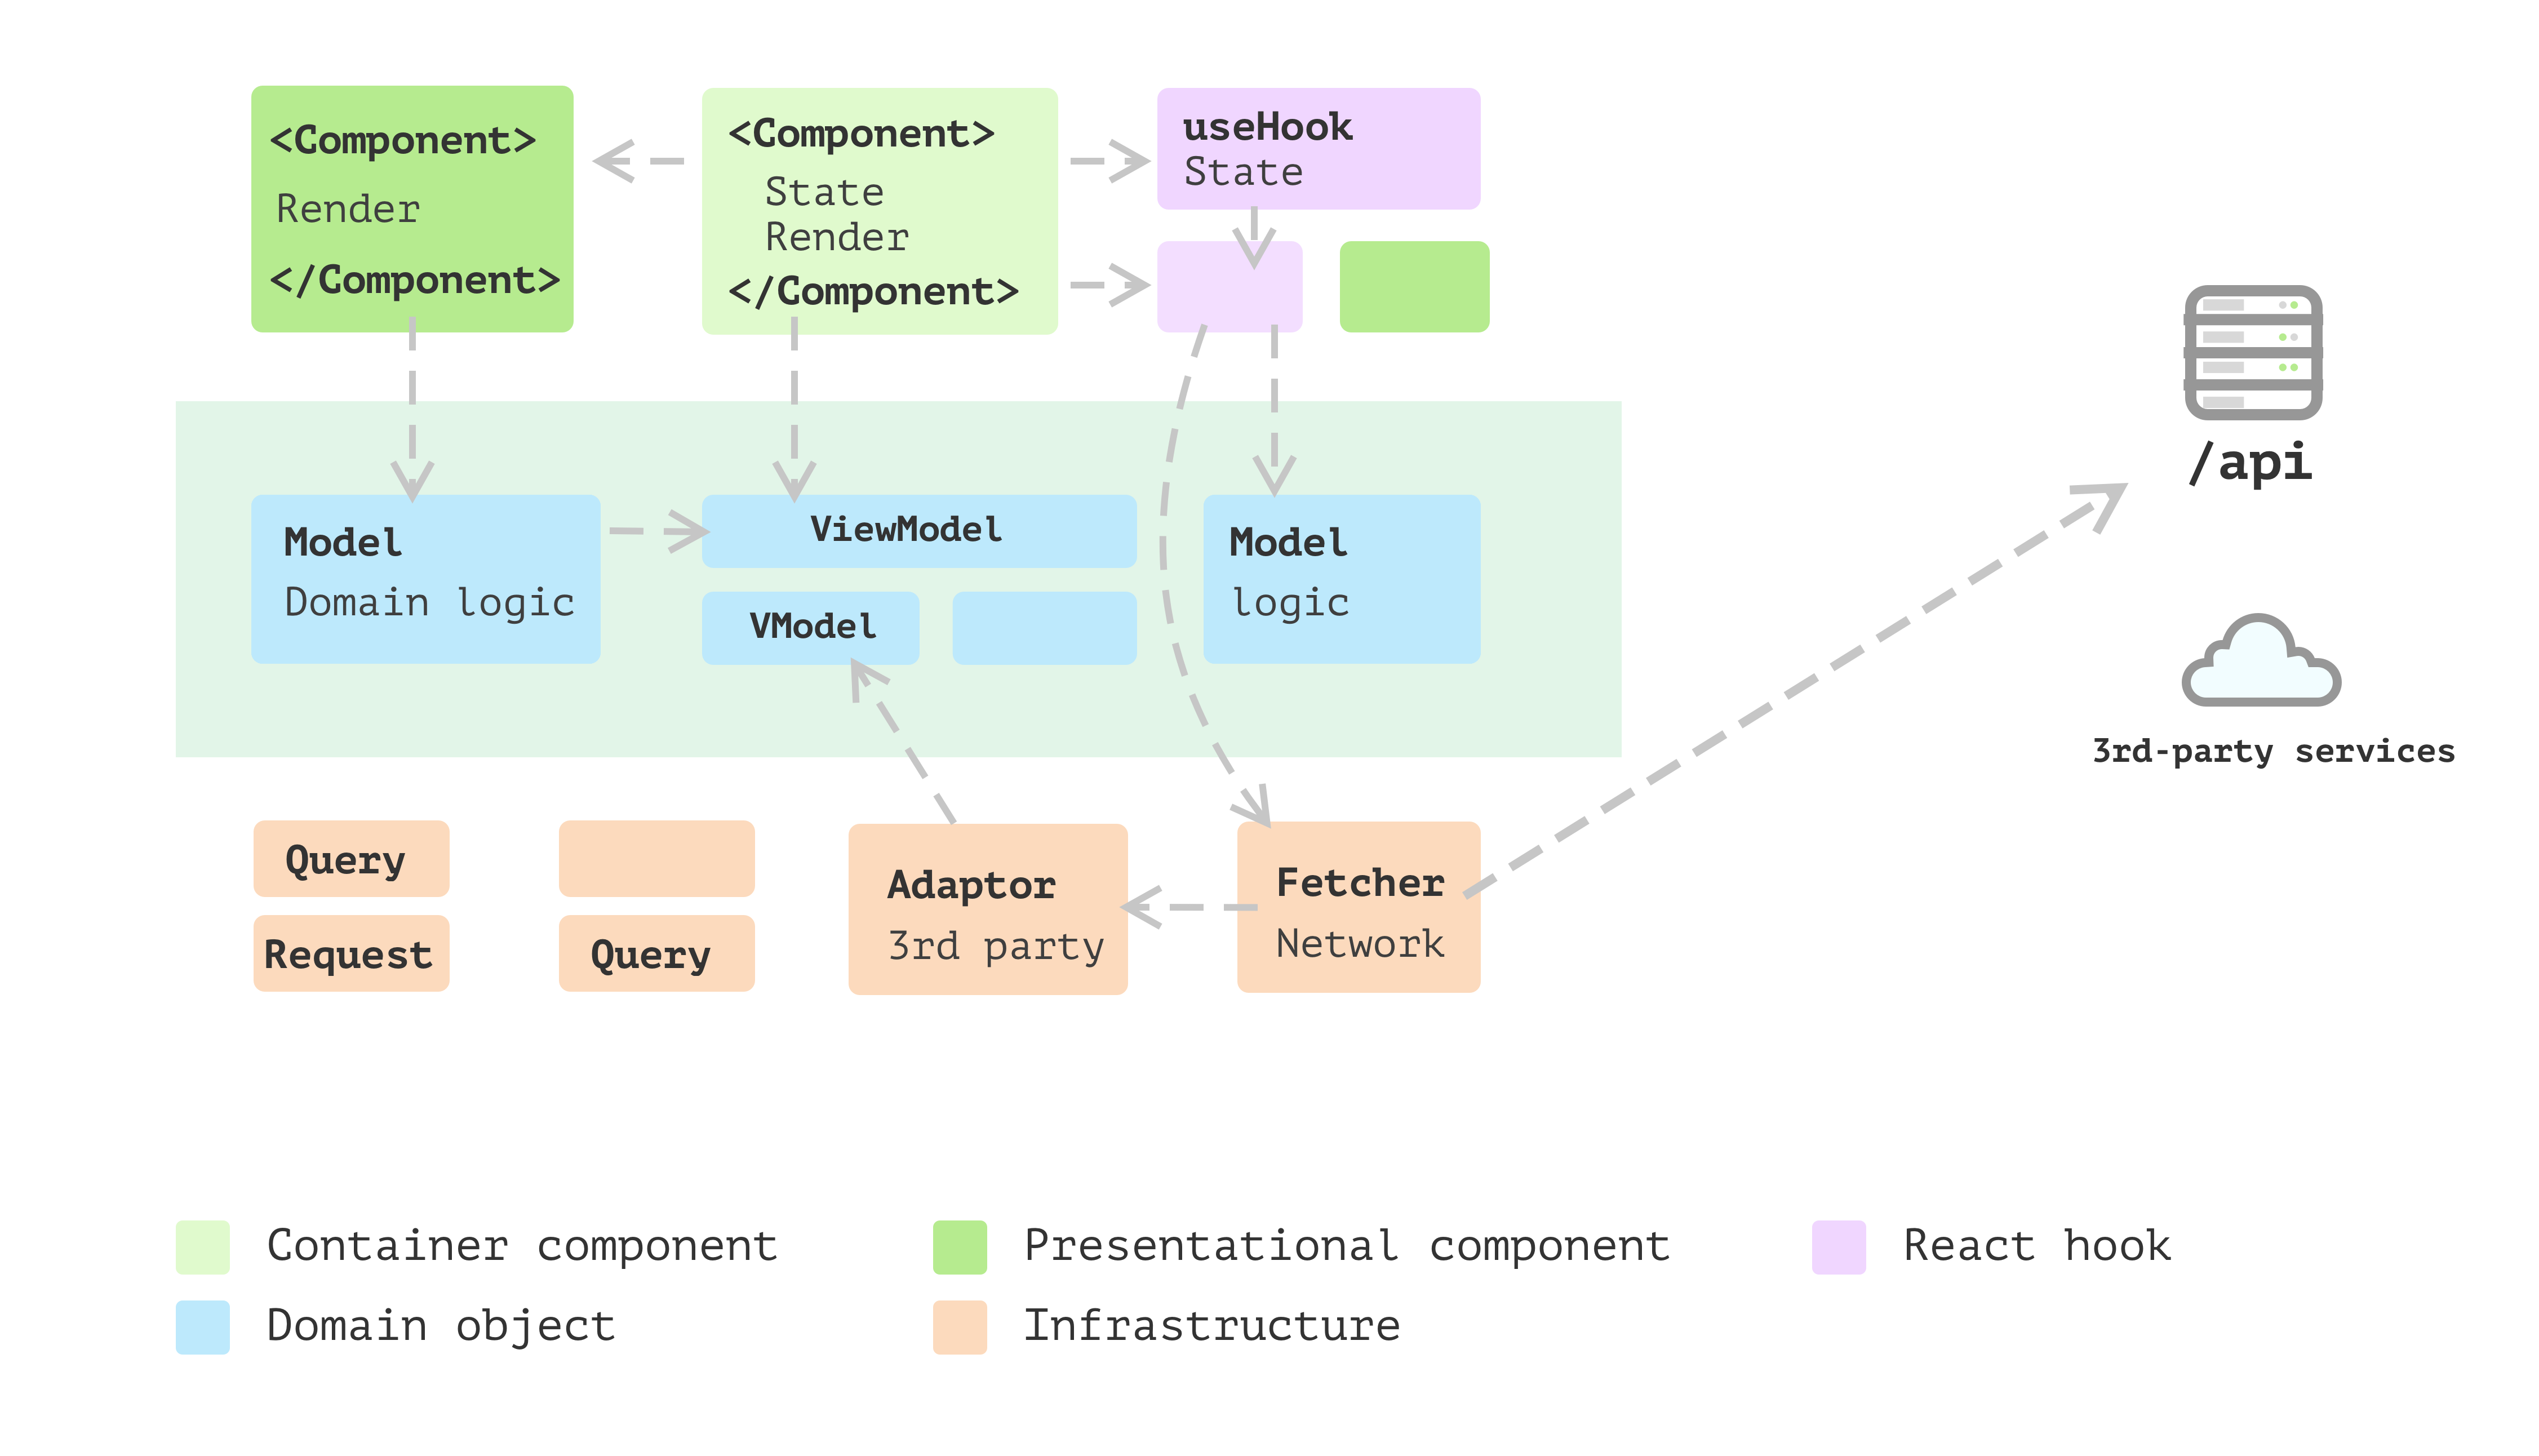
Determine 5: Layered frontend utility
The above evolution course of is a high-level overview, and it is best to
have a style of how it is best to construction your code or no less than what the
route needs to be. Nevertheless, there can be many particulars you must
contemplate earlier than making use of the idea in your utility.
Within the following sections, I’ll stroll you thru a characteristic I
extracted from an actual challenge to show all of the patterns and design
ideas I feel helpful for large frontend functions.
Introduction of the Cost characteristic
I’m utilizing an oversimplified on-line ordering utility as a beginning
level. On this utility, a buyer can choose up some merchandise and add
them to the order, after which they might want to choose one of many cost
strategies to proceed.
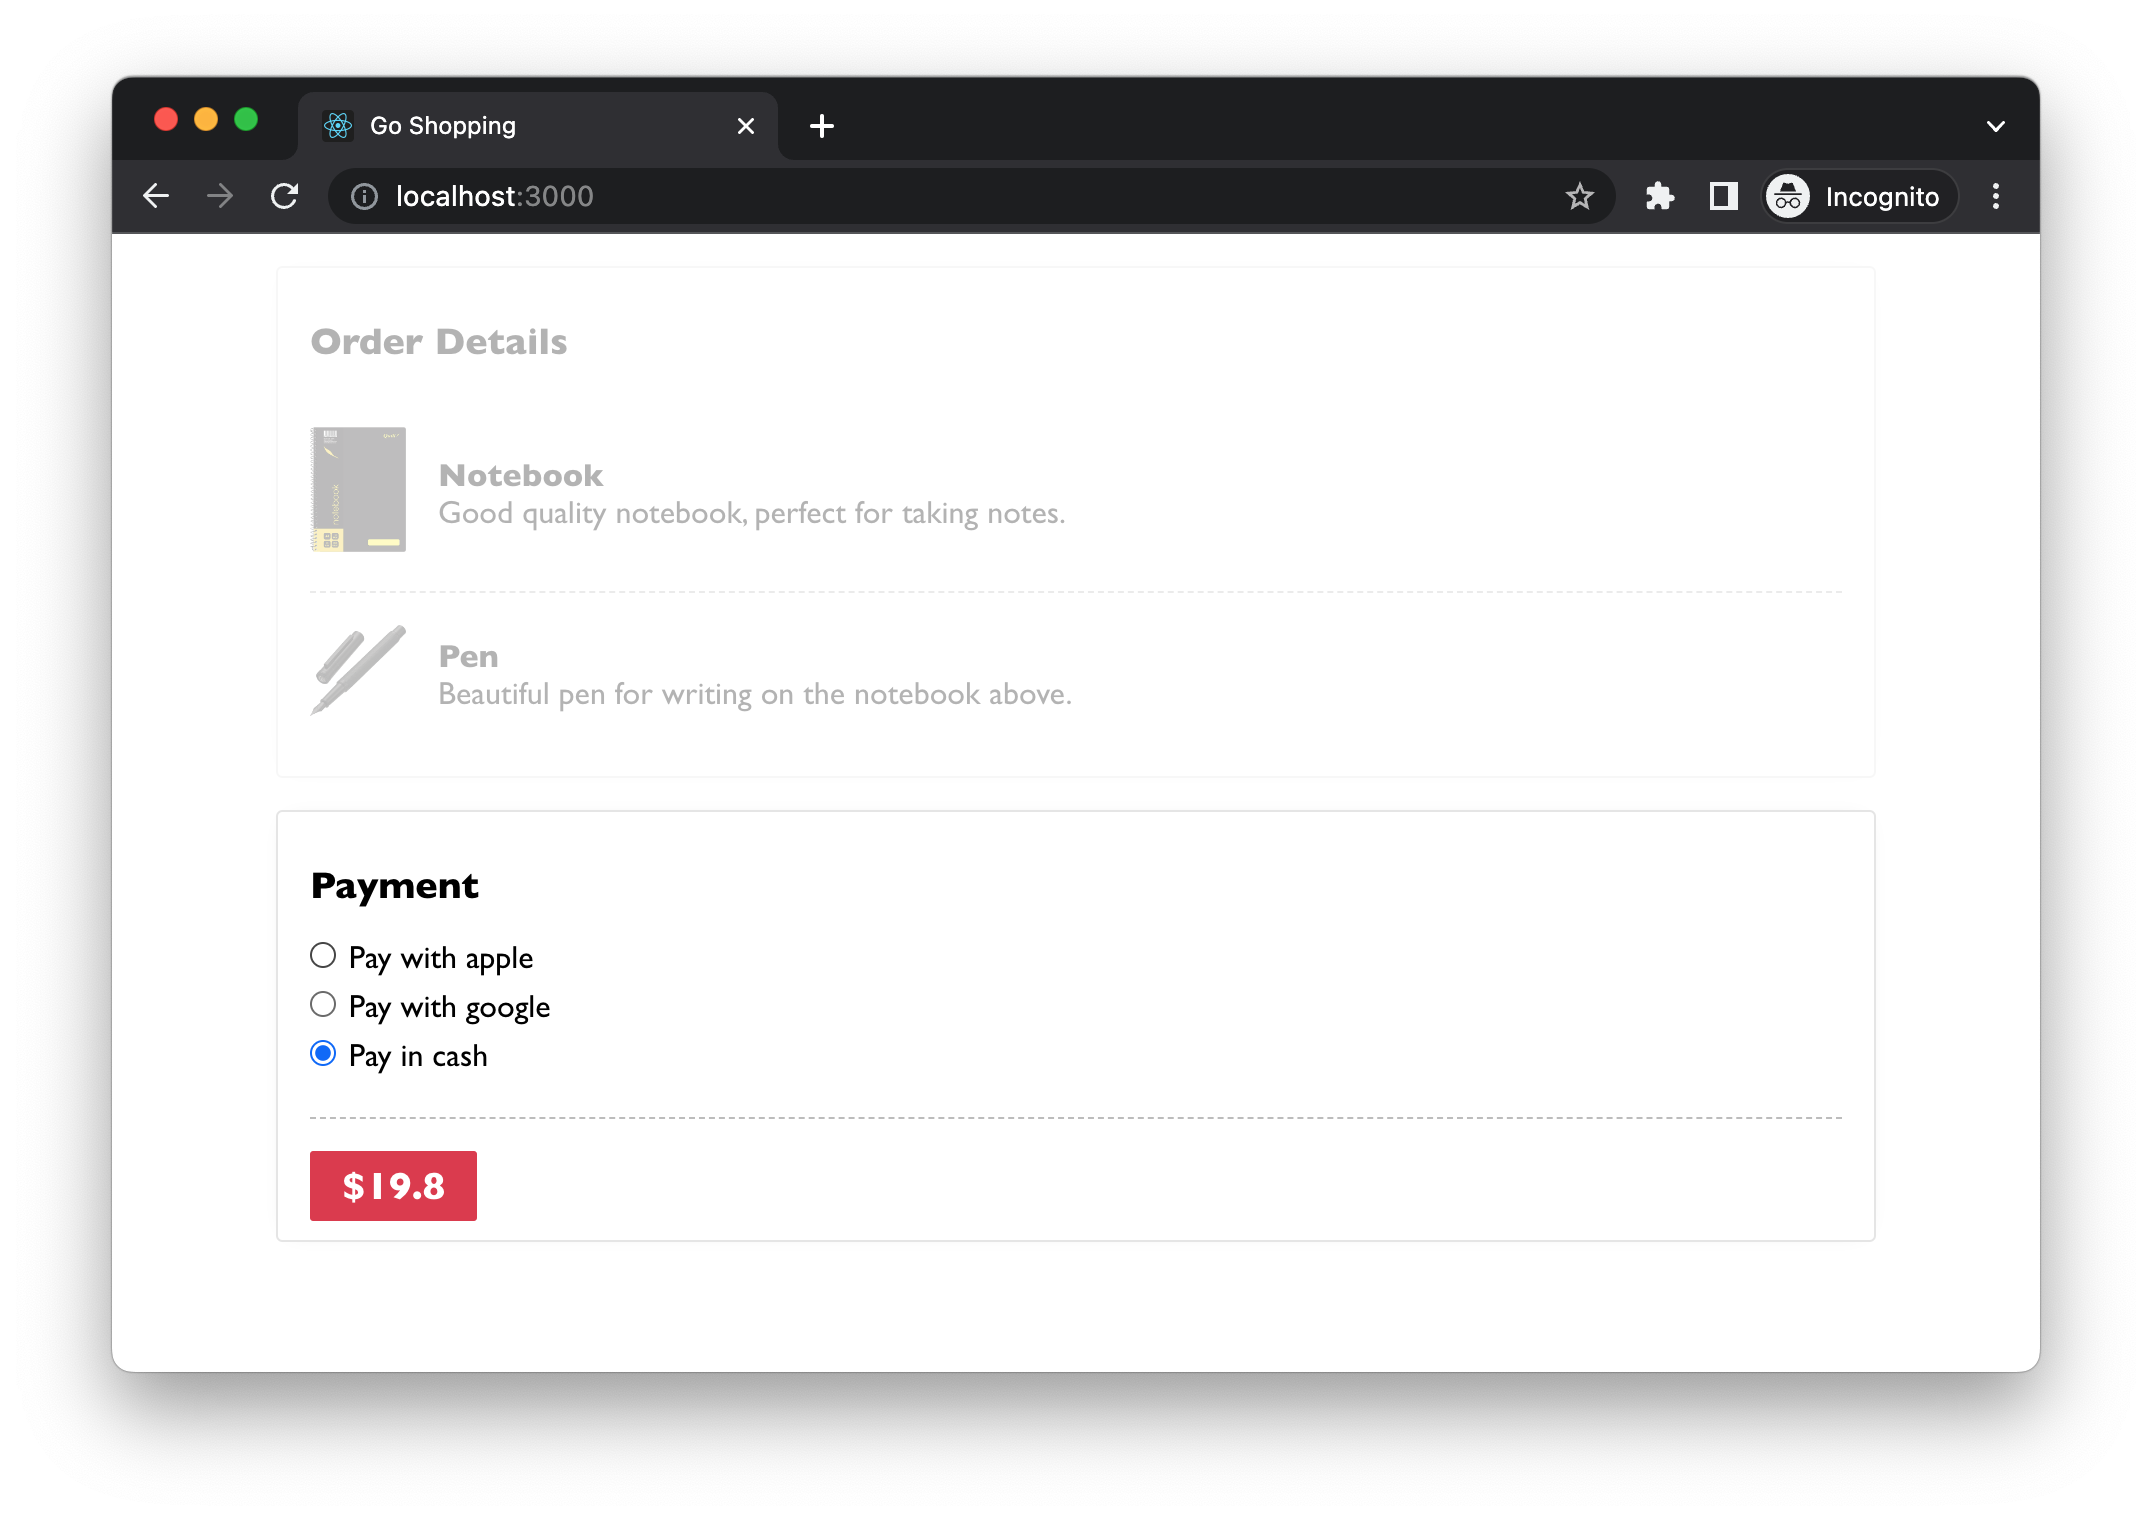
Determine 6: Cost part
These cost technique choices are configured on the server aspect, and
clients from totally different international locations might even see different choices. For instance,
Apple Pay could solely be in style in some international locations. The radio buttons are
data-driven – no matter is fetched from the backend service can be
surfaced. The one exception is that when no configured cost strategies
are returned, we don’t present something and deal with it as “pay in money” by
default.
For simplicity, I’ll skip the precise cost course of and give attention to the
Cost part. Let’s say that after studying the React howdy world
doc and a few stackoverflow searches, you got here up with some code
like this:
src/Cost.tsx…
  export const Cost = ({ quantity }: { quantity: quantity }) => {
    const [paymentMethods, setPaymentMethods] = useState<LocalPaymentMethod[]>(
      []
    );

    useEffect(() => {
      const fetchPaymentMethods = async () => {
        const url = "https://online-ordering.com/api/payment-methods";

        const response = await fetch(url);
        const strategies: RemotePaymentMethod[] = await response.json();

        if (strategies.size > 0) {
          const prolonged: LocalPaymentMethod[] = strategies.map((technique) => ({
            supplier: technique.identify,
            label: `Pay with ${technique.identify}`,
          }));
          prolonged.push({ supplier: "money", label: "Pay in money" });
          setPaymentMethods(prolonged);
        } else {
          setPaymentMethods([]);
        }
      };

      fetchPaymentMethods();
    }, []);

    return (
      <div>
        <h3>Cost</h3>
        <div>
          {paymentMethods.map((technique) => (
            <label key={technique.supplier}>
              <enter
                sort="radio"
                identify="cost"
                worth={technique.supplier}
                defaultChecked={technique.supplier === "money"}
              />
              <span>{technique.label}</span>
            </label>
          ))}
        </div>
        <button>${quantity}</button>
      </div>
    );
  };
The code above is fairly typical. You may need seen it within the get
began tutorial someplace. And it isn’t vital unhealthy. Nevertheless, as we
talked about above, the code has combined totally different issues all in a single
part and makes it a bit tough to learn.
The issue with the preliminary implementation
The primary difficulty I wish to tackle is how busy the part
is. By that, I imply Cost offers with various things and makes the
code tough to learn as you must change context in your head as you
learn.
So as to make any adjustments you must comprehend
how one can initialise community request
,
how one can map the information to an area format that the part can perceive
,
how one can render every cost technique
,
and
the rendering logic for Cost part itself
.
src/Cost.tsx…
  export const Cost = ({ quantity }: { quantity: quantity }) => {
    const [paymentMethods, setPaymentMethods] = useState<LocalPaymentMethod[]>(
      []
    );

    useEffect(() => {
      const fetchPaymentMethods = async () => {
        const url = "https://online-ordering.com/api/payment-methods";

        const response = await fetch(url);
        const strategies: RemotePaymentMethod[] = await response.json();

        if (strategies.size > 0) {
          const prolonged: LocalPaymentMethod[] = strategies.map((technique) => ({
            supplier: technique.identify,
            label: `Pay with ${technique.identify}`,
          }));
          prolonged.push({ supplier: "money", label: "Pay in money" });
          setPaymentMethods(prolonged);
        } else {
          setPaymentMethods([]);
        }
      };

      fetchPaymentMethods();
    }, []);

    return (
      <div>
        <h3>Cost</h3>
        <div>
          {paymentMethods.map((technique) => (
            <label key={technique.supplier}>
              <enter
                sort="radio"
                identify="cost"
                worth={technique.supplier}
                defaultChecked={technique.supplier === "money"}
              />
              <span>{technique.label}</span>
            </label>
          ))}
        </div>
        <button>${quantity}</button>
      </div>
    );
  };
It is not an enormous drawback at this stage for this easy instance.
Nevertheless, because the code will get larger and extra complicated, we’ll must
refactoring them a bit.
It’s good observe to separate view and non-view code into separate
locations. The reason being, typically, views are altering extra steadily than
non-view logic. Additionally, as they cope with totally different elements of the
utility, separating them means that you can give attention to a selected
self-contained module that’s way more manageable when implementing new
options.
The break up of view and non-view code
In React, we are able to use a customized hook to keep up state of a part
whereas conserving the part itself kind of stateless. We will
use
to create a operate referred to as usePaymentMethods (the
prefix use is a conference in React to point the operate is a hook
and dealing with some states in it):
src/Cost.tsx…
  const usePaymentMethods = () => {
    const [paymentMethods, setPaymentMethods] = useState<LocalPaymentMethod[]>(
      []
    );

    useEffect(() => {
      const fetchPaymentMethods = async () => {
        const url = "https://online-ordering.com/api/payment-methods";

        const response = await fetch(url);
        const strategies: RemotePaymentMethod[] = await response.json();

        if (strategies.size > 0) {
          const prolonged: LocalPaymentMethod[] = strategies.map((technique) => ({
            supplier: technique.identify,
            label: `Pay with ${technique.identify}`,
          }));
          prolonged.push({ supplier: "money", label: "Pay in money" });
          setPaymentMethods(prolonged);
        } else {
          setPaymentMethods([]);
        }
      };

      fetchPaymentMethods();
    }, []);

    return {
      paymentMethods,
    };
  };
This returns a paymentMethods array (in sort LocalPaymentMethod) as
inner state and is prepared for use in rendering. So the logic in
Cost will be simplified as:
src/Cost.tsx…
  export const Cost = ({ quantity }: { quantity: quantity }) => {
    const { paymentMethods } = usePaymentMethods();

    return (
      <div>
        <h3>Cost</h3>
        <div>
          {paymentMethods.map((technique) => (
            <label key={technique.supplier}>
              <enter
                sort="radio"
                identify="cost"
                worth={technique.supplier}
                defaultChecked={technique.supplier === "money"}
              />
              <span>{technique.label}</span>
            </label>
          ))}
        </div>
        <button>${quantity}</button>
      </div>
    );
  };
This helps relieve the ache within the Cost part. Nevertheless, when you
take a look at the block for iterating via paymentMethods, it appears a
idea is lacking right here. In different phrases, this block deserves its personal
part. Ideally, we would like every part to give attention to, just one
factor.
Information modelling to encapsulate logic
Up to now, the adjustments we’ve made are all about splitting view and
non-view code into totally different locations. It really works properly. The hook handles information
fetching and reshaping. Each Cost and PaymentMethods are comparatively
small and simple to grasp.
Nevertheless, when you look intently, there may be nonetheless room for enchancment. To
begin with, within the pure operate part PaymentMethods, we’ve a bit
of logic to verify if a cost technique needs to be checked by default:
src/Cost.tsx…
  const PaymentMethods = ({
    paymentMethods,
  }: {
    paymentMethods: LocalPaymentMethod[];
  }) => (
    <>
      {paymentMethods.map((technique) => (
        <label key={technique.supplier}>
          <enter
            sort="radio"
            identify="cost"
            worth={technique.supplier}
            defaultChecked={technique.supplier === "money"}
          />
          <span>{technique.label}</span>
        </label>
      ))}
    </>
  );
These check statements in a view will be thought of a logic leak, and
progressively they are often scatted elsewhere and make modification
tougher.
One other level of potential logic leakage is within the information conversion
the place we fetch information:
src/Cost.tsx…
  const usePaymentMethods = () => {
    const [paymentMethods, setPaymentMethods] = useState<LocalPaymentMethod[]>(
      []
    );

    useEffect(() => {
      const fetchPaymentMethods = async () => {
        const url = "https://online-ordering.com/api/payment-methods";

        const response = await fetch(url);
        const strategies: RemotePaymentMethod[] = await response.json();

        if (strategies.size > 0) {
          const prolonged: LocalPaymentMethod[] = strategies.map((technique) => ({
            supplier: technique.identify,
            label: `Pay with ${technique.identify}`,
          }));
          prolonged.push({ supplier: "money", label: "Pay in money" });
          setPaymentMethods(prolonged);
        } else {
          setPaymentMethods([]);
        }
      };

      fetchPaymentMethods();
    }, []);

    return {
      paymentMethods,
    };
  };
Observe the nameless operate inside strategies.map does the conversion
silently, and this logic, together with the technique.supplier === "money"
above will be extracted into a category.
We might have a category PaymentMethod with the information and behavior
centralised right into a single place:
src/PaymentMethod.ts…
  class PaymentMethod {
    personal remotePaymentMethod: RemotePaymentMethod;

    constructor(remotePaymentMethod: RemotePaymentMethod) {
      this.remotePaymentMethod = remotePaymentMethod;
    }

    get supplier() {
      return this.remotePaymentMethod.identify;
    }

    get label() {
      if(this.supplier === 'money') {
        return `Pay in ${this.supplier}`
      }
      return `Pay with ${this.supplier}`;
    }

    get isDefaultMethod() {
      return this.supplier === "money";
    }
  }
With the category, I can outline the default money cost technique:
const payInCash = new PaymentMethod({ identify: "money" });
And in the course of the conversion – after the cost strategies are fetched from
the distant service – I can assemble the PaymentMethod object in-place. And even
extract a small operate referred to as convertPaymentMethods:
src/usePaymentMethods.ts…
  const convertPaymentMethods = (strategies: RemotePaymentMethod[]) => {
    if (strategies.size === 0) {
      return [];
    }

    const prolonged: PaymentMethod[] = strategies.map(
      (technique) => new PaymentMethod(technique)
    );
    prolonged.push(payInCash);

    return prolonged;
  };
Additionally, within the PaymentMethods part, we don’t use the
technique.supplier === "money"to verify anymore, and as a substitute name the
getter:
src/PaymentMethods.tsx…
  export const PaymentMethods = ({ choices }: { choices: PaymentMethod[] }) => (
    <>
      {choices.map((technique) => (
        <label key={technique.supplier}>
          <enter
            sort="radio"
            identify="cost"
            worth={technique.supplier}
            defaultChecked={technique.isDefaultMethod}
          />
          <span>{technique.label}</span>
        </label>
      ))}
    </>
  );
Now we’re restructuring our Cost part right into a bunch of smaller
elements that work collectively to complete the work.
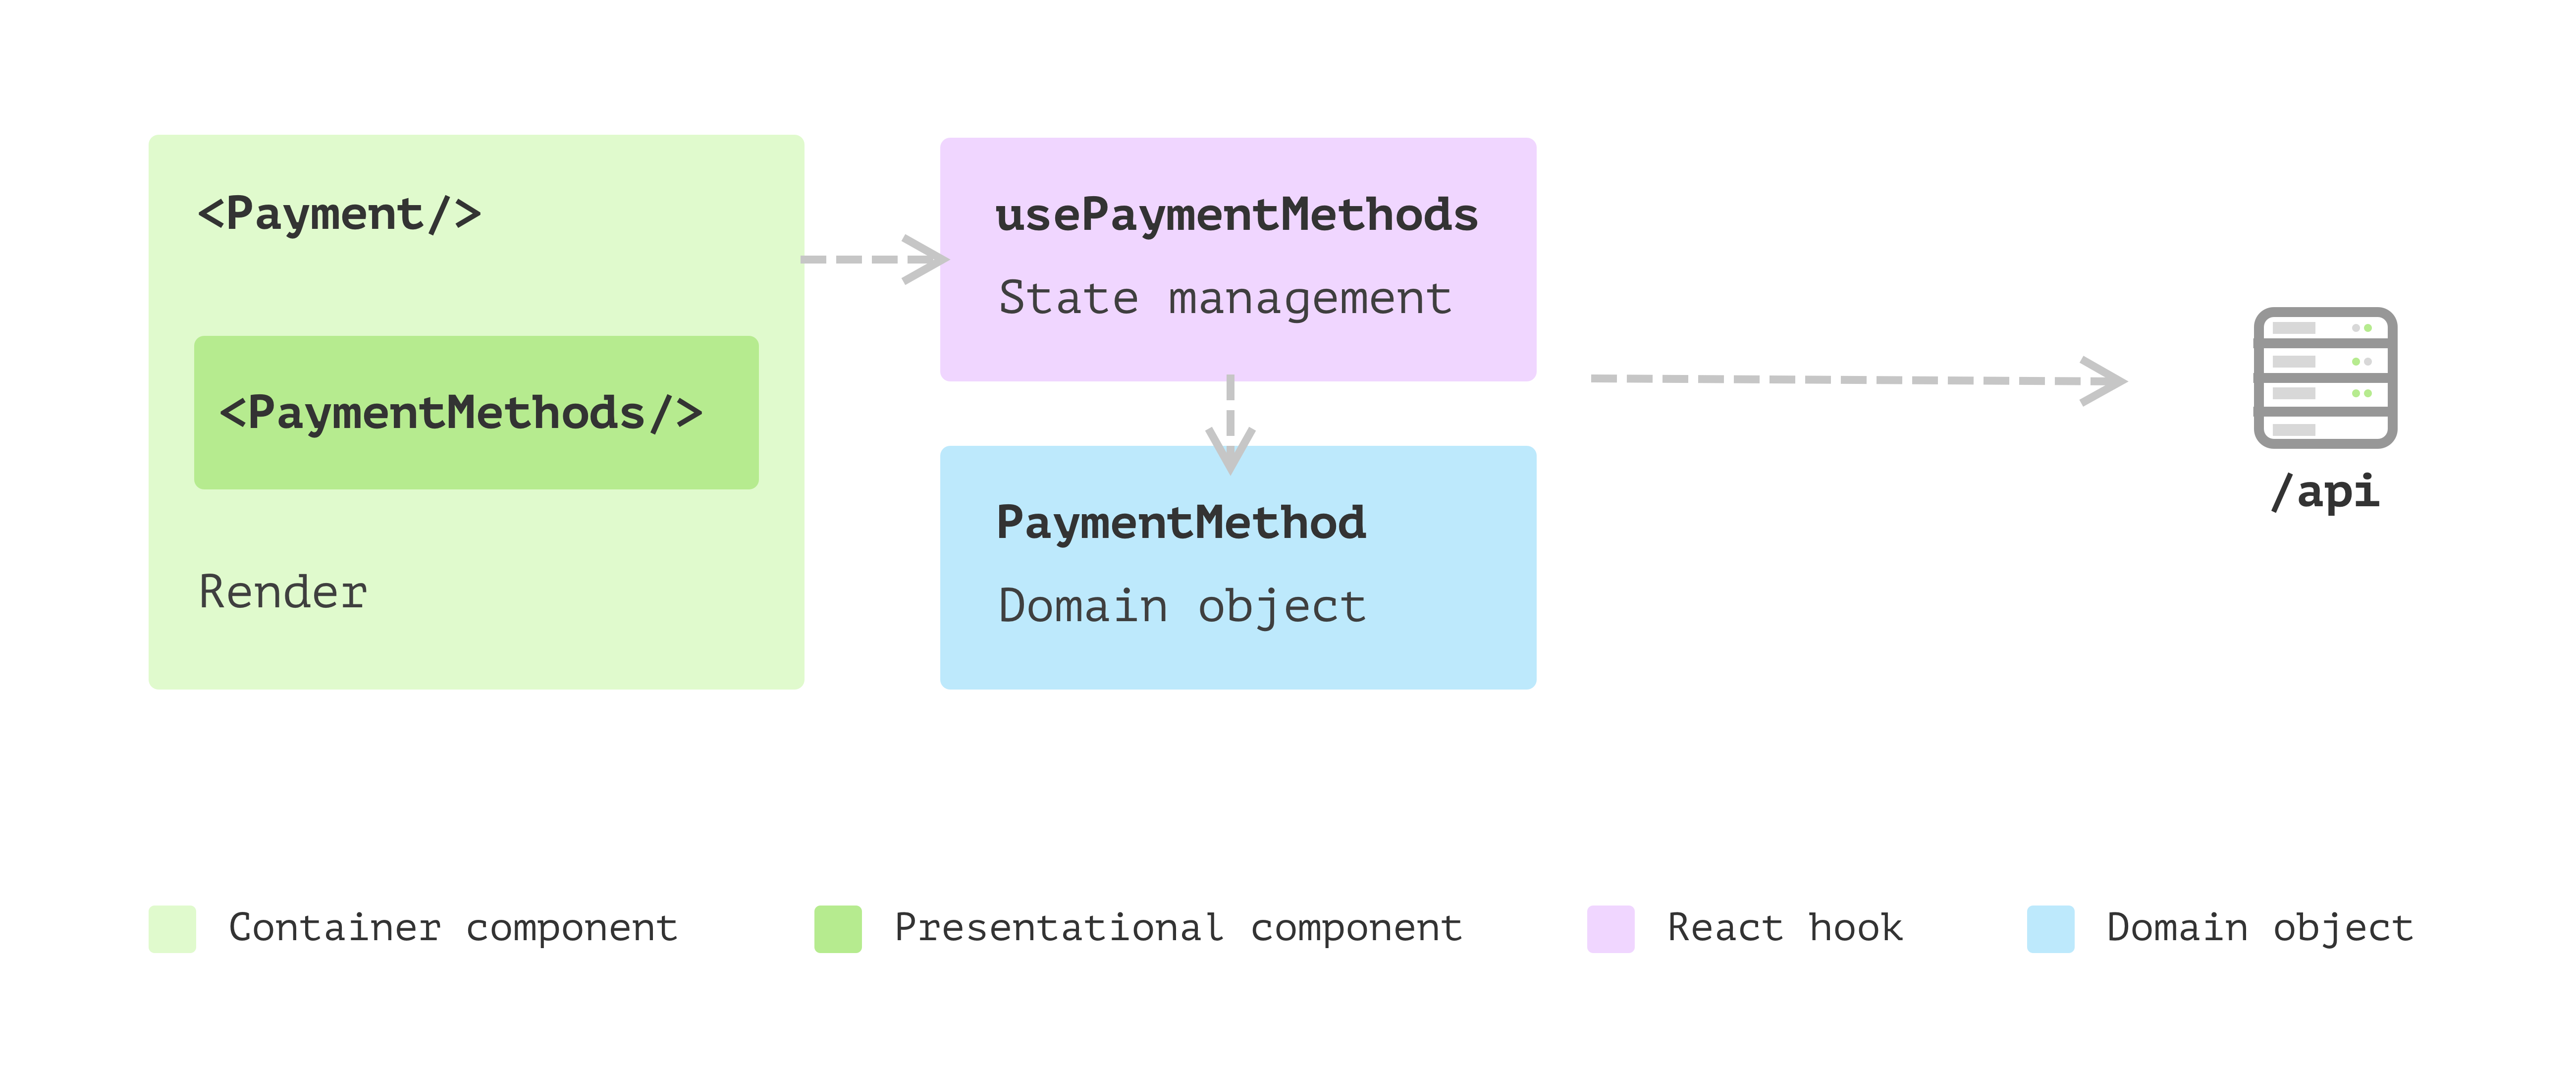
Determine 7: Refactored Cost with extra elements that may be composed simply
The advantages of the brand new construction
- Having a category encapsulates all of the logic round a cost technique. It’s a
area object and doesn’t have any UI-related data. So testing and
probably modifying logic right here is far simpler than when embedded in a
view. - The brand new extracted part
PaymentMethodsis a pure operate and solely
is determined by a site object array, which makes it tremendous straightforward to check and reuse
elsewhere. We would must go in aonSelectcallback to it, however even in
that case, it’s a pure operate and doesn’t have to the touch any exterior
states. - Every a part of the characteristic is evident. If a brand new requirement comes, we are able to
navigate to the fitting place with out studying all of the code.
I’ve to make the instance on this article sufficiently complicated in order that
many patterns will be extracted. All these patterns and ideas are
there to assist simplify our code’s modifications.
New requirement: donate to a charity
Let’s study the idea right here with some additional adjustments to the
utility. The brand new requirement is that we wish to supply an choice for
clients to donate a small sum of money as a tip to a charity alongside
with their order.
For instance, if the order quantity is $19.80, we ask if they want
to donate $0.20. And if a person agrees to donate it, we’ll present the overall
quantity on the button.
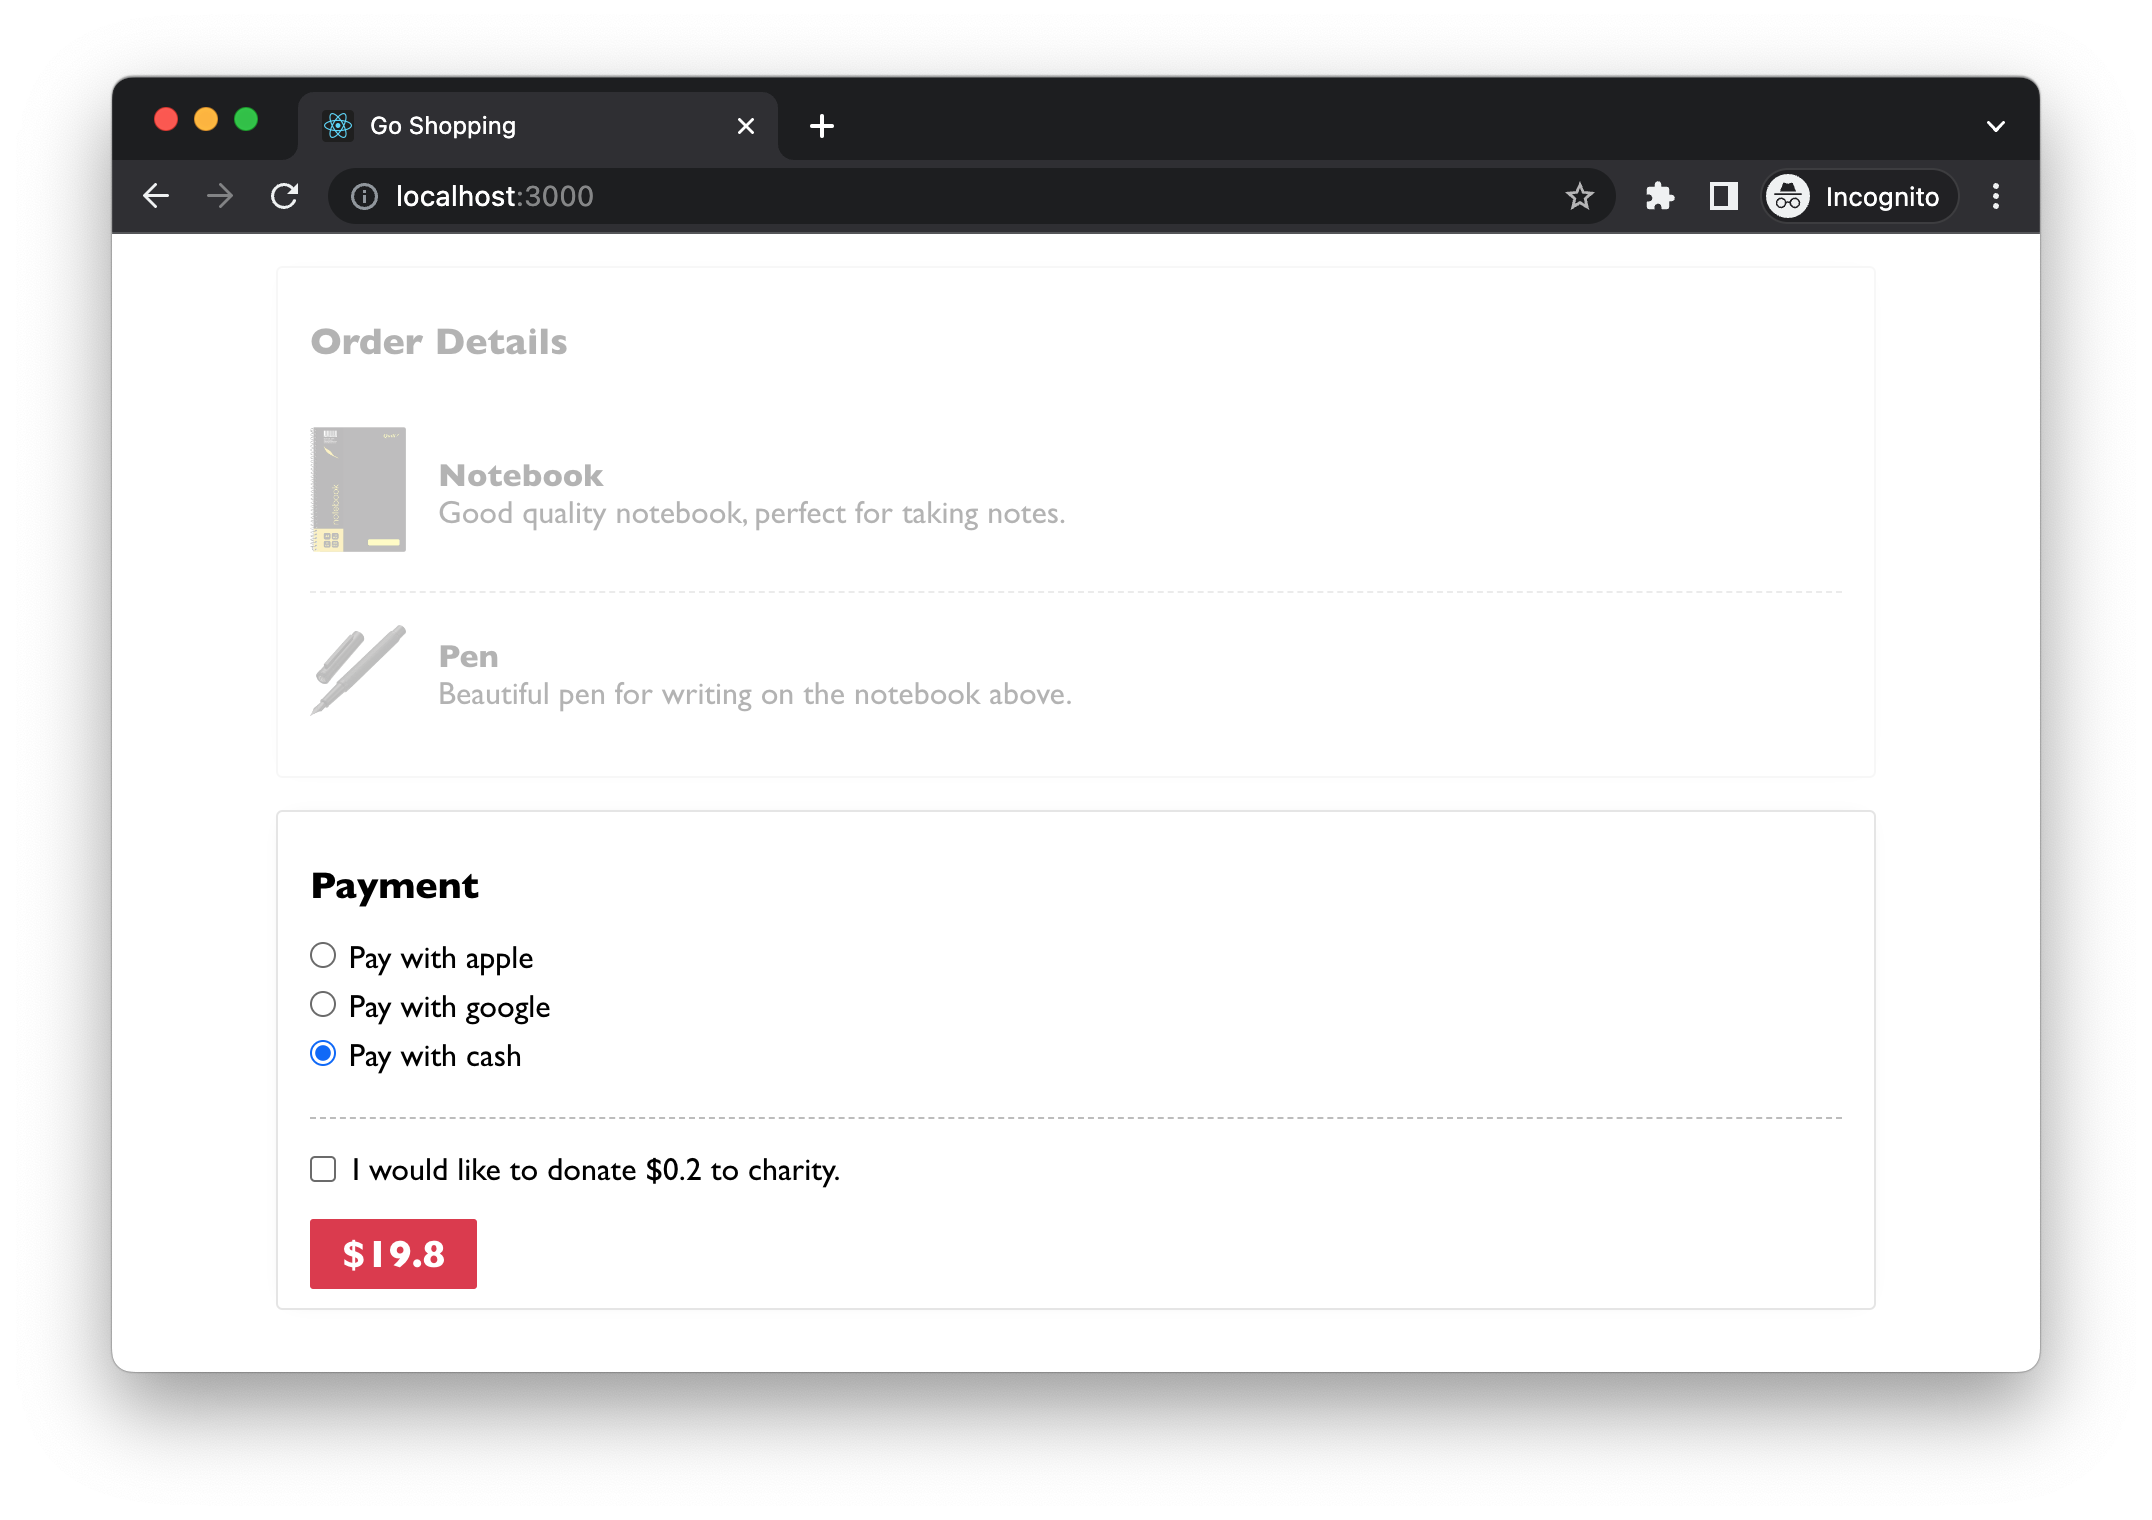
Determine 8: Donate to a charity
Earlier than we make any adjustments, let’s have a fast take a look at the present code
construction. I desire have totally different elements of their folder so it is easy for
me to navigate when it grows larger.
      src
      ├── App.tsx
      ├── parts
      │   ├── Cost.tsx
      │   └── PaymentMethods.tsx
      ├── hooks
      │   └── usePaymentMethods.ts
      ├── fashions
      │   └── PaymentMethod.ts
      └── varieties.ts
App.tsx is the primary entry, it makes use of Cost part, and Cost
makes use of PaymentMethods for rendering totally different cost choices. The hook
usePaymentMethods is liable for fetching information from distant service
after which convert it to a PaymentMethod area object that’s used to
maintain label and the isDefaultChecked flag.
Inside state: comply with donation
To make these adjustments in Cost, we’d like a boolean state
agreeToDonate to point whether or not a person chosen the checkbox on the
web page.
src/Cost.tsx…
  const [agreeToDonate, setAgreeToDonate] = useState<boolean>(false);

  const { complete, tip } = useMemo(
    () => ({
      complete: agreeToDonate ? Math.flooring(quantity + 1) : quantity,
      tip: parseFloat((Math.flooring(quantity + 1) - quantity).toPrecision(10)),
    }),
    [amount, agreeToDonate]
  );
The operate Math.flooring will around the quantity down so we are able to get the
correct quantity when the person selects agreeToDonate, and the distinction
between the rounded-up worth and the unique quantity can be assigned to tip.
And for the view, the JSX can be a checkbox plus a brief
description:
src/Cost.tsx…
  return (
    <div>
      <h3>Cost</h3>
      <PaymentMethods choices={paymentMethods} />
      <div>
        <label>
          <enter
            sort="checkbox"
            onChange={handleChange}
            checked={agreeToDonate}
          />
          <p>
            {agreeToDonate
              ? "Thanks to your donation."
              : `I wish to donate $${tip} to charity.`}
          </p>
        </label>
      </div>
      <button>${complete}</button>
    </div>
  );
With these new adjustments, our code begins dealing with a number of issues once more.
It’s important to remain alert for potential mixing of view and non-view
code. If you happen to discover any pointless mixing, search for methods to separate them.
Observe that it isn’t a set-in-stone rule. Hold issues all collectively good
and tidy for small and cohesive parts, so you do not have to look in
a number of locations to grasp the general behaviour. Usually, it is best to
bear in mind to keep away from the part file rising too large to understand.
Extra adjustments about round-up logic
The round-up appears good up to now, and because the enterprise expands to different
international locations, it comes with new necessities. The identical logic doesn’t work in
Japan market as 0.1 Yen is just too small as a donation, and it must spherical
as much as the closest hundred for the Japanese foreign money. And for Denmark, it
must spherical as much as the closest tens.
It appears like a straightforward repair. All I want is a countryCode handed into
the Cost part, proper?
<Cost quantity={3312} countryCode="JP" />;
And since all the logic is now outlined within the useRoundUp hook, I
may go the countryCode via to the hook.
const useRoundUp = (quantity: quantity, countryCode: string) => {
  //...

  const { complete, tip } = useMemo(
    () => ({
      complete: agreeToDonate
        ? countryCode === "JP"
          ? Math.flooring(quantity / 100 + 1) * 100
          : Math.flooring(quantity + 1)
        : quantity,
      //...
    }),
    [amount, agreeToDonate, countryCode]
  );
  //...
};
You’ll discover that the if-else can go on and on as a brand new
countryCode is added within the useEffect block. And for the
getTipMessage, we’d like the identical if-else checks as a special nation
could use different foreign money signal (as a substitute of a greenback signal by default):
const formatCheckboxLabel = (
  agreeToDonate: boolean,
  tip: quantity,
  countryCode: string
) => {
  const currencySign = countryCode === "JP" ? "¥" : "$";

  return agreeToDonate
    ? "Thanks to your donation."
    : `I wish to donate ${currencySign}${tip} to charity.`;
};
One final thing we additionally want to vary is the foreign money signal on the
button:
<button>
  {countryCode === "JP" ? "¥" : "$"}
  {complete}
</button>;
The shotgun surgical procedure drawback
This state of affairs is the well-known “shotgun surgical procedure” odor we see in
many locations (not significantly in React functions). This primarily
says that we’ll have to the touch a number of modules each time we have to modify
the code for both a bug fixing or including a brand new characteristic. And certainly, it’s
simpler to make errors with this many adjustments, particularly when your checks
are inadequate.
Determine 10: The shotgun surgical procedure odor
As illustrated above, the colored traces point out branches of nation
code checks that cross many information. In views, we’ll must do separate
issues for various nation code, whereas in hooks, we’ll want comparable
branches. And each time we have to add a brand new nation code, we’ll must
contact all these elements.
For instance, if we contemplate Denmark as a brand new nation the enterprise is
increasing to, we’ll find yourself with code in lots of locations like:
const currencySignMap = {
  JP: "¥",
  DK: "Kr.",
  AU: "$",
};

const getCurrencySign = (countryCode: CountryCode) =>
  currencySignMap[countryCode];
One attainable answer for the issue of getting branches scattered in
totally different locations is to make use of polymorphism to switch these change instances or
desk look-up logic. We will use Extract Class on these
properties after which Substitute Conditional with Polymorphism.
Polymorphism to the rescue
The very first thing we are able to do is study all of the variations to see what
must be extracted into a category. For instance, totally different international locations have
totally different foreign money indicators, so getCurrencySign will be extracted right into a
public interface. Additionally ,international locations may need totally different round-up
algorithms, thus getRoundUpAmount and getTip can go to the
interface.
export interface PaymentStrategy {
  getRoundUpAmount(quantity: quantity): quantity;

  getTip(quantity: quantity): quantity;
}
A concrete implementation of the technique interface could be like
following the code snippet: PaymentStrategyAU.
export class PaymentStrategyAU implements PaymentStrategy {
  get currencySign(): string {
    return "$";
  }

  getRoundUpAmount(quantity: quantity): quantity {
    return Math.flooring(quantity + 1);
  }

  getTip(quantity: quantity): quantity {
    return parseFloat((this.getRoundUpAmount(quantity) - quantity).toPrecision(10));
  }
}
Observe right here the interface and courses don’t have anything to do with the UI
straight. This logic will be shared somewhere else within the utility or
even moved to backend providers (if the backend is written in Node, for
instance).
We might have subclasses for every nation, and every has the nation particular
round-up logic. Nevertheless, as operate is first-class citizen in JavaScript, we
can go within the round-up algorithm into the technique implementation to make the
code much less overhead with out subclasses. And becaues we’ve just one
implementation of the interface, we are able to use Inline Class to
cut back the single-implementation-interface.
src/fashions/CountryPayment.ts…
  export class CountryPayment {
    personal readonly _currencySign: string;
    personal readonly algorithm: RoundUpStrategy;

    public constructor(currencySign: string, roundUpAlgorithm: RoundUpStrategy) {
      this._currencySign = currencySign;
      this.algorithm = roundUpAlgorithm;
    }

    get currencySign(): string {
      return this._currencySign;
    }

    getRoundUpAmount(quantity: quantity): quantity {
      return this.algorithm(quantity);
    }

    getTip(quantity: quantity): quantity {
      return calculateTipFor(this.getRoundUpAmount.bind(this))(quantity);
    }
  }
As illustrated under, as a substitute of rely upon scattered logic in
parts and hooks, they now solely depend on a single class
PaymentStrategy. And at runtime, we are able to simply substitute one occasion
of PaymentStrategy for an additional (the crimson, inexperienced and blue sq. signifies
totally different cases of PaymentStrategy class).
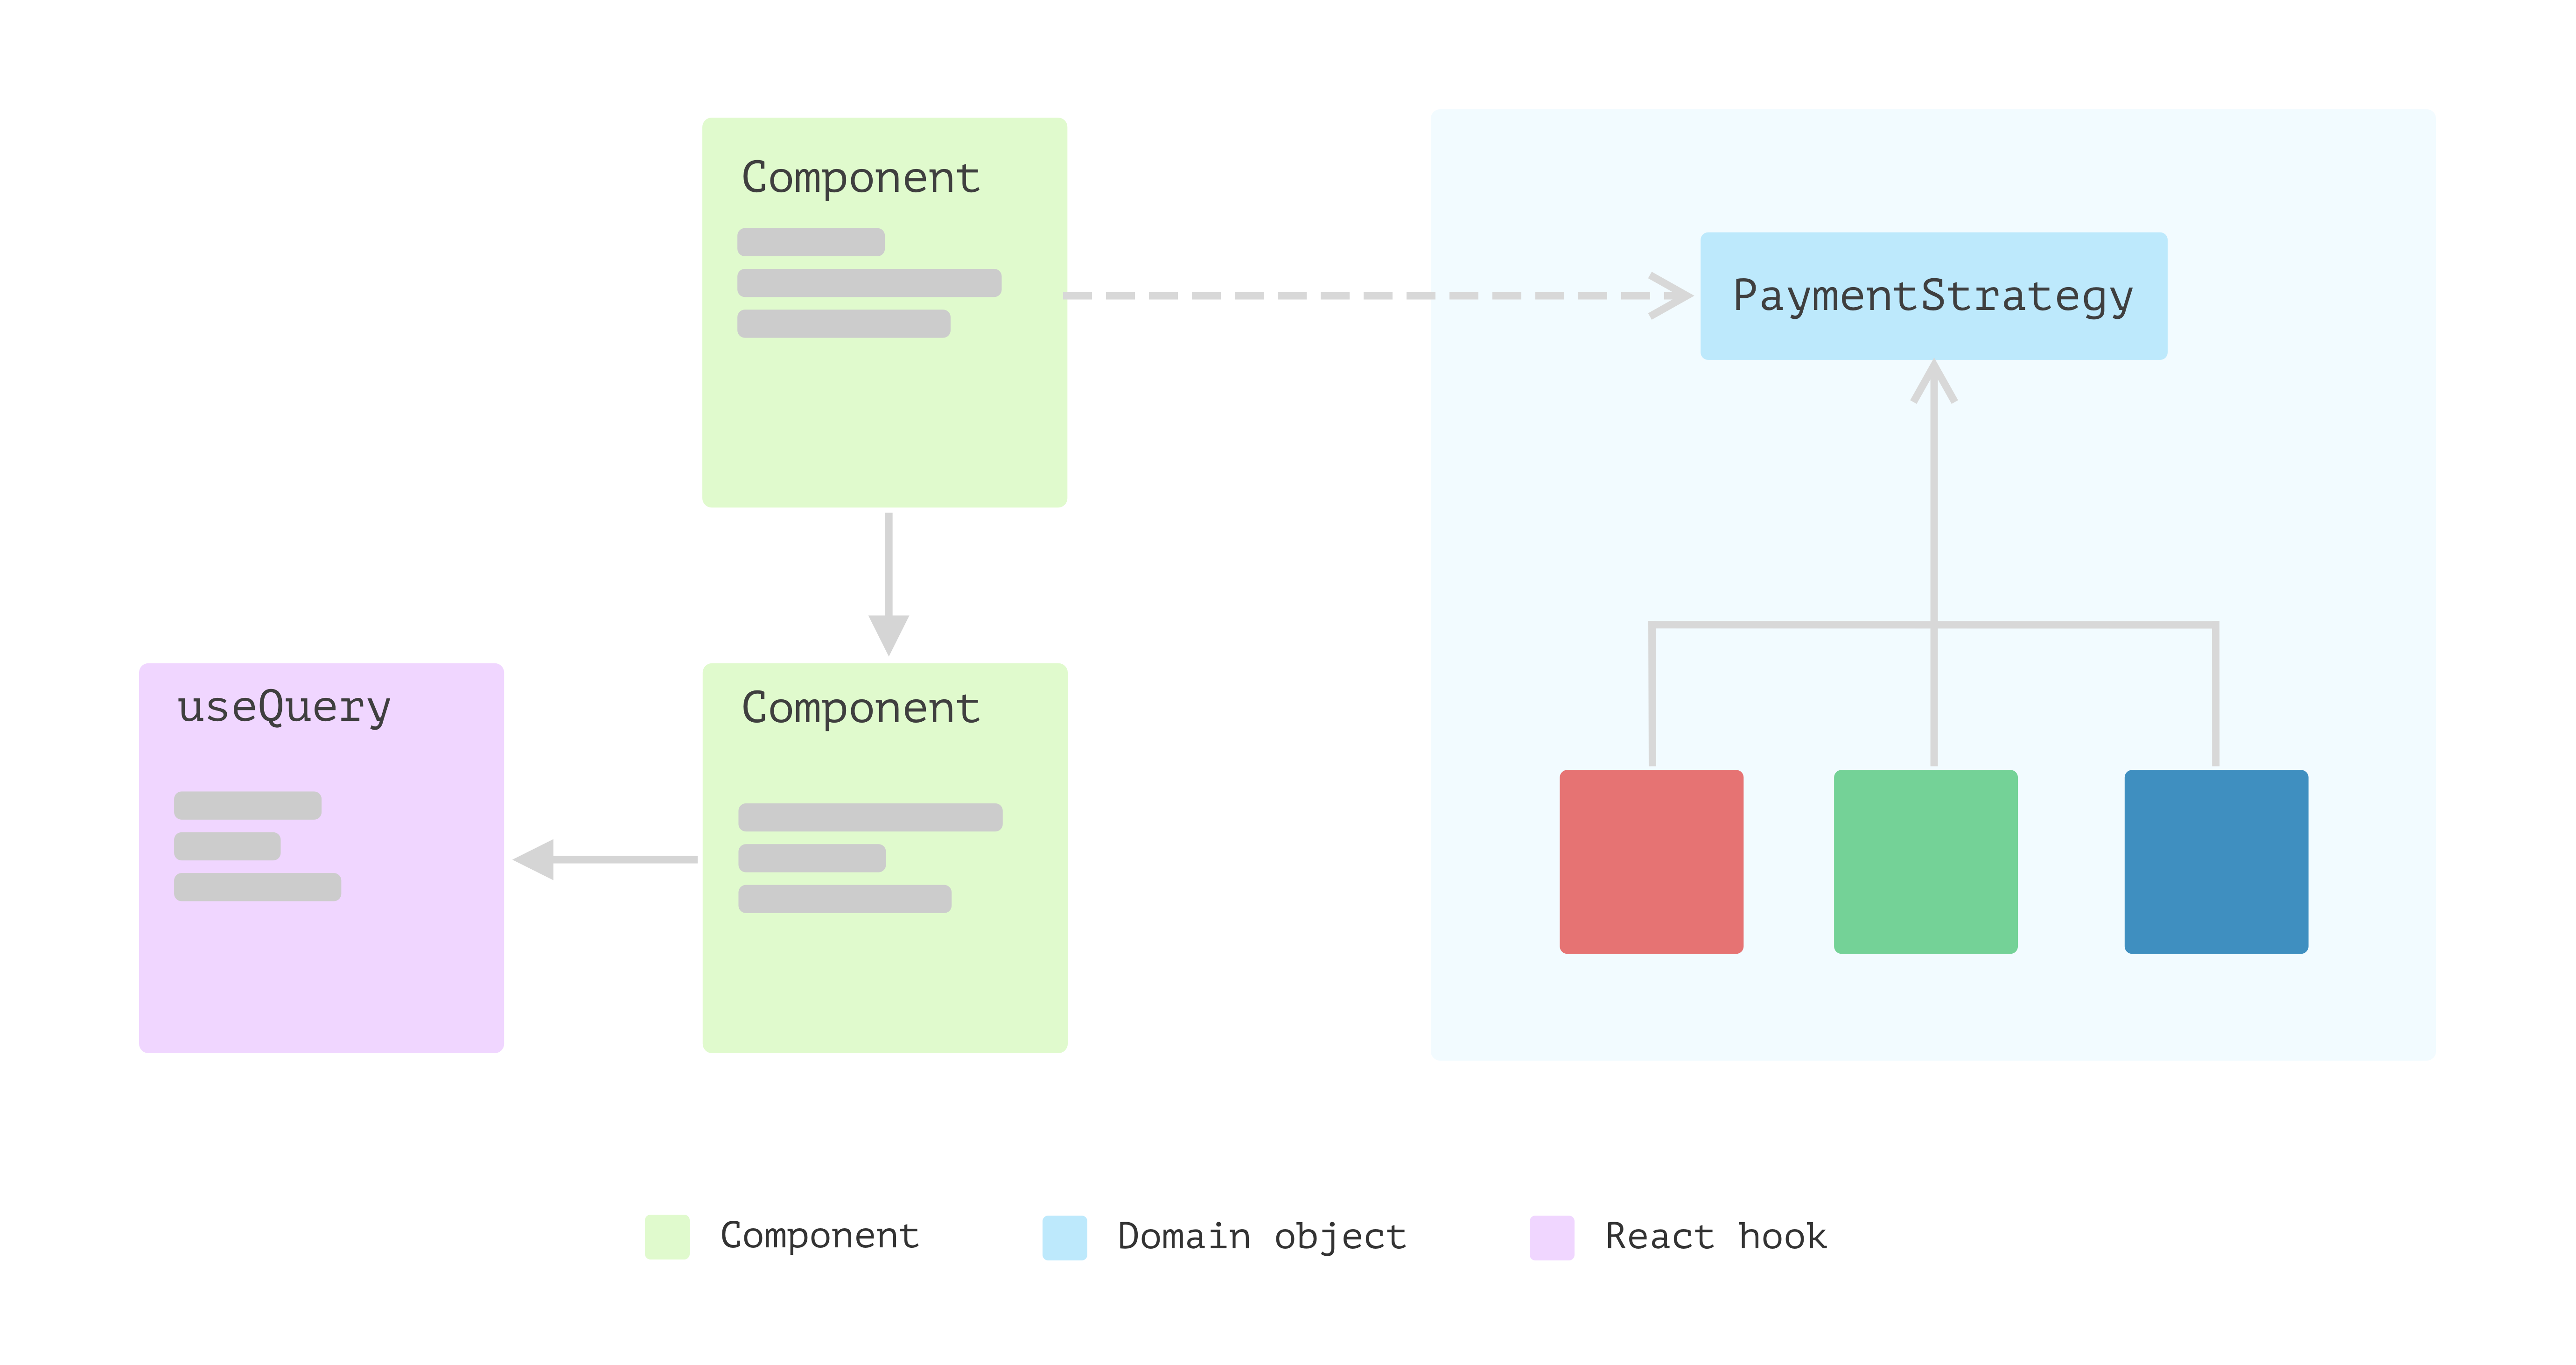
Determine 11: Extract class to encapsulate logic
And the useRoundUp hook, the code might be simplified as:
src/hooks/useRoundUp.ts…
  export const useRoundUp = (quantity: quantity, technique: PaymentStrategy) => {
    const [agreeToDonate, setAgreeToDonate] = useState<boolean>(false);

    const { complete, tip } = useMemo(
      () => ({
        complete: agreeToDonate ? technique.getRoundUpAmount(quantity) : quantity,
        tip: technique.getTip(quantity),
      }),
      [agreeToDonate, amount, strategy]
    );

    const updateAgreeToDonate = () => {
      setAgreeToDonate((agreeToDonate) => !agreeToDonate);
    };

    return {
      complete,
      tip,
      agreeToDonate,
      updateAgreeToDonate,
    };
  };
Within the Cost part, we go the technique from props via
to the hook:
src/parts/Cost.tsx…
  export const Cost = ({
    quantity,
    technique = new PaymentStrategy("$", roundUpToNearestInteger),
  }: {
    quantity: quantity;
    technique?: PaymentStrategy;
  }) => {
    const { paymentMethods } = usePaymentMethods();

    const { complete, tip, agreeToDonate, updateAgreeToDonate } = useRoundUp(
      quantity,
      technique
    );

    return (
      <div>
        <h3>Cost</h3>
        <PaymentMethods choices={paymentMethods} />
        <DonationCheckbox
          onChange={updateAgreeToDonate}
          checked={agreeToDonate}
          content material={formatCheckboxLabel(agreeToDonate, tip, technique)}
        />
        <button>{formatButtonLabel(technique, complete)}</button>
      </div>
    );
  };
And I then did a bit clear as much as extract a couple of helper capabilities for
producing the labels:
src/utils.ts…
  export const formatCheckboxLabel = (
    agreeToDonate: boolean,
    tip: quantity,
    technique: CountryPayment
  ) => {
    return agreeToDonate
      ? "Thanks to your donation."
      : `I wish to donate ${technique.currencySign}${tip} to charity.`;
  };
I hope you may have observed that we’re attempting to straight extract non-view
code into separate locations or summary new mechanisms to reform it to be
extra modular.
You’ll be able to consider it this fashion: the React view is barely one of many
shoppers of your non-view code. For instance, when you would construct a brand new
interface – possibly with Vue or perhaps a command line device – how a lot code
are you able to reuse along with your present implementation?
The advantages of getting these layers
As demonstrated above, these layers brings us many benefits:
- Enhanced maintainability: by separating a part into distinct elements,
it’s simpler to find and repair defects in particular elements of the code. This will
save time and cut back the danger of introducing new bugs whereas making adjustments. - Elevated modularity: the layered construction is extra modular, which may
make it simpler to reuse code and construct new options. Even in every layer, take
views for instance, are usually extra composable. - Enhanced readability: it is a lot simpler to grasp and comply with the logic
of the code. This may be particularly useful for different builders who’re studying
and dealing with the code. That is the core of creating adjustments to the
codebase. - Improved scalability: with lowered complixity in every particular person module,
the applying is commonly extra scalable, as it’s simpler so as to add new options or
make adjustments with out affecting your complete system. This may be particularly
essential for big, complicated functions which can be anticipated to evolve over
time. - Migrate to different techstack: if we’ve to (even impossible in most
initiatives), we are able to substitute the view layer with out altering the underlying fashions
and logic. All as a result of the area logic is encapsulated in pure JavaScript (or
TypeScript) code and is not conscious of the existence of views.
Conclusion
Constructing React utility, or a frontend utility with React as its
view, shouldn’t be handled as a brand new sort of software program. Many of the patterns
and ideas for constructing the standard person interface nonetheless apply. Even
the patterns for setting up a headless service within the backend are additionally
legitimate within the frontend discipline. We will use layers within the frontend and have the
person interface as skinny as attainable, sink the logic right into a supporting mannequin
layer, and information entry into one other.
The advantage of having these layers in frontend functions is that you just
solely want to grasp one piece with out worrying about others. Additionally, with
the advance of reusability, making adjustments to present code could be
comparatively extra manageable than earlier than.