
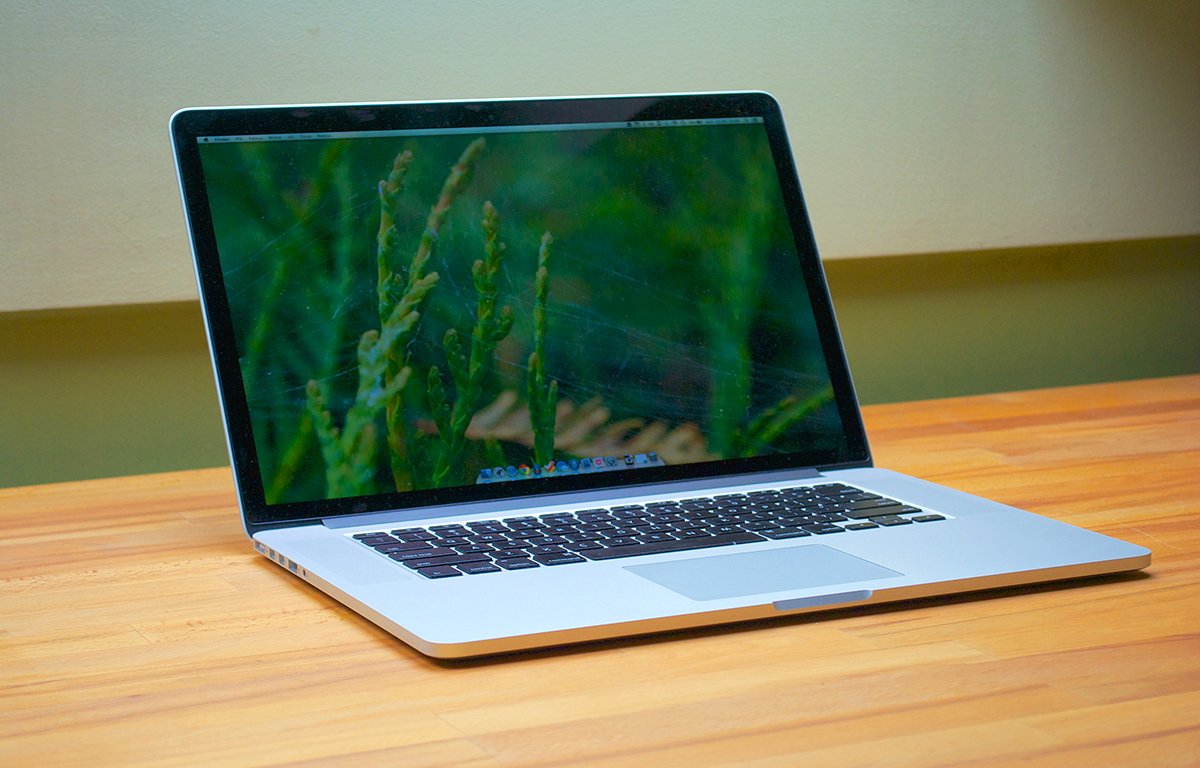
Older MacBook Execs are nonetheless a viable possibility for cell work these days. Here is refurbish a 13-inch MacBook Professional from 2012 and convey it as much as scratch.
On this refurbishment tutorial, we’ll take a look at refurbish a 2012 MacBook Professional 13-inch. The mannequin we’ll be taking a look at is the MacBook Professional Core i7 2.9 GHz Mid-2012 mannequin with Apple identifiers of MD102LL/A – MacBookPro9,2 – A1278 – 2554.
There are a variety of those fashions used on eBay for round $300 right this moment. Though they can not do every part fashionable Macs can, they will nonetheless be helpful contemplating the low value.
Primarily the identical course of and steps apply to the 15-inch non-Retina 2012 MacBook Professional as properly, though they might range barely.
These fashions are restricted to working macOS 10.15 Catalina most and might be upgraded to 16GB of RAM. Older RAM is reasonable now and you may get a 16GB improve on Amazon for round $17.
You will additionally want a brand new 2.5-inch SATA SSD drive to switch the present laborious drive. 1TB SSDs are low cost at the moment – ranging between $35 and $60 {dollars} on most on-line retailers.
Getting began
To start you will want a number of objects: a small screwdriver and Torx toolkit, a comfortable floor resembling a shower or seaside city or giant soldering mat, an X-Acto interest knife, and a few 1/4-inch vast Kapton tape for electronics.
You will additionally want a pair of tweezers, and a vivid mild supply since a few of the elements are extremely tiny.
You will in all probability additionally want a can of compressed air or an air compressor to blow any mud and filth out of the machine as you take away components.
The plastics and supplies in older computer systems are recognized to degrade over time and this can be very simple to break your laptop whereas repairing it. Proceed at your individual threat.
Step 1: Take away the rear cowl
To start, use a tiny screw bit out of your toolkit and a screwdriver to take away the ten tiny rear cowl screws. Flip the pc over on its face and lay it on a comfortable floor:
It’s possible you’ll wish to lay out the screws in your work floor in the identical association as they’re on the pc after removing so you possibly can bear in mind the place to re-install them.
Word the three screws within the higher proper nook are longer than the others, so make be aware of the place they get reinstalled.
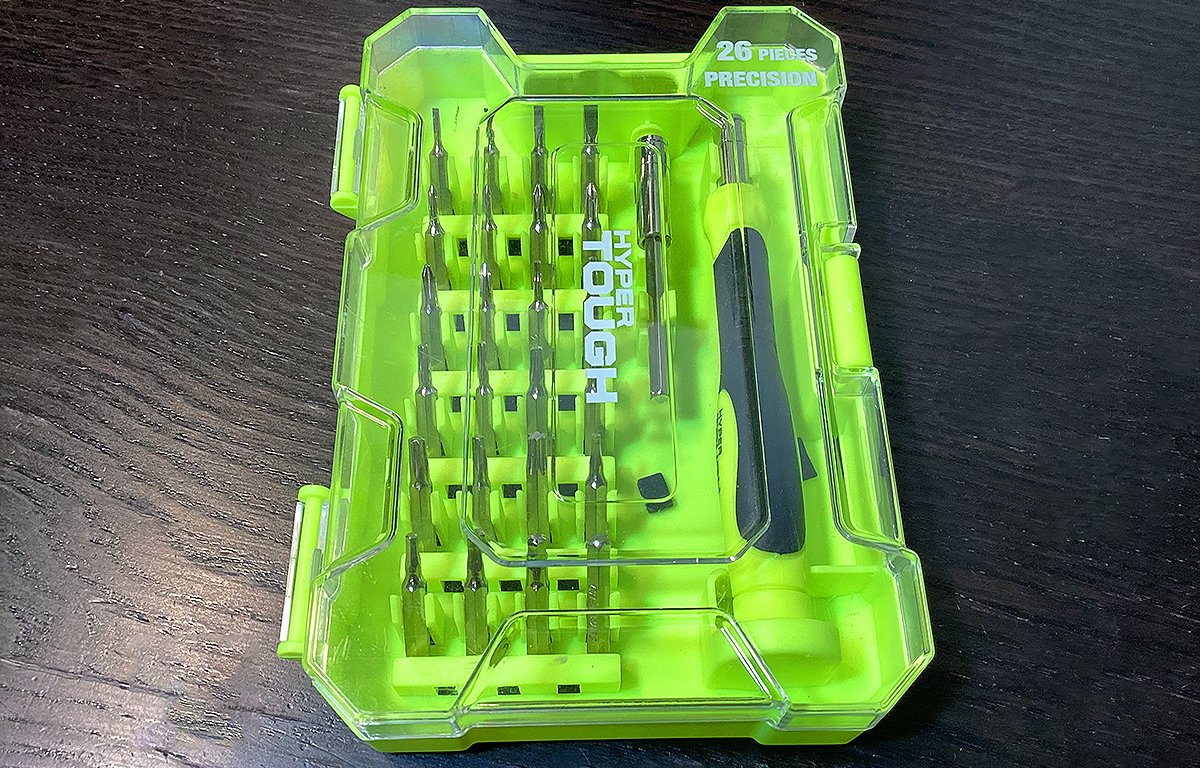
Use a small restore toolkit resembling this one for repairs.
Step 2: Take away the laborious drive
The two.5-inch laborious drive is situated within the lower-left nook of the pc. Take away the 2 small black captive screws within the plastic bar holding the drive in and take away the bar:
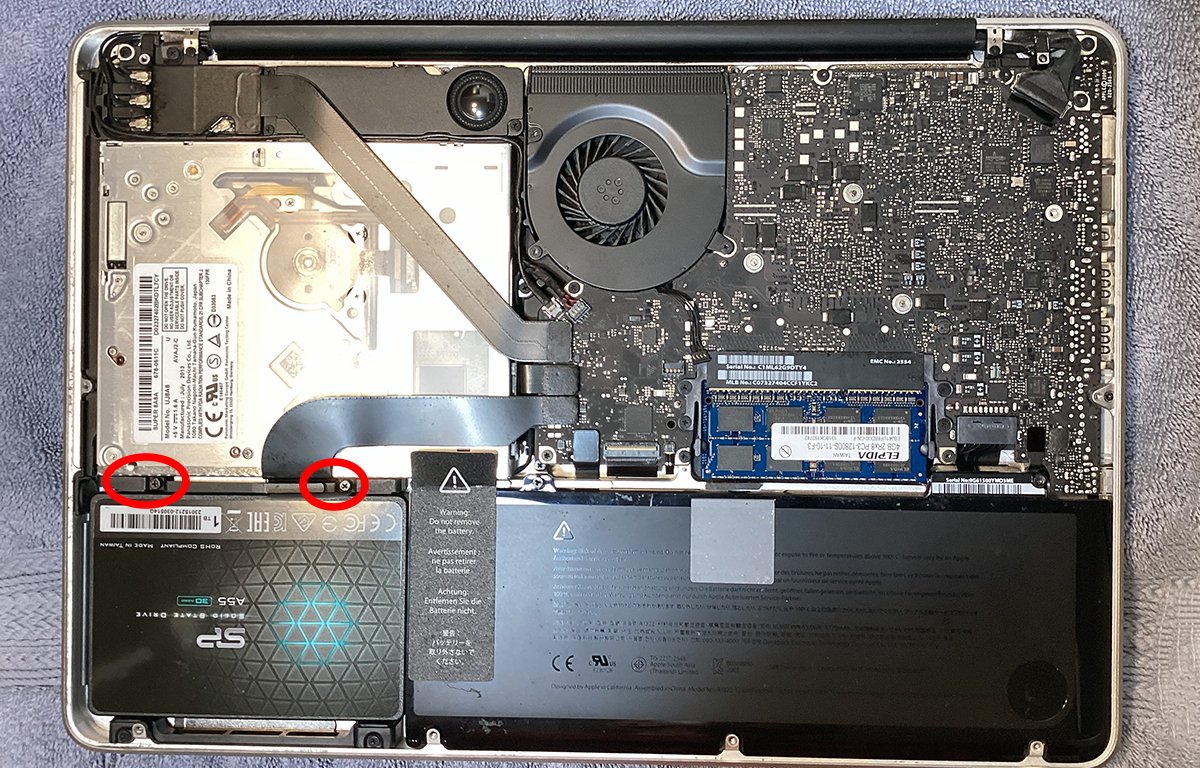
Take away the 2 drive screws.
Carry the drive out and punctiliously disconnect the cable from the left aspect. Use compressed air to blow out any mud and filth below the drive.
Word that there are 4 tiny chrome-plated screws hooked up to each side of the previous drive. You will have to take away these screws and set up them on the brand new SSD prior to installing it.
These screws do not connect to something on the pc’s case: they sit in small rubber mounting brackets on the case and are held in solely by friction.
Set up your new SSD drive within the reverse order, reinstalling the plastic bar and two screws after re-attaching the info cable.
Word that some corporations promote M.2 to plain 2.5-inch drive adapters that match into normal 2.5-inch drive bays. If you wish to use an M.2 SSD drive you should utilize one among these adapters to put in it into your MacBook.
Step 3: Take away the fan
The machine’s fan is held in by three screws on the high. Do not confuse these with motherboard screws. The fan screws are black and put in immediately on the fan:
The fan’s three mounting screws and cable connector.
The highest screw is longer than the opposite two so be aware the place it will get reinstalled. Take away all three screws, then gently pull up on the fan cable connector to disconnect it.
Word these tiny black plastic cable connectors are extraordinarily fragile and it is easy to break them on account of plastic oxidation over time. Do not pull ahead on the fan connector – elevate it straight up.
It’s possible you’ll wish to use a interest knife or plastic spudger to elevate the connector, however watch out to not contact the fan cables with a knife.
If there’s a small piece of black insulating tape over the connector take away it first and set it apart.
As soon as the fan is eliminated, blast it with compressed air to take away any mud. You might also wish to clear it with a little bit spray of isopropyl alcohol to kill any remaining microorganisms dwelling contained in the fan. Do not use an excessive amount of.
Set the fan and its screws apart.
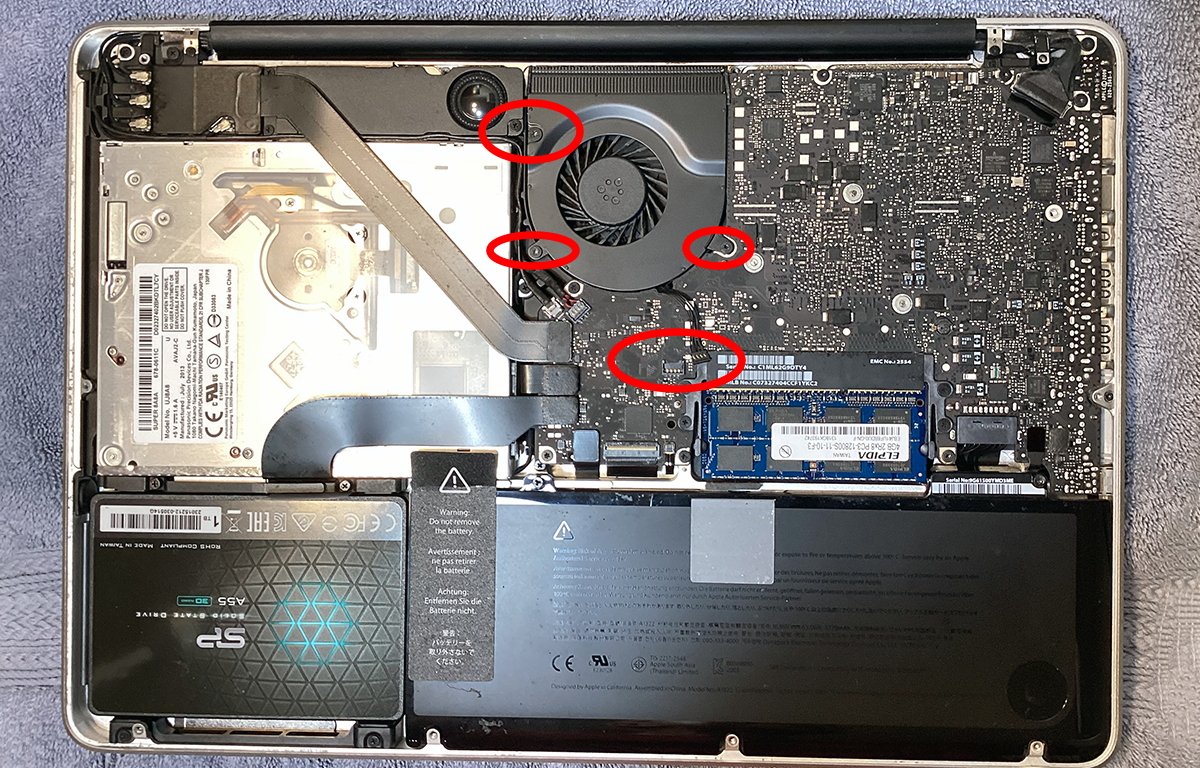
Step 4: Disconnect all motherboard cables
Subsequent, disconnect the eleven motherboard cables. A few of these cables are extremely tiny so you will need to use nice care in eradicating them or else you will harm them:
Motherboard cables.
Two of the cables are held in by small folding latches: the massive cable within the upper-right nook, and the tiny flat ribbon cable on the backside.
It’s possible you’ll want to make use of a magnifier on the latter, or a microscope when you’ve got one. It is extremely tiny.
The flat ribbon cable simply to the left of the tiny flat one on the backside is held in by nothing however friction.
Its connector is minuscule and you will want to make use of a spherical screwdriver or a plastic spudger, when you’ve got one, to very gently get below the cable and rock it slowly free from its connector.
Most of the motherboard cables are merely held into their connectors by friction, so it ought to be pretty simple to pry them unfastened. However watch out.
Step 5: Take away motherboard screws
Subsequent, you will take away all screws from the motherboard. There are ten of them as proven under:
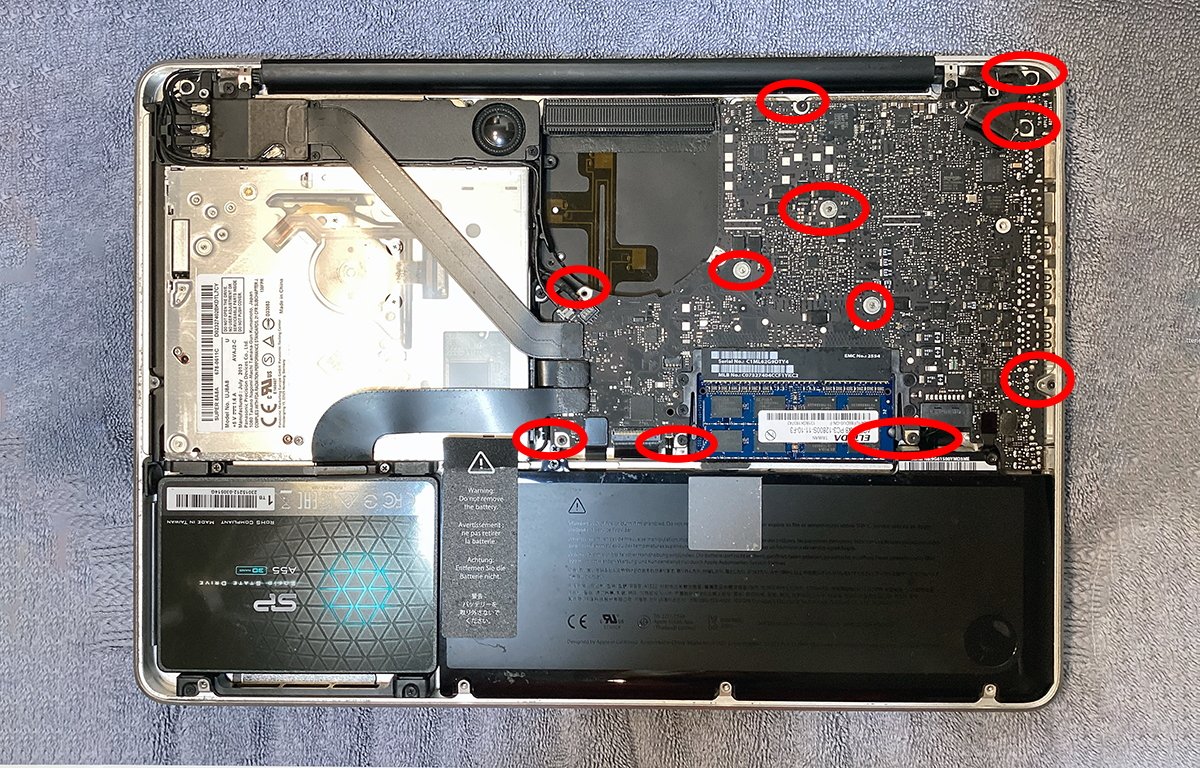
Motherbaord screws.
Additionally, take away the 2 considerably bigger two screws holding the charging port in place on the machine’s upper-right nook as proven.
It’s possible you’ll wish to lay all of the screws out in your work floor in the identical association as they had been put in on the motherboard in order that once you go to reassemble every part you’ll know the place every screw goes.
Step 6: Rigorously elevate the motherboard from the pc
Word that the motherboard is linked to the show by two tiny cables, and the cost port cable is on the correct aspect.
Because of this, you possibly can’t elevate the motherboard totally freed from the pc. You’ll be able to attempt to disconnect the 2 tiny cables which run alongside the speaker module, however we do not advocate it.
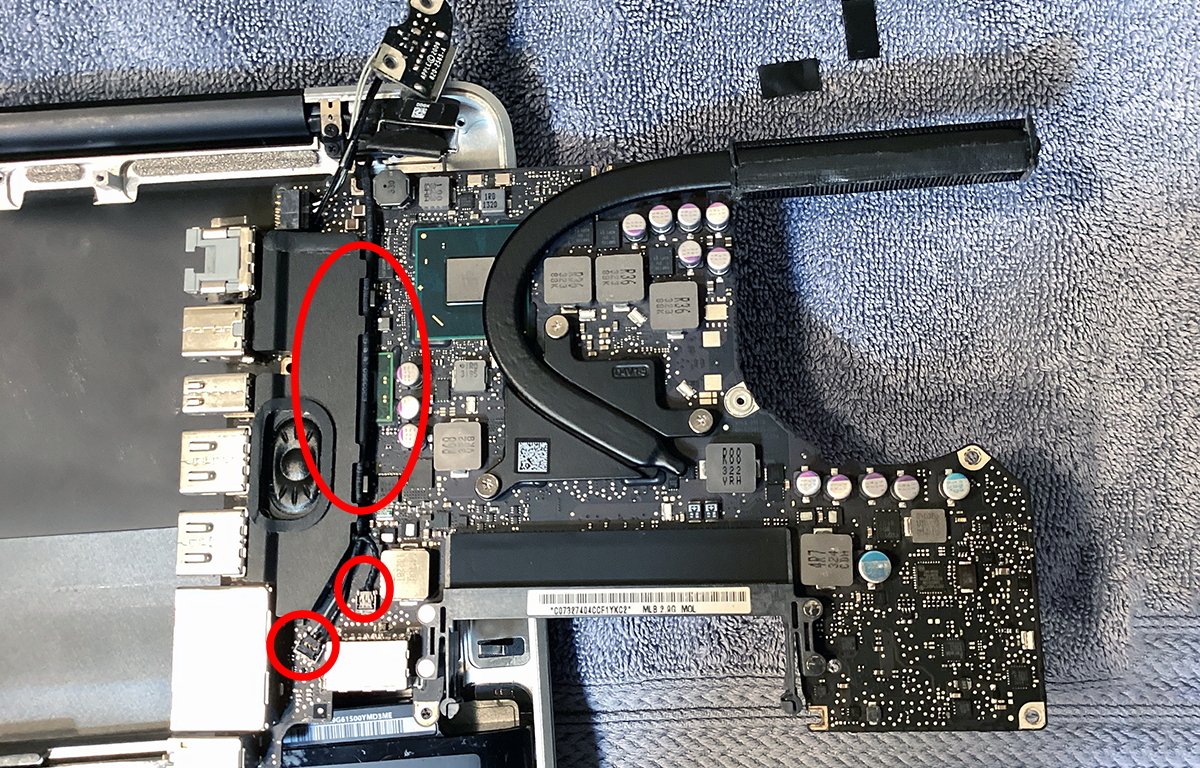
Underside of the motherboard. Word the 2 cables which run alongside the speaker module. The dangling cost port is proven on the high.
Why? As a result of the 2 connectors these cables use to connect to the motherboard’s underside are extremely tiny and it is extremely probably you will harm the connectors when you attempt to take away them.
So as a substitute of lifting the motherboard completely freed from the pc, slide it barely to the left to free all of the ports on the correct aspect from the case. Then, gently tilt the motherboard upwards in the direction of the again of the machine so it is standing vertically.
That is the most effective you are able to do with out disconnecting the 2 tiny cables on the underside. It is a bit awkward, however when you go sluggish and take your time you will see the way it’s performed.
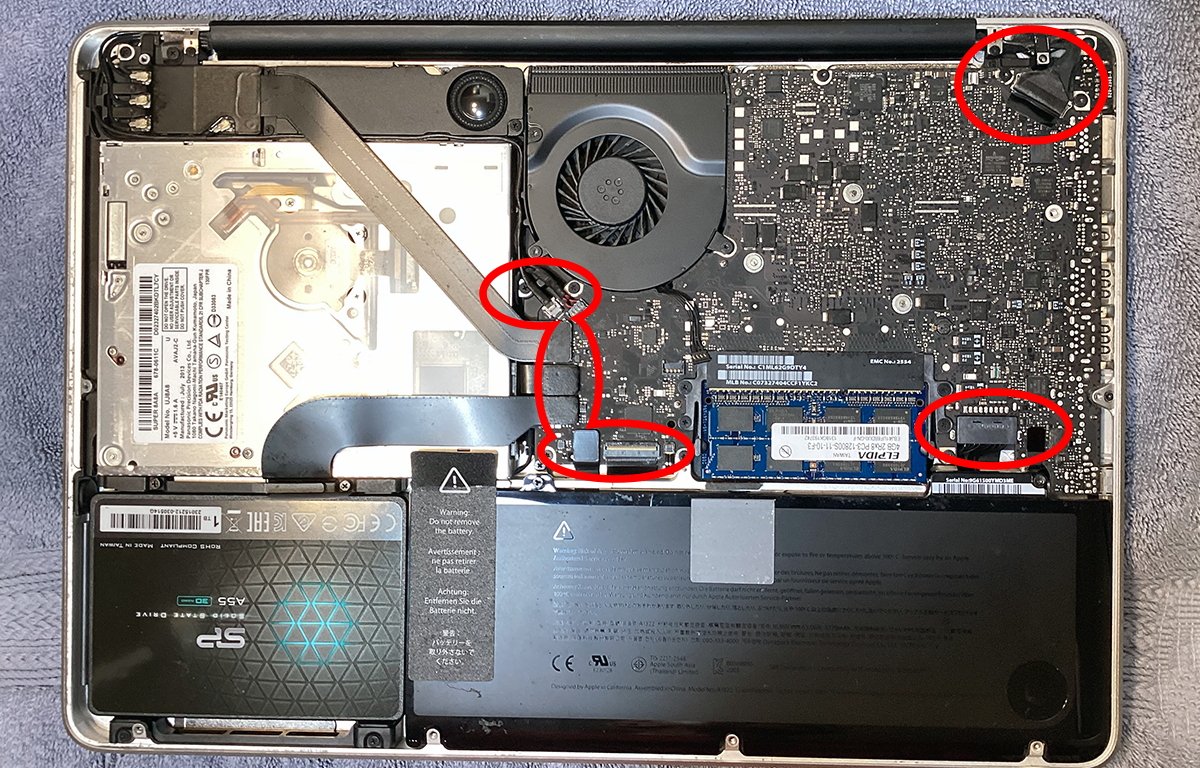
Step 7: Disconnect the cost port and set up a brand new one
The charging port on the nook of the pc attaches to the underside of the motherboard with a small plastic connector, however in comparison with the opposite two connectors on the underside, it is large.
Utilizing a tiny flat-blade screwdriver or plastic spudger, slowly pry the cost port connector free from the underside of the motherboard. At this level, the cost port and its cable will come freed from the machine.
Word that the cost port is magnetized and can stick with every other steel half it is available in contact with. So take away it and set it apart.
Over time, the plastic insulator across the MagSafe cost port will degrade and are available unfastened, probably even falling off. If this occurs the pc will not cost as a result of the MagSafe charging cable will brief on the connector.
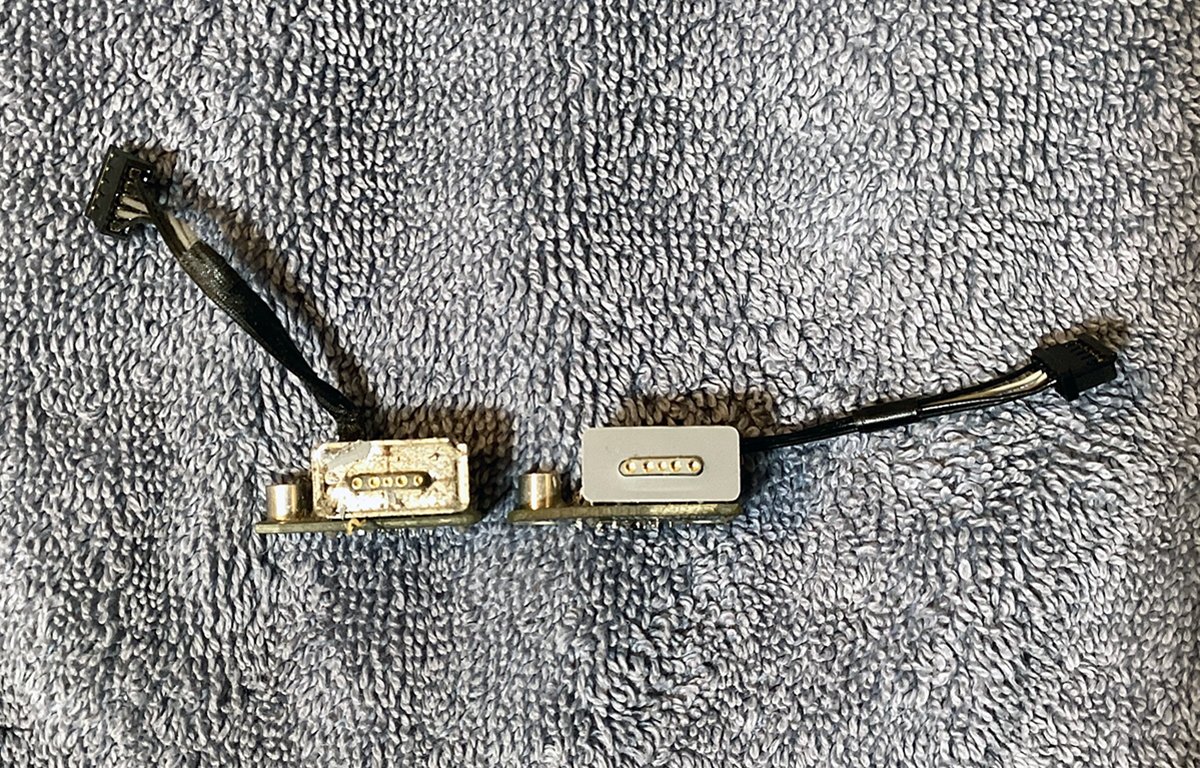
Previous MagSafe cost port, left, and new refurbished one prepared to put in, proper.
New or refurbished MagSafe ports might be discovered on Amazon, eBay, AliExpress and different on-line retailers. You will have to supply a brand new one to switch the previous one.
We discovered ours on Amazon for $12 refurbished.
As soon as you’ve got sourced the brand new MagSafe port and cable, first blow any remaining mud from the underside of the motherboard utilizing compressed air.
As soon as that is performed, join the brand new cost port cable to the underside of the motherboard the place you eliminated the previous cable. Set the brand new cost port meeting onto its two steel mounting posts within the case’s higher proper nook.
When you like, you possibly can partially reinstall one of many cost port’s screws now to carry it in place, however do not completely safe it but.
Step 8: Reinstall the motherboard
Reassembly is mainly the reverse of disassembly. You will want to put the motherboard flat on the machine once more, and lifting up barely on the left aspect, slide it down and to the correct to ensure all of the ports line up on the correct aspect of the machine.
As soon as reinstalled, safe each cost port screws first, securing it to the pc’s case. Then reinstall all motherboard screws in the identical order you eliminated them.
Make sure every part traces up completely and guarantee not one of the wires which run below the motherboard are misplaced or protruding.
Step 9: Improve the RAM
In case your MacBook Professional has 4GB or 8GB of RAM an improve is so as. At the moment, you may get two 8GB SO-DIMMs on Amazon that match for round $17 for a complete of 16GB. At that value why would not you wish to improve?
Word there are two an identical SO-DIMMs, one on high of the opposite.
To exchange the RAM, very rigorously take away the previous SO-DIMMs from their slots by barely bending the 2 plastic clips on both aspect holding them in and lifting up on every one.
Word the plastics might be extraordinarily brittle and it is easy to interrupt the clips – so solely press them so far as they should go to take away the RAM.
Carry up and slide every SO-DIMM towards the underside of the case to take away them. Set up the brand new SO-DIMMs by sliding them down into the 2 plastic clips and urgent down on them till they snap into their sockets. You will hear every one click on.
Step 10: Reinstall the fan
Lastly, reinstall the motherboard fan by reinserting it and reinstalling its three screws. Do not forget to reconnect the fan cable to its connector on the motherboard.
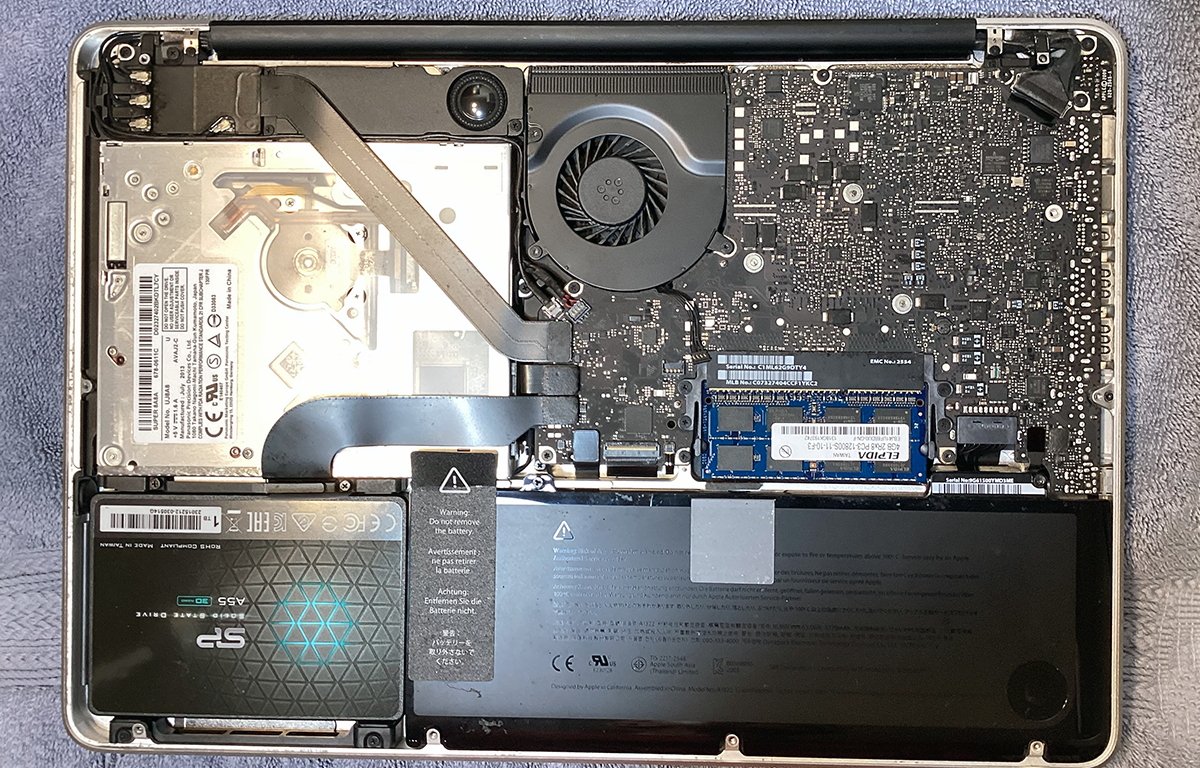
Every thing absolutely reassembled.
When you possess excessive electrical and soldering mastery, then this subsequent step is for you. However be warned: this step is extraordinarily tough and harmful to the pc, so you need to solely try it if you’re 100% certain of your electrical restore and soldering abilities.
On this step, you will take away the MCP chip’s heatsink and add new thermal paste. You will additionally change all of the electrolytic capacitors on the underside of the motherboard.
On many of the A1278 MacBook Professional fashions, Apple makes use of an built-in MCP chip which supplies the graphics and built-in energy management features into one chip.
You will want a sizzling air soldering station to take away the capacitors.
First, you will have to take away the motherboard totally. We’ll assume you will do that step after eradicating the cost port within the step above.
To take away the motherboard, observe all of the steps above, but additionally take away the 2 tiny wires from the underside of the board as properly. On each, use a small plastic spudger or interest knife to elevate the wires’ connectors from the motherboard.
Do not pull on the cables – as a substitute, gently pry the 2 connectors up from the motherboard by lifting up vertically on them as near the place their wires join as attainable.
Word how the wires are put in earlier than eradicating them. You will additionally have to wiggle the lengthy wire unfastened from the speaker module to the aspect on which it sits.
Be extraordinarily cautious when disconnecting these two wires.
When you do that and take away the cost port, the motherboard will come completely freed from the machine. Set it in your comfortable work floor face-down.
To take away the MCP’s warmth sink, first, take away the three giant chrome-plated screws holding the warmth sink to the motherboard. The warmth sink is the lengthy black curved steel bar that runs from the MCP to the fan’s exhaust port:
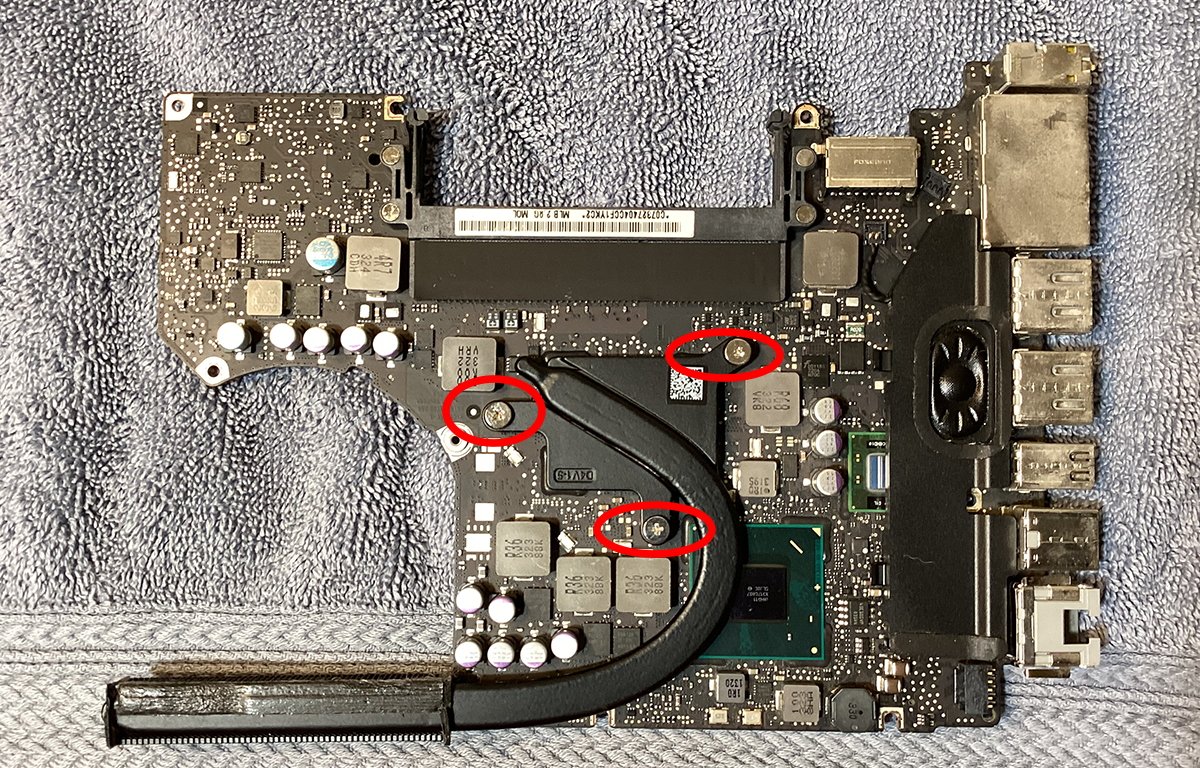
Three heat-sink screws.
Clear the previous thermal paste off the MCP chip with a paper towel and isopropyl alcohol. Reapply new thermal paste and reinstall the warmth sink with the three screws:
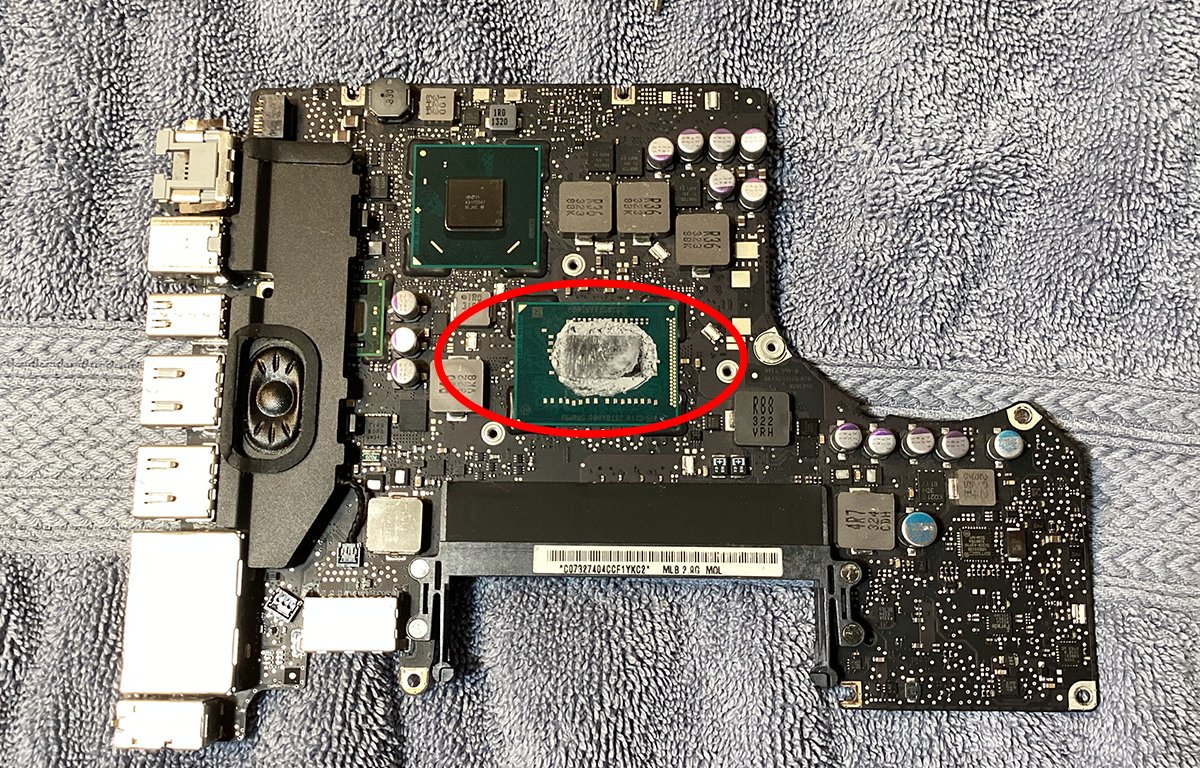
Clear and reapply thermal paste.
The warmth sink absorbs all of the MCP’s warmth and thermally transfers it to its steel, the place, when the fan comes on will get sucked out of the steel and despatched out the again of the pc by the fan.
Subsequent, you will want to examine and change all fifteen electrolytic capacitors surface-mounted to the motherboard. This step can also be very harmful and you’ll simply harm the motherboard when you’re not cautious.
These capacitors are aluminum-style “can” caps which are mounted to the floor of the motherboard with solder on two solder pads every.
To take away them you will want to make use of a sizzling air soldering station. Blow sizzling air onto every and take away them with tweezers by pulling up on them because the solder comes unfastened.
Use the new air gun in a round movement and blow sizzling air on every capacitor one after the other whereas pulling up on every with tweezers. Because the solder melts the capacitor will come free from the motherboard.
Do not hold the new air gun in a single spot too lengthy otherwise you threat frying or melting elements or the motherboard itself.
Use a solder wick to take away any extra solder by making use of the wick and urgent your soldering iron onto it to soak up any extra solder from the motherboard.
A full Invoice Of Supplies (BOM) for every half on the motherboard is past the scope of this tutorial, so you will have to discover a BOM on-line in your motherboard to search out which new capacitors to buy.
On-line retailers resembling Mouser and Digikey are nice sources to search for and order digital components on-line.
Can-style electrolytic capacitors.
After getting new matching capacitors in hand, solder every new one onto the motherboard rigorously of their respective places. In some instances, you possibly can pre-apply new solder to the motherboard’s solder pads, maintain new capacitors in place on the pads with tweezers, then solder them through the use of the new air gun.
Normally, can-style SMD capacitors have two attachment factors on both sides: one for constructive, and one for unfavourable. Normally, the unfavourable aspect is marked with a coloured or black stripe.
Some capacitors haven’t got a polarity so you will have to test the specs on every first.
Step 11: Reinstall the rear cowl
Now that the improve is full, change the machine’s rear cowl and reinstall all ten rear cowl screws within the order you eliminated them.
Flip the pc over, plug in its charging cable, and energy the machine on. Maintain down Command-R on startup to enter Restoration Mode.
Run Disk Utility, format the inner SSD as an APFS quantity, then exit Disk Utility and run the macOS installer from the Restoration Mode menu.
As soon as macOS finishes putting in, Restart the pc once more besides into macOS Catalina.
Your refurbishment and improve is now full.
A further possibility: add a second laborious drive
When you by no means use your MacBook Professional’s optical drive you possibly can take away it and as a substitute use the inner house for a second 2.5-inch drive.
Varied distributors resembling OWC, iFixit, and others promote particular adapters that match within the optical bay and plug into its cable however have an area for the standard 2.5-inch drive inside them.
Utilizing one among these lets you add a second laborious drive or SSD internally.
To take action, first, take away the three small optical drive mounting screws from round its edges, then rigorously elevate the optical drive out and to the left. As you do you will discover its small flat ribbon cable on one aspect.
In case your MacBook Professional has a small flat speaker meeting ribbon cable that crosses the optical drive, you will additionally have to disconnect it from the motherboard.
Gently take away the optical drive cable’s connector, ensuring to not pull on the cable itself.
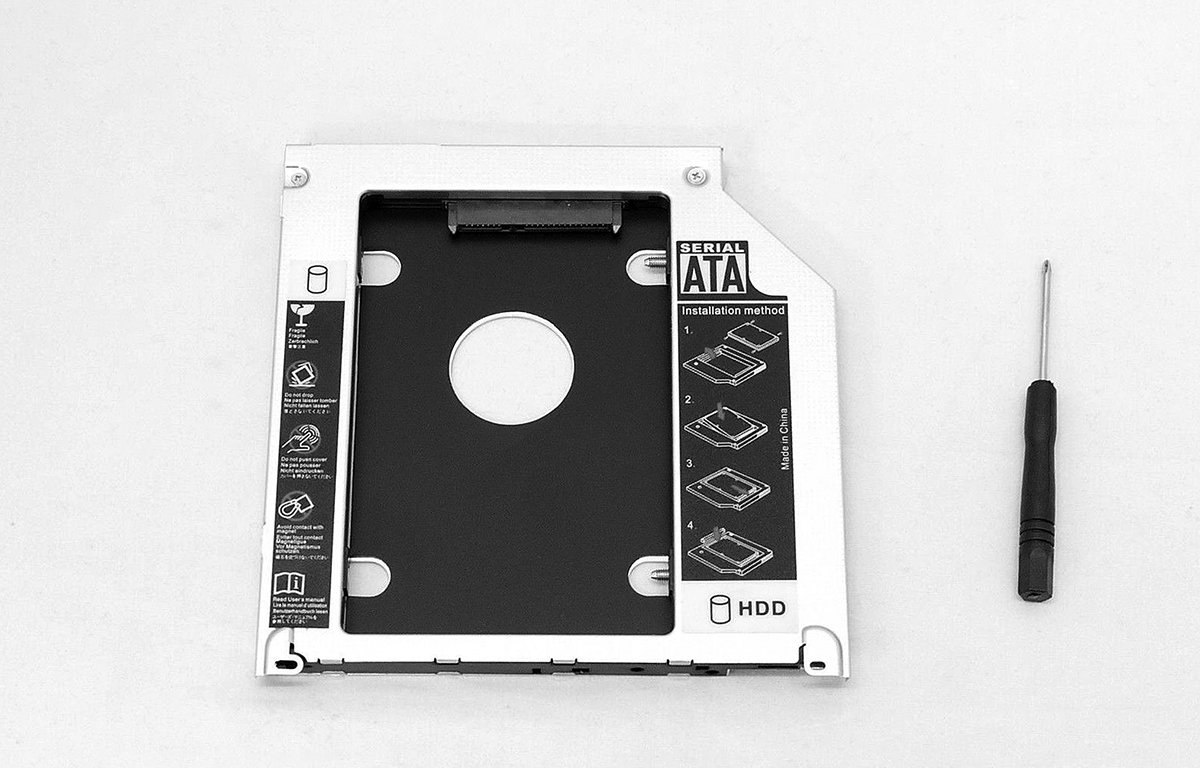
A typical optical to 2.5-inch drive adapter.
Subsequent, set up your second 2.5-inch drive inside your optical bay drive adapter, then set up the drive adapter simply as if it was an optical drive. Reinstall the three optical drive screws to safe the adapter.
You now have two inside drives in your MacBook Professional.
The ultimate frontier: a brand new battery
We ignored one step on this tutorial as a result of it is largely self-explanatory: putting in a brand new battery into your MacBook Professional. The battery is barely held in by three screws and changing it’s easy.
A number of distributors on-line promote new higher-capacity batteries in your MacBook for round $35.
Even an eleven-year-old Mac will nonetheless run properly given a brand new SSD and a brand new RAM improve. You will be stunned how significantly better your machine’s efficiency is with these new upgrades put in.