

Have you ever skilled lengthy wait instances when loading up a 3D scene in AWS IoT TwinMaker? Maybe scuffling with poor rendering efficiency when navigating a fancy 3D mannequin? There’s a solution to convert your fashions into the 3D Tiles customary for environment friendly streaming in a scene.
On this weblog you’ll learn to compress a 3D mannequin or Level Cloud file into 3D tilesets utilizing Cesium ion and the right way to create a TwinMaker scene utilizing the transformed 3D tilesets. Utilizing 3D tilesets, you may scale back the unique mannequin dimension by 50% to 90% and enhance the rendering efficiency in an AWS IoT TwinMaker powered dashboard.
Overview
On this weblog publish, a number of file extensions and mannequin course of requirements are referenced. Earlier than getting began, here’s a fast refresher on the terminologies that you’ll encounter on this weblog:
- glTF – Graphics Language Transmission Format is a typical file format for three-dimensional scenes and fashions. A glTF file makes use of one among two doable file extensions: .gltf or .glb
- Cesium ion – Cesium ion is a strong, scalable, and safe platform for 3D geospatial knowledge provided by Cesium.
- Draco Compression – Draco is an open-source library for compressing and decompressing 3D geometric meshes and level clouds. It’s meant to enhance the storage and transmission of 3D graphics. Cesium presents to make use of this compression to additional scale back file dimension.
- 3D Tileset – 3D Tiles is an Open Geospatial Consortium (OGC) Neighborhood Normal. The 3D tileset is used for sharing, visualizing, fusing, and interacting with huge heterogeneous 3D geospatial content material throughout desktop, internet, and cellular purposes.
AWS IoT TwinMaker helps 3D property within the glTF and 3D Tiles format. glTF is the usual for displaying 3D content material on an online browser, however at this time, very massive (>100MB) and/or very complicated fashions (>10K nodes) can take too lengthy to render. glTF, and it’s binary format glb, could be transformed to the 3D Tiles format to keep away from lengthy load instances and low body fee. 3D Tiles makes use of a hierarchical degree of element (HLOD) to stream content material in tiles which might be spatially bounded. Streaming content material means a big asset will solely render smais an Open Geospatial Consortium (OGC) Neighborhood Normal. The 3D tileset is used for sharing, visualizing, fusing, and interacting with huge heterogeneous 3D geospatial content material throughout desktop, internet, and cellular purposes.ller chunks relying on the place the person is oriented within the 3D scene. A tile can render the chunks in batches of distinct fashions, or situations of the identical mannequin could be optimally rendered. Level clouds can be rendered in a tile as an entire mannequin or individually as spatially bounded factors. The 3D Tiles 1.0 format makes use of JSON and binary format to retailer the totally different tile sorts. This reorganization of huge 3D property permits IoT TwinMaker to ship a 3D scene with excessive constancy, the next body fee, and quicker loading. Quick rendering of 3D scenes is crucial for successfully visualizing knowledge in your digital twin.
Cesium ion is a robust, absolutely managed platform for managing 3D geospatial knowledge. Cesium ion’s 3D Tiling Pipeline compresses and converts massive 3D fashions from many codecs (gltf, .glb, .obj, .las, .laz, .fbx, .dae) into 3D Tiles to optimize rendering and streaming of the content material to any gadget. Cesium ion shops 3D fashions, converts fashions into 3D Tiles, and exports the tilesets to an AWS S3 bucket. We’ll stroll you thru a step-by-step information to transform a big mannequin into 3D Tileset and import it as an AWS IoT TwinMaker scene utilizing Cesium ion. The method will contain working the offered scripts to assemble an IoT TwinMaker Scene with the transformed 3D Tilesets.
Stipulations
- An account on Cesium ion. You may register Cesium and select the suitable subscription plan primarily based on your enterprise requirement on this Cesium’s pricing web page. To observe this weblog publish, you may select the free group tier because the mannequin dimension is smaller than 5GB.
- A free Cgtrader account
- An current AWS IoT TwinMaker Workspace
- AWS Cloud9 can be used for this weblog. Should you select to run this in one other atmosphere, the next is required:
- Node.js, NPM, and Git put in
- A desktop with at the least 5GB space for storing and 4GB of ram to run the script.
Open Supply Mannequin
For this text we’ll use the open supply downtown London metropolis lowpoly mannequin:
- Obtain the metropolis.glb that’s 172MB. A Cgtrader account is required to obtain this mannequin.

London metropolis mannequin render
Walkthrough
Step 1: Create a Cesium entry token
- Login to your Cesium account and go to the tokens web page
- Click on Create token
- Identify it TwinMaker token
- Toggle on the next permission scopes:
- property:learn
- property:write
- property:record
- archives:learn
- archives:write
- Click on Create
Tutorial reference for Cesium authentication

Cesium ion entry token technology: toggle on the permissions on this picture
Step 2: Put together the cesium_sample script
Observe: The script on this weblog just isn’t really helpful for a manufacturing atmosphere. Cesium ion is a third celebration service so you have to explicitly verify that you simply opt-in to make use of it. We suggest reviewing phrases and circumstances that apply to this script on the Cesium web site
- Go browsing to AWS Console and choose a area that helps AWS IoT TwinMaker
- Launch AWS Cloud9 in your AWS Console
- Create a brand new atmosphere and choose t2.medium and Amazon Linux 2.
- As soon as the IDE is working, click on on “File → Add Native Recordsdata…” to add the town.glb file you downloaded.
- Within the terminal for AWS Cloud9, run the command beneath to clone the aws-iot-twinmaker-samples repo
- Set up node modules for the scene_utils lib
- If you’re utilizing a dev machine aside from AWS Cloud9, guarantee you have got created AWS credentials
-
- Minimal permissions are encapsulated within the following coverage JSON:
-
- Run this command beneath to set your AWS Area environmental variable to the area of your AWS IoT TwinMaker workspace. The command beneath is utilizing us-east-1 however could also be totally different to your atmosphere.
Step 3: Automated Conversion and Scene Creation
- Set the atmosphere variable CESIUM_ACCESS_TOKEN with the token you created in Step 1
- Run the pattern script together with your workspaceId, a given sceneId, and the native path to metropolis.glb.
- View the Scene in your IoT TwinMaker workspace to see the scene and mannequin created for you.
Consequence
You now have a brand new IoT TwinMaker scene together with your 3D asset compressed utilizing 3D Tiles! Click on the Snap to ground checkbox on the fitting to see the complete mannequin above the ground.
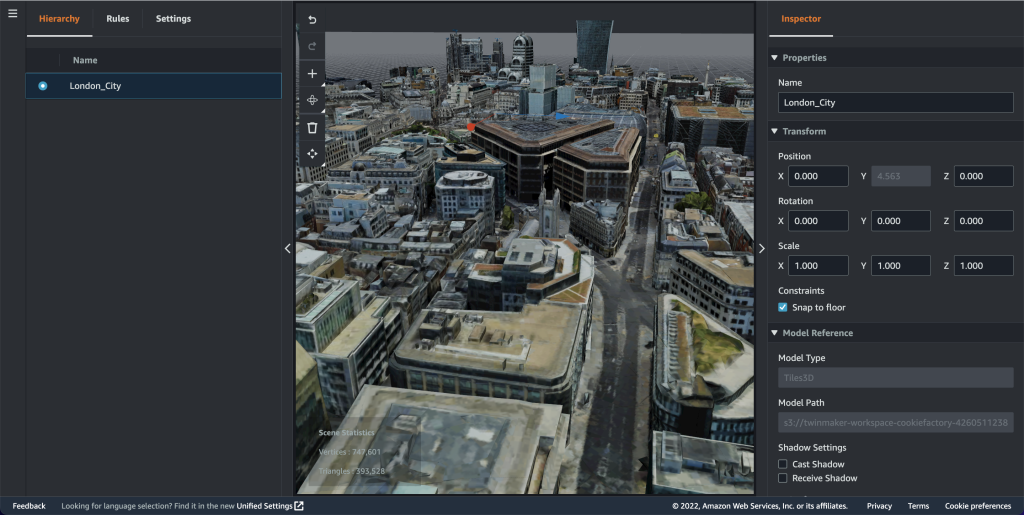
Instance scene with the London_City 3D tileset
File Dimension Compression
Now, navigate to Amazon S3, and find your AWS IoT Twinmaker workspace S3 bucket. Checking the scale of the London metropolis 3D Tileset in S3 reveals a lower in dimension from 172.1MB to 44.2MB. That may be a 74% compression.
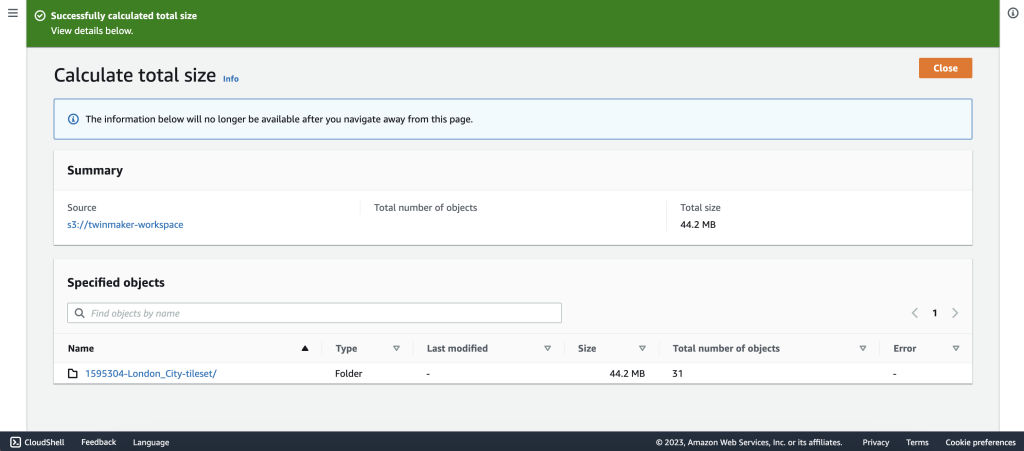
S3 folder dimension calculation for the London_City tileset
File Load Time Comparability
Scene Viewer took round 24 seconds to load the unique 172MB glb file when it’s instantly added to the scene.
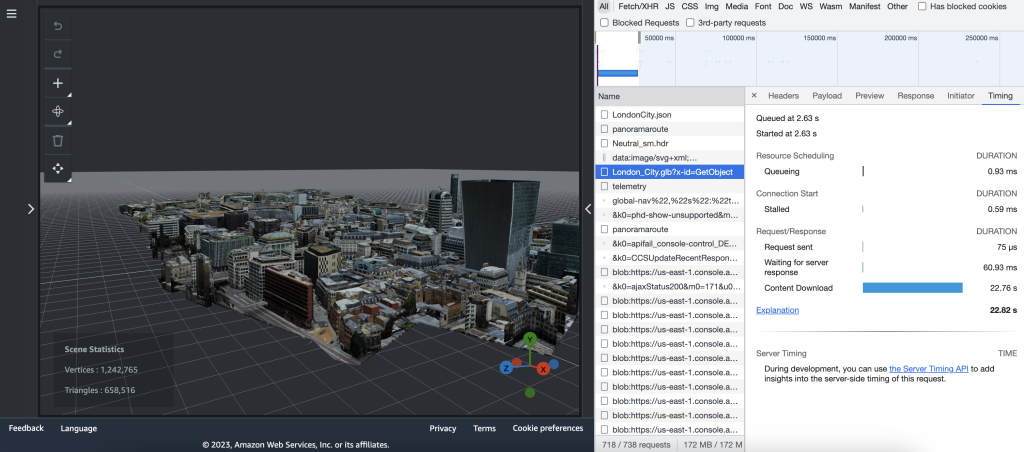
IoT TwinMaker scene with the unique London_City.glb – S3 GetObject community name timing tab reveals >20s of load time
Compared, Scene Viewer takes round 2.5 seconds to load the 3D tileset, lowering the loading time by 90%.

IoT TwinMaker scene with the London_City 3D tileset – accumulation of S3 GetObject community calls full inside 2.5 seconds as seen on the request timeline
Notable Variations
It’s clear that 3D Tiles improves the loading and rendering expertise of your 3D asset visualization. Nevertheless, the 3D tileset is doesn’t but help geometric and semantic metadata. The Cesium group is at present engaged on this. At present, the mesh hierarchy of the unique file can’t be used for the sub-model choice function. The pictures beneath compares a scene with the unique London_City glb and its mesh hierarchy breakdown to the scene with the London_City tileset with none hierarchy breakdown.

IoT TwinMaker scene with the unique London_City.glb – mesh hierarchy record is supported |

IoT TwinMaker scene with the London_City 3D tileset – there isn’t any mesh hierarchy |
It is strongly recommended to make use of the 3D Tiles conversion for giant property that function context for the background of a scene. Within the London metropolis instance, when you wished the highlighted node to be additional damaged down and annotated then it must be extracted as a separate glTF/glb asset and added on to the scene. This may be executed with free and customary 3D instruments like Blender.
Troubleshooting
- Situation with the Cesium ion tiling course of
If there’s any error through the tiling conversion course of, the pattern script will notify you to examine in your asset on the Cesium ion web site asset web page. One frequent concern is {that a} mannequin is already draco compressed which isn’t supported as a supply file for Cesium ion. For different points please publish to the Cesium Neighborhood Discussion board to succeed in the Cesium ion group instantly.
- Script stop as a result of a step took too lengthy
The default wait instances for tiling and downloading archives from Cesium ion is 5 minutes for every step. For very massive recordsdata (>1GB) this might take longer. Please learn the documentation of the pattern script to see the right way to proceed with the following step after Cesium finishes processing your asset.
Conclusion
On this weblog, you realized the right way to convert a typical glTF/glb file into the optimized 3D Tiles and created a scene in AWS IoT TwinMaker with quicker loading pace. You may apply this to any of your massive property. You too can edit the script to your use case. To learn to customise the Scene Util script, please go to the supply pattern code.
Listed below are different mannequin conversion blogs obtainable, with extra to come back:
– The way to convert and compress OBJ fashions to glTF to be used with AWS IoT TwinMaker
Concerning the authors
Harry Wandersman Harry is a Software program Growth Engineer on the IoT TwinMaker frontend service group. Harry has labored within the IoT house since 2018, serving to construct and develop the IoT SiteWise and TwinMaker companies. Harry is obsessed with 3D graphics and immersive digital experiences, and its software in IoT to help digital twins. Harry is a Software program Growth Engineer on the IoT TwinMaker frontend service group. Harry has labored within the IoT house since 2018, serving to construct and develop the IoT SiteWise and TwinMaker companies. Harry is obsessed with 3D graphics and immersive digital experiences, and its software in IoT to help digital twins. |
Chris Azer is a Principal IoT Specialist Options Architect serving to clients with their digital twin initiatives. Chris has labored in numerous roles at AWS since 2017 supporting companions and clients with architecting IoT options. This features a broad set of use instances masking the DoD, Manufacturing, State and Native Authorities, Federal and Civilian, Good Cities, Companions, and others. His profession in Industrial Automation dates again to 2004 the place he continues to help enterprises at this time with their good manufacturing journey. is a Principal IoT Specialist Options Architect serving to clients with their digital twin initiatives. Chris has labored in numerous roles at AWS since 2017 supporting companions and clients with architecting IoT options. This features a broad set of use instances masking the DoD, Manufacturing, State and Native Authorities, Federal and Civilian, Good Cities, Companions, and others. His profession in Industrial Automation dates again to 2004 the place he continues to help enterprises at this time with their good manufacturing journey. |