

Except for taking nice 12 and 48-MP images, the Mini 3 Execs 1/1.3-inch CMOS digicam is kind of able to taking pictures clear and high-resolution movies.
Not like its youthful sibling, the Mini 3, the Mini 3 Professional can shoot video as much as 60 frames per second in 4k and gradual movement at 120 frames per second in full HD.
Due to these capabilities, together with true vertical taking pictures, the Mini 3 Professional works nicely for hikers, bikers, climbers, social media content material creators, and everybody in between.
On this article and the included YouTube video, we’ll go over how one can change the varied video settings throughout the DJI Fly app, by going into Guide Mode and getting probably the most out of the Mini 3 Professional digicam.
DJI Mini 3 Professional Video Settings
Much like accessing the Mini 3 Professional picture settings, we might be making all the crucial video settings adjustments throughout the DJI Fly apps Reside View display.
» MORE: DJI Mini 3 Professional – The best way to Change Photograph Settings
In case you are new to taking pictures video and wish to be taught extra about it, be at liberty to learn this text, with pattern footage, on the perfect video settings for the Mini 3 Professional:
» MORE: Greatest Video Settings for DJI Mini 3 Professional
Video Mode
To entry Video Mode, whereas within the DJI Fly app:
STEP 1: Press the icon above the shutter button on the fitting.
Right here you’ll see Photograph, Video, Mastershots, Quickshots, Hyperlapse, and Pano.

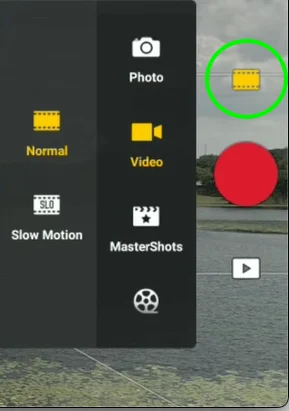
STEP 2: Select the Video choice/icon.

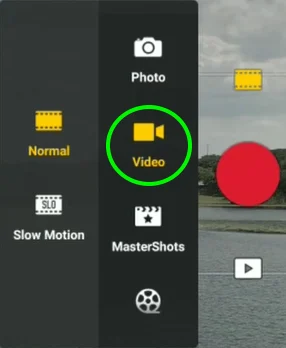
You’ll discover that after in video mode, you might be offered with two separate taking pictures modes:
- Regular – absolutely customizable video mode
- Sluggish Movement – mechanically units video settings to gradual movement requirements: 1080p, 120fps – when in Professional Mode, solely the ISO and White Steadiness could be personalized
To vary between these video taking pictures modes, merely select the one you’d like to make use of.
Professional (Guide) Mode
To get probably the most out of your video, you’ll need to change from Auto Mode and go into Professional Mode.
To change to Professional Mode:
On the underside proper of the Reside View display, you will notice an space the place the digicam settings are positioned.
In Auto Mode, you’ll solely see the next digicam settings out there: RES&FPS (Decision and Frames per Second) and EV (Publicity Worth).


STEP: Faucet the digicam icon that claims Auto and it’ll then mechanically change to Professional Mode.

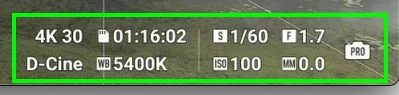
After coming into Professional Mode, you’ll see that there are actually fairly a couple of choices out there so that you can alter.
On the underside of the Professional Mode display, you’ll see 4K 30 (or a variation of this as it’s primarily based on the Decision and frames per second), D-Cine or Norm., WB, S, ISO, F, and MM.
Aside from F (the fastened aperture of 1.7), and MM (guide metering), all of the choices are adjustable which helps get the perfect video potential.
To vary these values, merely press the world on the backside of the display.
4K 30 (Res&FPS)
This space is the place you may change the decision and body fee of your video. Regardless of the Res & FPS is presently chosen might be displayed right here.
The Mini 3 Execs’ present Decision and Body Charges are:
- 4K 24fps, 25fps, 30fps, 48fps, 50fps, and 60fps
- 2.7K 24fps, 25fps, 30fps, 48fps, 50fps, and 60fps
- 1080p 24fps, 25fps, 30fps, 48fps, 50fps, and 60fps
Word: To get into Sluggish Movement Mode, you will have to return to Video Mode and select gradual movement to get the 120fps worth
Colour Profile
The Mini 3 Professional has two shade profiles: Regular and D-Cinelike. Relying on which shade profile you select, you’ll both be taking pictures in 8-bit or 10-bit. That alternative might be proven onscreen as both D-Cine or Norm.
D-Cinelike is a reasonably flat video shade profile that’s particular to DJI client/prosumer drones.
When D-Cinelike is chosen the footage might be recorded in 10-bit. You may both select the h264 or h265 codec (high-efficiency video coding). D-Cinelike is helpful for individuals who use LUTs of their shade grading.
The Regular profile is DJI’s interpretation of the colour presently being seen. This shade profile is helpful for those who both don’t need to shade grade their footage or those who need to make minimal changes.
W (White Steadiness)
White steadiness evens out the colour temperature in a video to make the colour look extra pure and more true. That is executed by making the picture Cooler or Hotter, from 2000k (kelvin) to 10000k.
Within the DJI Fly app, the White Steadiness is not represented by Sunny, Cloudy, Incandescent, and Customized, because it was within the Go4 app.
White Steadiness is now adjusted utilizing a White Steadiness slider. The slider is in numerical kelvin values.
Tip: You may forgo manually altering the kelvin (okay) values and simply select Auto. In Auto, the Mini 3 Professional will attempt to determine what White Steadiness values are finest for the present taking pictures situations.
S (Shutter)
This controls how lengthy or how brief the shutter is open. Decrease numbers let in additional gentle, whereas Greater numbers decrease the sunshine allowed into the digicam.
As a substitute of utilizing the shutter to control gentle when taking pictures video, the shutter needs to be used to control movement blur in movies.
That is executed utilizing the 180-degree rule. This filming rule is the place you’ll need to have your shutter set to double (180 levels) your body fee, if potential.
This implies in case you are taking pictures at 24 Frames per second, you’d need your shutter pace to be double that, on this case, 1/50 of a second, because the Mini 3 Professional doesn’t have a 1/48 choice.
Tip: In case you discover that the situations are too vibrant in your shutter pace, it’s urged to make use of an ND filter set to attenuate the quantity of sunshine coming into the digicam.

Okay&F Idea Variable ND Lens Filters Package
DJI Mini 3/ Mini 3 Professional Variable ND Lens Filters Package ND2-32+ND32-512(2 Pcs), Variable ND Filters 1-5 Stops + 5-9 Stops Suitable with DJI Mini 3/ Mini 3 Professional.
We earn a fee in case you make a purchase order, at no further value to you.
04/18/2023 12:55 pm GMT
ISO
ISO is the worth of measure for a digicam’s sensitivity to gentle. As you improve the ISO quantity (the bottom being 100) the brighter your footage might be.
Bear in mind that the upper the ISO is raised, the extra noise or grain is launched into the footage. The Mini 3 Execs ISO vary is between 100 and 6400, for each images and movies.
When potential, maintain the ISO at 100. In case you should increase the brightness, improve ISO sparingly.
MM (Guide Metering)
That is much like the Publicity Worth (EV) in Auto mode. Nonetheless, in contrast to the EV in Auto Mode, you can not change the Guide Metering worth in Professional Mode.
Guide Metering is a value-based information that tells you when your publicity is appropriate primarily based on the ISO and Shutter.