
Amazon Redshift Serverless makes it simple to run and scale analytics in seconds with out the necessity to arrange and handle information warehouse clusters. With Redshift Serverless, customers reminiscent of information analysts, builders, enterprise professionals, and information scientists can get insights from information by merely loading and querying information within the information warehouse.
Clients use their most well-liked SQL shoppers to investigate their information in Redshift Serverless. They wish to use an id supplier (IdP) or single sign-on (SSO) credentials to hook up with Redshift Serverless to reuse present utilizing credentials and keep away from further person setup and configuration. While you use AWS Identification and Entry Administration (IAM) or IdP-based credentials to hook up with a serverless information warehouse, Amazon Redshift robotically creates a database person for the end-user. You possibly can simplify managing person privileges by utilizing role-based entry management. Admins can use a database-role mapping for SSO with the IAM roles that customers are assigned to get their database privileges robotically. With this integration, organizations can simplify person administration as a result of they now not must create customers and map them to database roles manually. You possibly can outline the mapped database roles as a principal tag for the IdP teams or IAM function, so Amazon Redshift database roles and customers who’re members of these IdP teams are granted to the database roles robotically.
On this publish, we give attention to Okta because the IdP and supply step-by-step steering to combine Redshift Serverless with Okta utilizing the Amazon Redshift Question Editor V2 and with SQL shoppers like SQL Workbench/J. You need to use this mechanism with different IdP suppliers reminiscent of Azure Lively Listing or Ping with any functions or instruments utilizing Amazon’s JDBC/ODBC/Python driver.
Resolution overview
The next diagram illustrates the authentication stream of Okta with Redshift Serverless utilizing federated IAM roles and automated database-role mapping.

The workflow comprises the next steps:
- Both the person chooses an IdP app of their browser, or the SQL shopper initiates a person authentication request to the IdP (Okta).
- Upon a profitable authentication, Okta submits a request to the AWS federation endpoint with a SAML assertion containing the PrincipalTags.
- The AWS federation endpoint validates the SAML assertion and invokes the AWS Safety Token Service (AWS STS) API AssumeRoleWithSAML. The SAML assertion comprises the IdP person and group data that’s saved within the RedshiftDbUser and RedshiftDbRoles principal tags, respectively. Momentary IAM credentials are returned to the SQL shopper or, if utilizing the Question Editor v2, the person’s browser is redirected to the Question Editor v2 console utilizing the short-term IAM credentials.
- The short-term IAM credentials are utilized by the SQL shopper or Question Editor v2 to name the Redshift Serverless GetCredentials API. The API makes use of the principal tags to find out the person and database roles that the person belongs to. An related database person is created if the person is signing in for the primary time and is granted the matching database roles robotically. A short lived password is returned to the SQL shopper.
- Utilizing the database person and short-term password, the SQL shopper or Question Editor v2 connects to Redshift Serverless. Upon login, the person is allowed based mostly on the Amazon Redshift database roles that had been assigned in Step 4.
To arrange the answer, we full the next steps:
- Arrange your Okta utility:
- Create Okta customers.
- Create teams and assign teams to customers.
- Create the Okta SAML utility.
- Acquire Okta data.
- Arrange AWS configuration:
- Create the IAM IdP.
- Create the IAM function and coverage.
- Configure Redshift Serverless role-based entry.
- Federate to Redshift Serverless utilizing the Question Editor V2.
- Configure the SQL shopper (for this publish, we use SQL Workbench/J).
- Optionally, implement MFA with SQL Consumer and Question Editor V2.
Stipulations
You want the next conditions to arrange this resolution:
Arrange Okta utility
On this part, we offer the steps to configure your Okta utility.
Create Okta customers
To create your Okta customers, full the next steps:
- Sign up to your Okta group as a person with administrative privileges.
- On the admin console, below Listing within the navigation pane, select Folks.
- Select Add individual.
- For First Title, enter the person’s first identify.
- For Final Title, enter the person’s final identify.
- For Username, enter the person’s person identify in e-mail format.
- Choose I’ll set password and enter a password.
- Optionally, deselect Person should change password on first login if you happen to don’t need the person to alter their password once they first register. Select Save.

Create teams and assign teams to customers
To create your teams and assign them to customers, full the next steps:
- Sign up to your Okta group as a person with administrative privileges.
- On the admin console, below Listing within the navigation pane, select Teams.
- Select Add group.
- Enter a bunch identify and select Save.
- Select the lately created group after which select Assign individuals.
- Select the plus signal after which select Finished.
- Repeat Steps 1–6 so as to add extra teams.
On this publish, we create two teams: gross sales and finance.

Create an Okta SAML utility
To create your Okta SAML utility, full the next steps:
- Sign up to your Okta group as a person with administrative privileges.
- On the admin console, below Functions within the navigation pane, select Functions.
- Select Create App Integration.
- Choose SAML 2.0 because the sign-in methodology and select Subsequent.
- Enter a reputation in your app integration (for instance,
redshift_app) and select Subsequent. - Enter following values within the app and depart the remainder as is:
- Select Subsequent.
- Select I’m an Okta buyer including an inner app adopted by That is an inner app that now we have created.
- Select End.
- Select Assignments after which select Assign.
- Select Assign to teams after which choose Assign subsequent to the teams that you just wish to add.
- Select Finished.

Arrange Okta superior configuration
After you create the customized SAML app, full the next steps:
- On the admin console, navigate to Normal and select Edit below SAML settings.
- Select Subsequent.
- Set Default Relay State to the Question Editor V2 URL, utilizing the format
https://<area>.console.aws.amazon.com/sqlworkbench/residence. For this publish, we usehttps://us-west-2.console.aws.amazon.com/sqlworkbench/residence. - Beneath Attribute Statements (non-obligatory), add the next properties:
- Present the IAM function and IdP in comma-separated format utilizing the Position attribute. You’ll create this identical IAM function and IdP in a later step when establishing AWS configuration.
- Set
person.loginforRoleSessionName. That is used as an identifier for the short-term credentials which might be issued when the function is assumed. - Set the DB roles utilizing
PrincipalTag:RedshiftDbRoles. This makes use of the Okta teams to fill the principal tags and map them robotically with the Amazon Redshift database roles. Its worth have to be a colon-separated listing within the format role1:role2. - Set
person.loginforPrincipalTag:RedshiftDbUser. This makes use of the person identify within the listing. This can be a required tag and defines the database person that’s utilized by Question Editor V2. - Set the transitive keys utilizing
TransitiveTagKeys. This prevents customers from altering the session tags in case of function chaining.
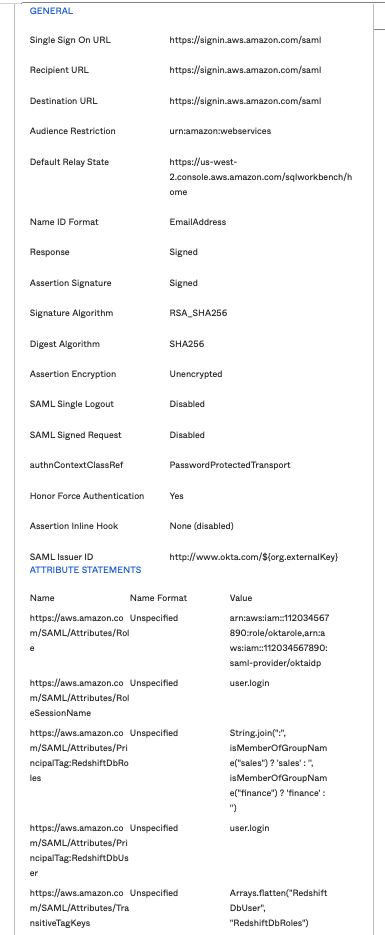
The previous tags are forwarded to the GetCredentials API to get short-term credentials in your Redshift Serverless occasion and map robotically with Amazon Redshift database roles. The next desk summarizes their attribute statements configuration.
| Title | Title Format | Format | Instance |
| https://aws.amazon.com/SAML/Attributes/Position | Unspecified | arn:aws:iam::<yourAWSAccountID>:function/role-name,arn:aws:iam:: <yourAWSAccountID>:saml-provider/provider-name |
arn:aws:iam::112034567890:function/oktarole,arn:aws:iam::112034567890:saml-provider/oktaidp |
| https://aws.amazon.com/SAML/Attributes/RoleSessionName | Unspecified | person.login |
person.login |
| https://aws.amazon.com/SAML/Attributes/PrincipalTag:RedshiftDbRoles | Unspecified | String.be part of(":", isMemberOfGroupName("group1") ? 'group1' : '', isMemberOfGroupName("group2") ? 'group2' : '') |
String.be part of(":", isMemberOfGroupName("gross sales") ? 'gross sales' : '', isMemberOfGroupName("finance") ? 'finance' : '') |
| https://aws.amazon.com/SAML/Attributes/PrincipalTag:RedshiftDbUser | Unspecified | person.login |
person.login |
| https://aws.amazon.com/SAML/Attributes/TransitiveTagKeys | Unspecified | Arrays.flatten("RedshiftDbUser", "RedshiftDbRoles") |
Arrays.flatten("RedshiftDbUser", "RedshiftDbRoles") |
- After you add the attribute claims, select Subsequent adopted by End.
Your attributes needs to be in comparable format as proven within the following screenshot.
Acquire Okta data
To collect your Okta data, full the next steps:
- On the Signal On tab, select View SAML setup directions.

- For Identification Supplier Single Signal-on URL, Use this URL when connecting with any third-party SQL shopper reminiscent of SQL Workbench/J.
- Use the IdP metadata in block 4 and save the metadata file in .xml format (for instance,
metadata.xml).

Arrange AWS configuration
On this part, we offer the steps to configure your IAM sources.
Create the IAM IdP
To create your IAM IdP, full the next steps:
- On the IAM console, below Entry administration within the navigation pane, select Identification suppliers.
- Select Add supplier.
- For Supplier kind¸ choose SAML.
- For Supplier identify¸ enter a reputation.
- Select Select file and add the metadata file (.xml) you downloaded earlier.
- Select Add supplier.

Create the IAM Amazon Redshift entry coverage
To create your IAM coverage, full the next steps:
- On the IAM console, select Insurance policies.
- Select Create coverage.
- On the Create coverage web page, select the JSON tab.
- For the coverage, enter the JSON in following format:
The workgroup ARN is out there on the Redshift Serverless workgroup configuration web page.
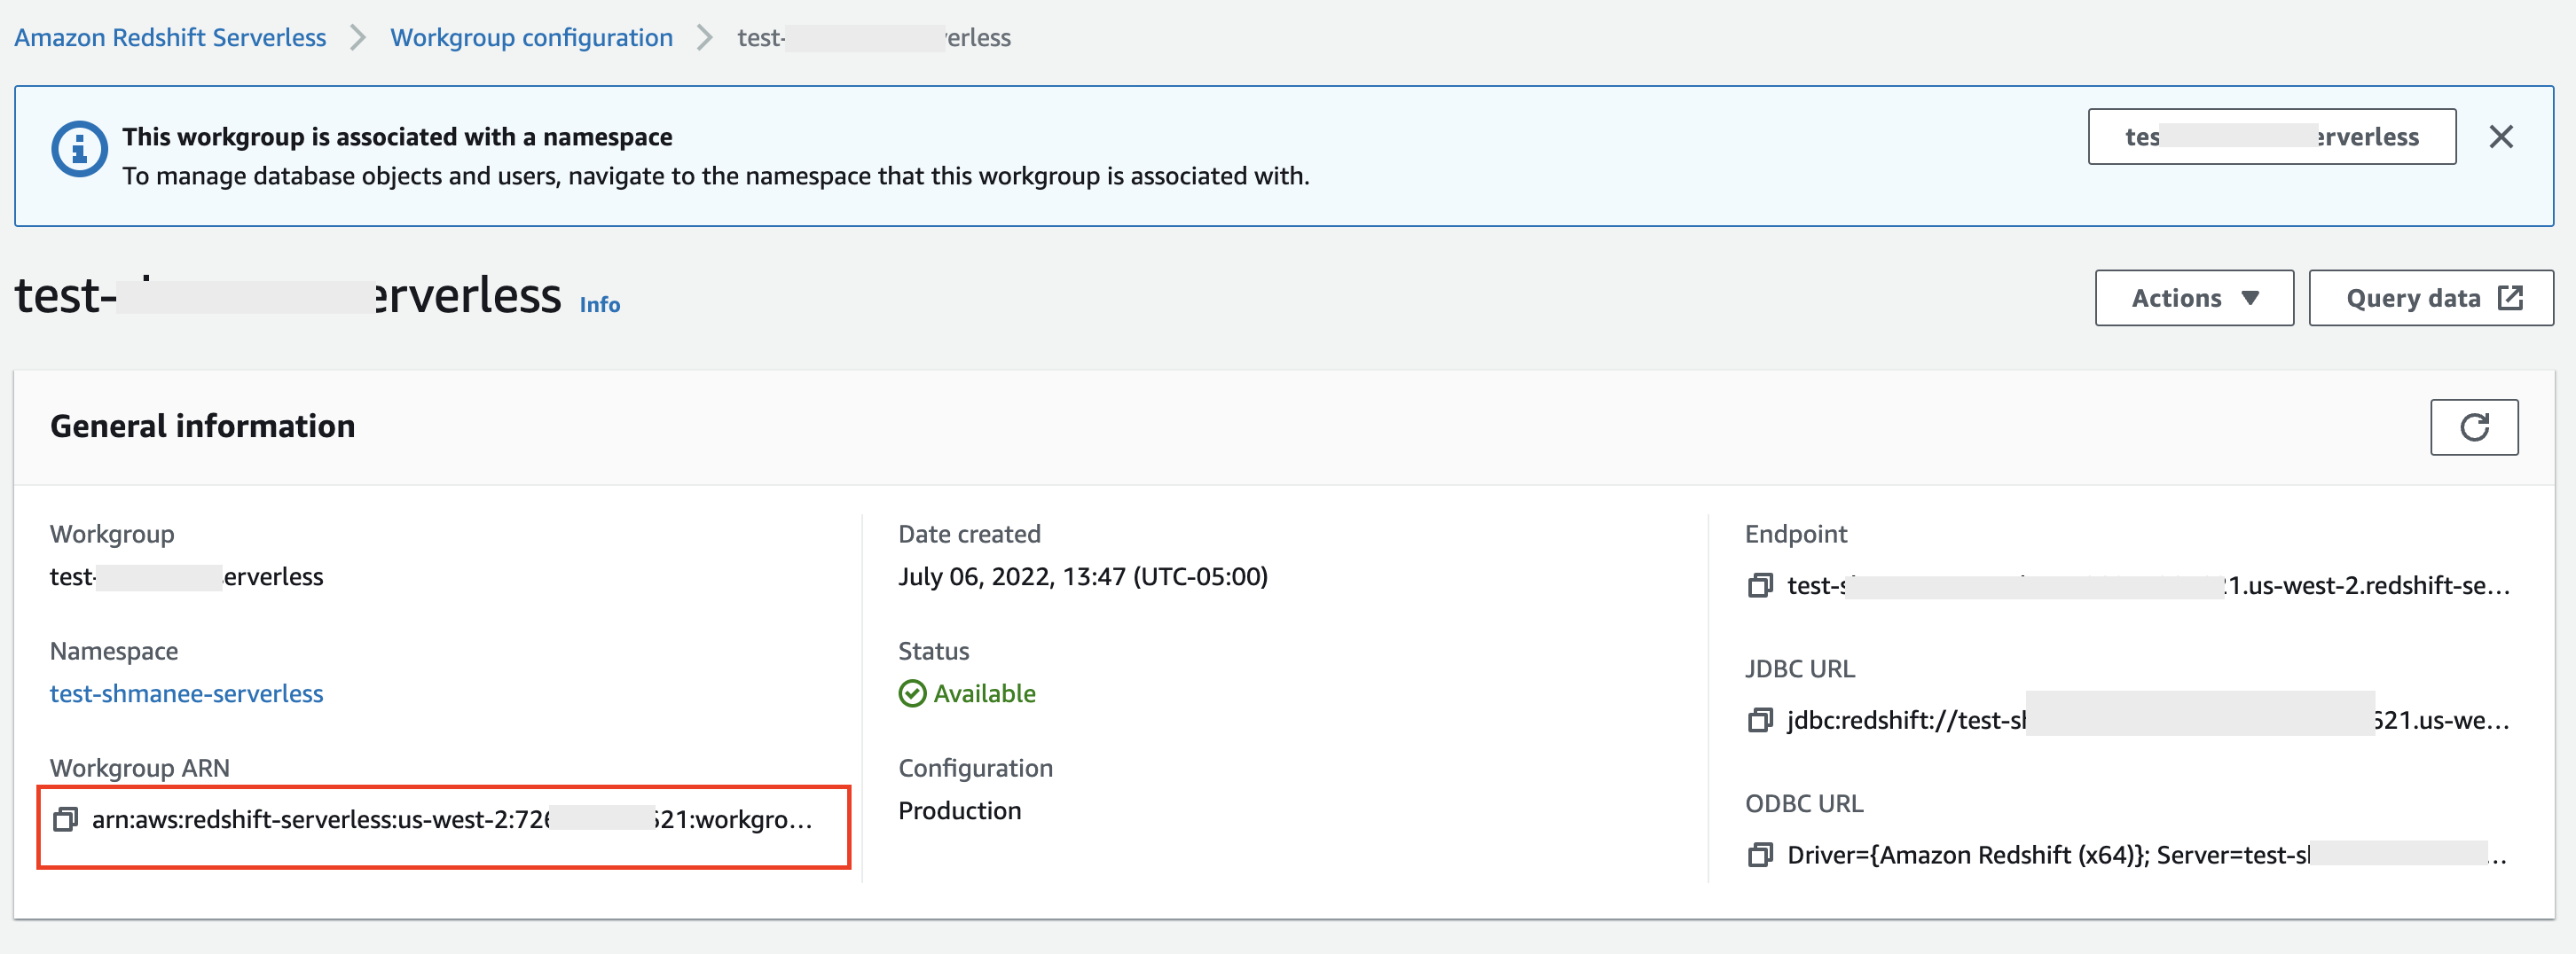
The next instance coverage contains solely a single Redshift Serverless workgroup; you’ll be able to modify the coverage to incorporate a number of workgroups within the Useful resource part:
- Select Subsequent: Tags.
- Select Subsequent: Evaluate.
- Within the Evaluate coverage part, for Title, enter the identify of your coverage; for instance, OktaRedshiftPolicy.
- For Description, you’ll be able to optionally enter a short description of what the coverage does.
- Select Create coverage.
Create the IAM function
To create your IAM function, full the next steps:
- On the IAM console, select Roles within the navigation pane.
- Select Create function.
- For Trusted entity kind, choose SAML 2.0 federation.
- For SAML 2.0-based supplier, select the IdP you created earlier.
- Choose Enable programmatic and AWS Administration Console entry.
- Select Subsequent.
- Select the coverage you created earlier.
- Additionally, add the coverage
AmazonRedshiftQueryEditorV2ReadSharing. - Select Subsequent.
- Within the Evaluate part, for Position Title, enter the identify of your function; for instance,
oktarole. - For Description, you’ll be able to optionally enter a short description of what the function does.
- Select Create function.
- Navigate to the function that you just simply created and select Belief Relationships.
- Select Edit belief coverage and select
TagSessionbelow Add actions for STS.

When utilizing session tags, belief insurance policies for all roles linked to the IdP passing tags should have the sts:TagSession permission. For roles with out this permission within the belief coverage, the AssumeRole operation fails.
- Select Replace coverage.
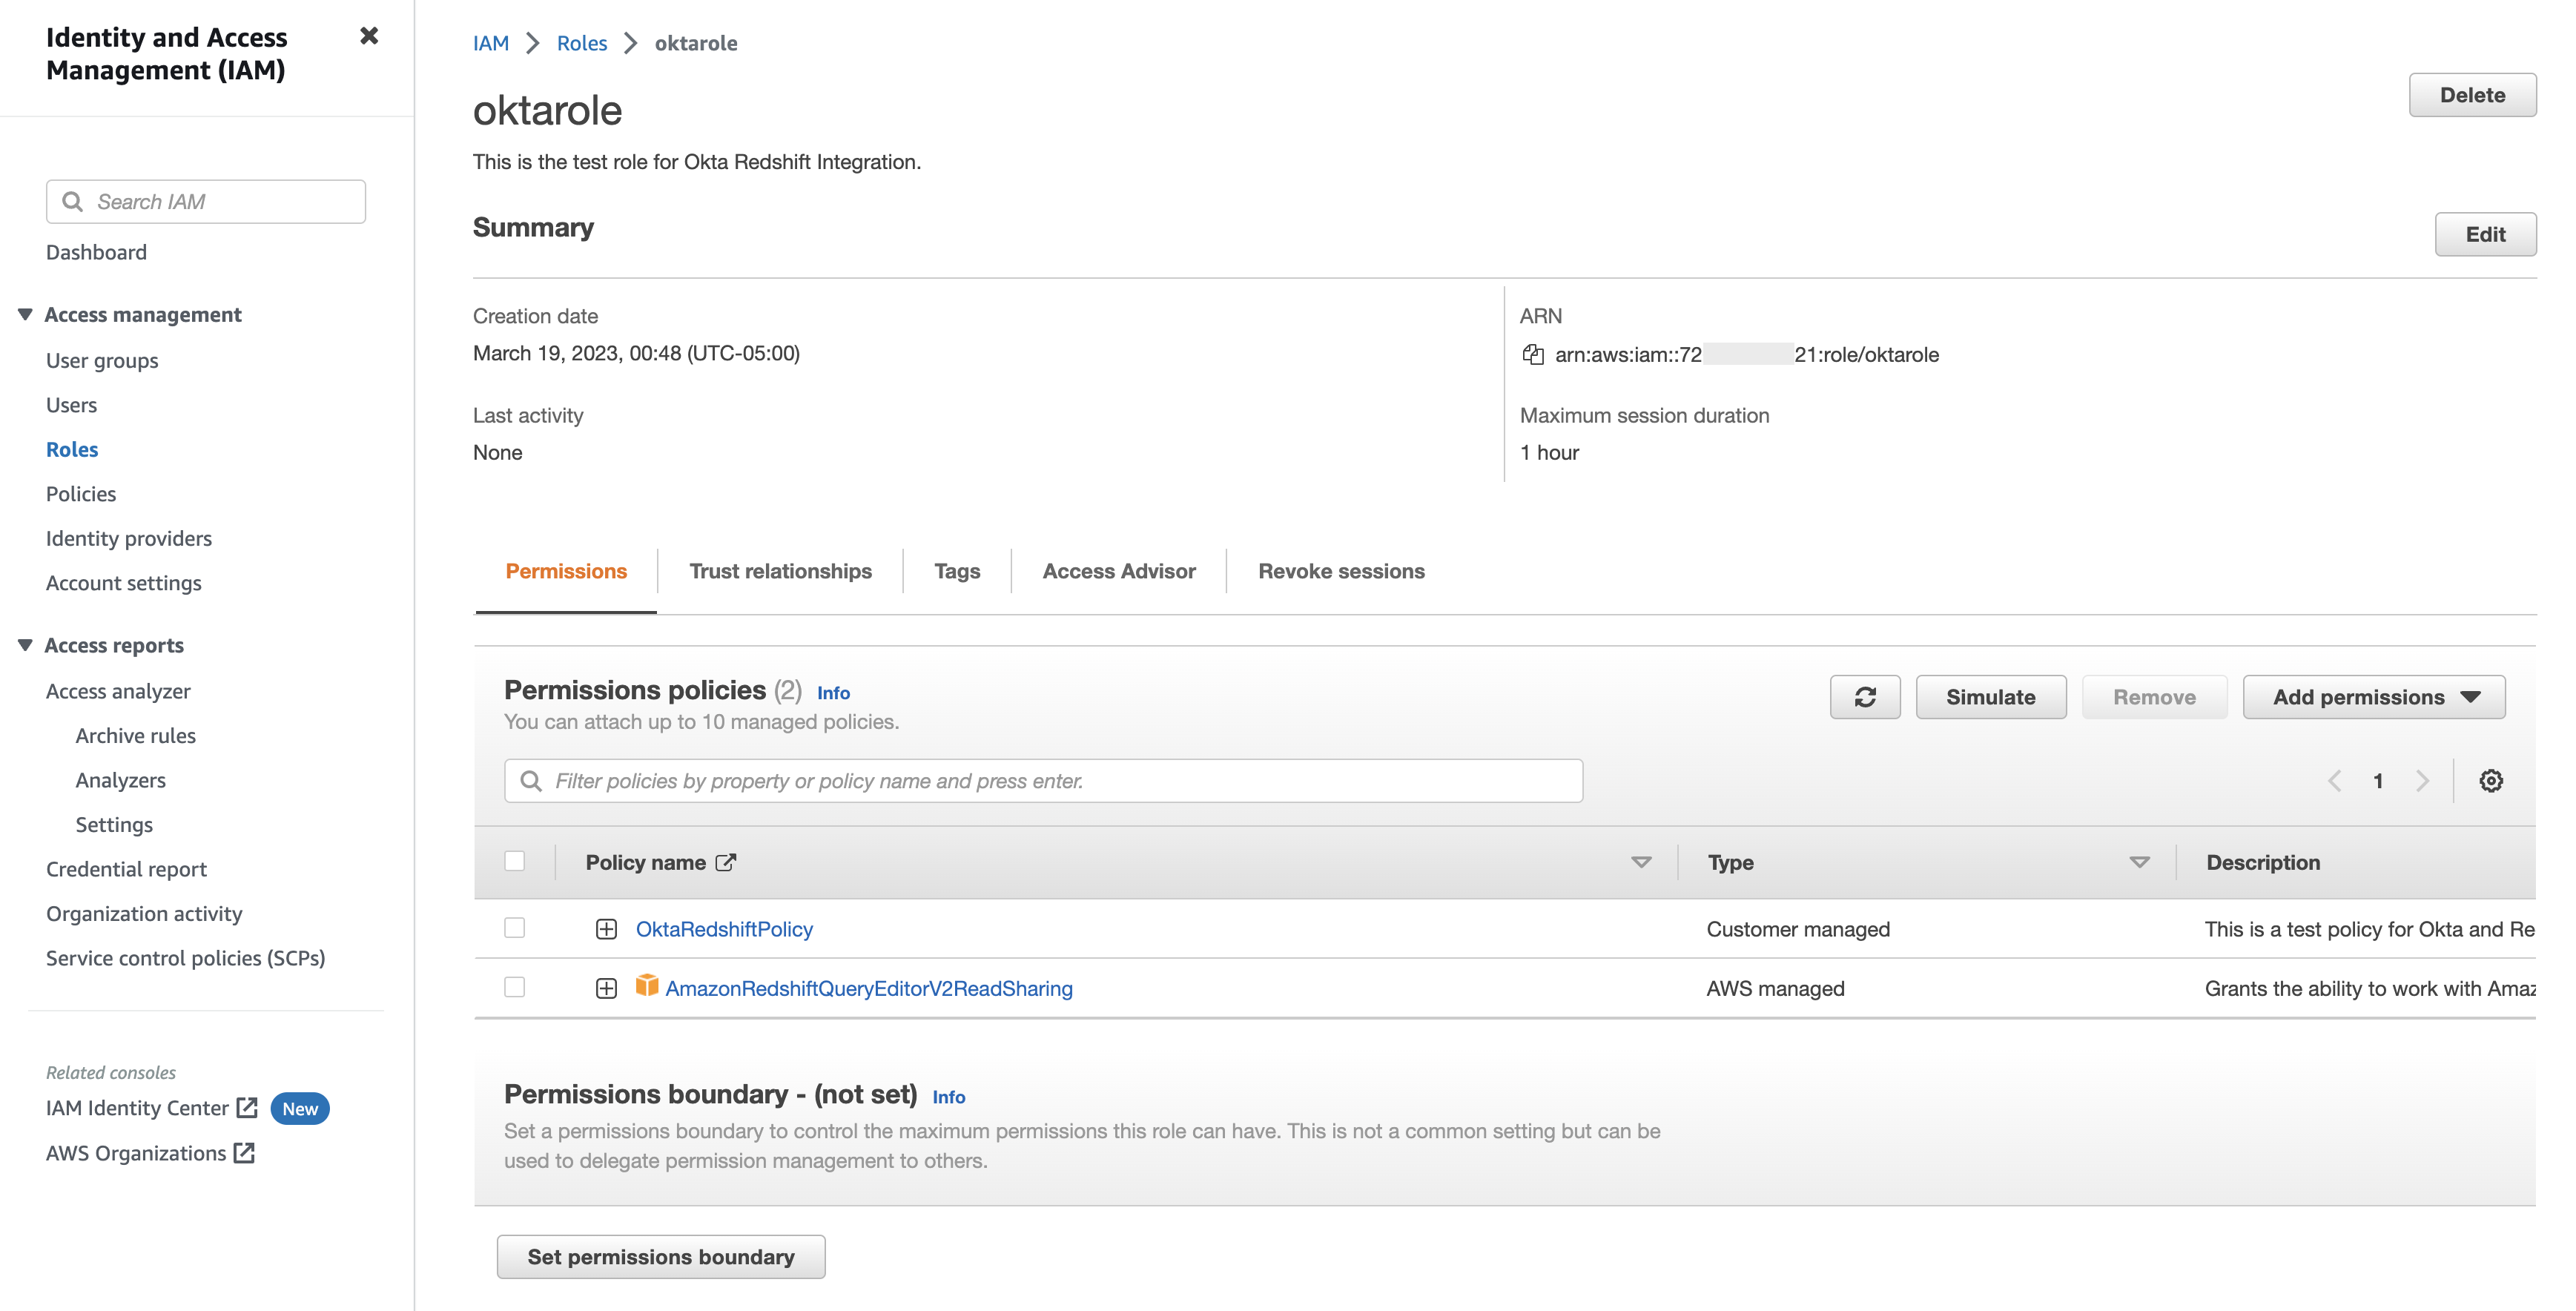
The next screenshot reveals the function permissions.
The next screenshot reveals the belief relationships.

Replace the superior Okta Position Attribute
Full the next steps:
- Swap again to Okta.com.
- Navigate to the appliance which you created earlier.
- Navigate to Normal and click on Edit below SAML settings.
- Beneath Attribute Statements (non-obligatory), replace the worth for the attribute – https://aws.amazon.com/SAML/Attributes/Position, utilizing the precise function and id supplier arn values from the above step. For instance,
arn:aws:iam::123456789012:function/oktarole,arn:aws:iam::123456789012:saml-provider/oktaidp.
Configure Redshift Serverless role-based entry
On this step, we create database roles in Amazon Redshift based mostly on the teams that you just created in Okta. Be certain the function identify matches with the Okta Group identify.
Amazon Redshift roles simplify managing privileges required in your end-users. On this publish, we create two database roles, gross sales and finance, and grant them entry to question tables with gross sales and finance information, respectively. You possibly can obtain this pattern SQL Pocket book and import into Redshift Question Editor v2 to run all cells within the pocket book used on this instance. Alternatively, you’ll be able to copy and enter the SQL into your SQL shopper.
The next is the syntax to create a task in Redshift Serverless:
For instance:
Create the gross sales and finance database schema:
Create the tables:
The next is the syntax to grant permission to the Redshift Serverless function:
Grant related permission to the function as per your necessities. Within the following instance, we grant full permission to the function gross sales on sales_schema and solely choose permission on finance_schema to the function finance:
Federate to Redshift Serverless utilizing Question Editor V2
The RedshiftDbRoles principal tag and DBGroups are each mechanisms that can be utilized to combine with an IdP. Nevertheless, federating with the RedshiftDbRoles principal has some clear benefits in terms of connecting with an IdP as a result of it offers automated mapping between IdP teams and Amazon Redshift database roles. Total, RedshiftDbRoles is extra versatile, simpler to handle, and safer, making it the higher possibility for integrating Amazon Redshift together with your IdP.
Now you’re prepared to hook up with Redshift Serverless utilizing the Question Editor V2 and federated login:
- Use the SSO URL you collected earlier and log in to your Okta account together with your person credentials. For this demo, we log in with person Ethan.
- Within the Question Editor v2, select your Redshift Serverless occasion (right-click) and select Create connection.
- For Authentication, choose Federated person.
- For Database, enter the database identify you wish to connect with.
- Select Create Connection.
Person Ethan will be capable of entry sales_schema tables. If Ethan tries to entry the tables in finance_schema, he’ll get a permission denied error.

Configure the SQL shopper (SQL Workbench/J)
To arrange SQL Workbench/J, full the next steps:
- Create a brand new connection in SQL Workbench/J and select Redshift Serverless as the driving force.
- Select Handle drivers and add all of the recordsdata from the downloaded AWS JDBC driver pack .zip file (keep in mind to unzip the .zip file).
- For Username and Password, enter the values that you just set in Okta.

- Seize the values for
app_id,app_name, andidp_hostfrom the Okta app embed hyperlink, which could be discovered on the Normal tab of your utility.
- Set the next prolonged properties:
- For app_id, enter the worth from app embed hyperlink (for instance,
0oa8p1o1RptSabT9abd0/avc8k7abc32lL4izh3b8). - For app_name, enter the worth from app embed hyperlink (for instance,
dev-123456_redshift_app_2). - For idp_host, enter the worth from app embed hyperlink (for instance,
dev-123456.okta.com). - For plugin_name, enter
com.amazon.redshift.plugin.OktaCredentialsProvider. The next screenshot reveals the SQL Workbench/J prolonged properties.
- Select OK.
- Select Check from SQL Workbench/J to check the connection.
- When the connection is profitable, select OK.
- Select OK to register with the customers created.
- For app_id, enter the worth from app embed hyperlink (for instance,
Person Ethan will be capable of entry the sales_schema tables. If Ethan tries to entry the tables within the finance_schema, he’ll get a permission denied error.

Congratulations! You could have federated with Redshift Serverless and Okta with SQL Workbench/J utilizing RedshiftDbRoles.
[Optional] Implement MFA with SQL Consumer and Question Editor V2
Implementing MFA poses a further problem as a result of the character of multi-factor authentication is an asynchronous course of between initiating the login (the primary issue) and finishing the login (the second issue). The SAML response can be returned to the suitable listener in every situation; the SQL Consumer or the AWS console within the case of QEV2. Relying on which login choices you’ll be giving your customers, you could want a further Okta utility. See beneath for the completely different situations:
- In case you are ONLY utilizing QEV2 and never utilizing another SQL shopper, then you should utilize MFA with Question Editor V2 with the above utility. There aren’t any modifications required within the customized SAML utility which now we have created above.
- In case you are NOT utilizing QEV2 and solely utilizing third occasion SQL shopper (SQL Workbench/J and so on), then it’s essential to modify the above customized SAML app as talked about beneath.
- If you wish to use QEV2 and third-party SQL Consumer with MFA, then you definately want create a further customized SAML app as talked about beneath.
Stipulations for MFA
Every id supplier (IdP) has step for enabling and managing MFA in your customers. Within the case of Okta, see the next guides on how one can allow MFA utilizing the Okta Confirm utility and by defining an authentication coverage.
Steps to create/replace SAML utility which helps MFA for a SQL Consumer
- If making a second app, comply with all of the steps that are described below part 1 (Create Okta SAML utility).
- Open the customized SAML app and choose Normal.
- Choose Edit below SAML settings
- Click on Subsequent in Normal Settings
- Beneath Normal, replace the Single sign-on URL to http://localhost:7890/redshift/
- Choose Subsequent adopted by End.
Beneath is the screenshot from the MFA App after making above modifications:

Configure SQL Consumer for MFA
To arrange SQL Workbench/J, full the next steps:
- Comply with all of the steps that are described below (Configure the SQL shopper (SQL Workbench/J))
- Modify your connection updating the prolonged properties:
- login_url – Get the Single Signal-on URL as proven in part -Acquire Okta data. (For instance,
https://dev-123456.okta.com/app/dev-123456_redshiftapp_2/abc8p6o5psS6xUhBJ517/sso/saml) - plugin_name –
com.amazon.redshift.plugin.BrowserSamlCredentialsProvider
- login_url – Get the Single Signal-on URL as proven in part -Acquire Okta data. (For instance,
- Select OK
- Select OK from SQL Workbench/J. You’re redirected to the browser to register together with your Okta credentials.
- After that, you’ll get immediate for MFA. Select both Enter a code or Get a push notification.

- As soon as authentication is profitable, log in to be redirected to a web page displaying the connection as profitable.

- With this connection profile, run the next question to return federated person identify.

Troubleshooting
In case your connection didn’t work, contemplate the next:
- Allow logging within the driver. For directions, see Configure logging.
- Be certain to make use of the most recent Amazon Redshift JDBC driver model.
- If you happen to’re getting errors whereas establishing the appliance on Okta, ensure you have admin entry.
- If you happen to can authenticate by way of the SQL shopper however get a permission difficulty or can’t see objects, grant the related permission to the function, as detailed earlier on this publish.
Clear up
While you’re accomplished testing the answer, clear up the sources to keep away from incurring future prices:
- Delete the Redshift Serverless occasion by deleting each the workgroup and the namespace.
- Delete the IAM roles, IAM IdPs, and IAM insurance policies.
Conclusion
On this publish, we offered step-by-step directions to combine Redshift Serverless with Okta utilizing the Amazon Redshift Question Editor V2 and SQL Workbench/J with the assistance of federated IAM roles and automated database-role mapping. You need to use the same setup with another SQL shopper (reminiscent of DBeaver or DataGrip) or enterprise intelligence device (reminiscent of Tableau Desktop). We additionally confirmed how Okta group membership is mapped robotically with Redshift Serverless roles to make use of role-based authentication seamlessly.
For extra details about Redshift Serverless single sign-on utilizing database roles, see Defining database roles to grant to federated customers in Amazon Redshift Serverless.
Concerning the Authors
 Maneesh Sharma is a Senior Database Engineer at AWS with greater than a decade of expertise designing and implementing large-scale information warehouse and analytics options. He collaborates with numerous Amazon Redshift Companions and clients to drive higher integration.
 Debu Panda is a Senior Supervisor, Product Administration at AWS. He’s an trade chief in analytics, utility platform, and database applied sciences, and has greater than 25 years of expertise within the IT world.
 Mohamed Shaaban is a Senior Software program Engineer in Amazon Redshift and relies in Berlin, Germany. He has over 12 years of expertise within the software program engineering. He’s enthusiastic about cloud providers and constructing options that delight clients. Exterior of labor, he’s an beginner photographer who likes to discover and seize distinctive moments.
 Rajiv Gupta is Sr. Supervisor of Analytics Specialist Options Architects based mostly out of Irvine, CA. He has 20+ years of expertise constructing and managing groups who construct information warehouse and enterprise intelligence options.
 Amol Mhatre is a Database Engineer in Amazon Redshift and works on Buyer & Companion engagements. Previous to Amazon, he has labored on a number of tasks involving Database & ERP implementations.
 Ning Di is a Software program Growth Engineer at Amazon Redshift, pushed by a real ardour for exploring all features of expertise.
 Harsha Kesapragada is a Software program Growth Engineer for Amazon Redshift with a ardour to construct scalable and safe methods. Previously few years, he has been engaged on Redshift Datasharing, Safety and Redshift Serverless.